Functional Balance Scale
thingiverse
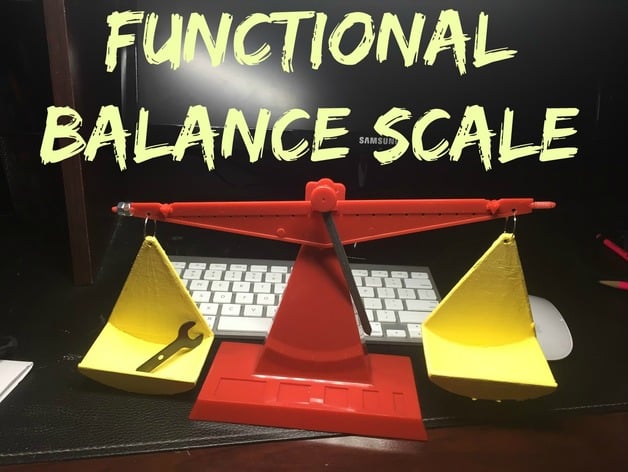
This project involves creating a balance scale using 3D printing technology and teaching students about simple machines, physics, and mechanics. The project aims to engage students of all ages and skill levels in learning about the properties of gravity, weight, and movement. **Objectives:** * Students will learn about the properties of gravity, weight, and movement. * Students will understand how simple machines work, specifically levers. * Students will develop problem-solving skills through hands-on activities. * Students will create a balance scale using 3D printing technology. **Audiences:** * Students from kindergarten to advanced students can participate in this project. * This project is suitable for students of all ages and skill levels. **Subjects:** * Science * Physics * Mechanics **Skills Learned:** * Processes skills (e.g., problem-solving, critical thinking) * Cognitive skills (e.g., understanding simple machines, physics concepts) * Relationship skills (e.g., identifying parts, functions, and interactions between components) **Lesson/Activity:** 1. Divide the classroom into 2-3 groups. 2. Assign each group a specific part or parts to create for the balance scale. 3. Use 3D printing technology to print the assigned parts. 4. Have students paint and decorate their parts according to what they have learned about them. 5. Have each group research more in-depth into their part and present a brief presentation. **Duration:** * This project can take anywhere from an hour to several days, depending on the level of complexity and engagement. **Preparation:** * Students should have a basic understanding of simple machines. * Less or more experienced students can still complete this project, but may not be as engaging. **References:** * http://www.mikids.com/Smachines.htm * http://idahoptv.org/sciencetrek/topics/simple_machines/facts.cfm **Rubric and Assessment:** * The final score should be up to the teacher's discretion. * Students should demonstrate a basic-intermediate understanding of the mechanics. * Students should be able to identify all parts correctly and explain their functions. * Students should show confidence in what they are presenting and be engaged in the project. **Project Reflection & Goals:** * The author is pleased with how the project turned out but would do things differently if possible, such as using a larger 3D printer for better quality and fitting the pieces together.
With this file you will be able to print Functional Balance Scale with your 3D printer. Click on the button and save the file on your computer to work, edit or customize your design. You can also find more 3D designs for printers on Functional Balance Scale.