GADGET the robotic GREMLIN
pinshape
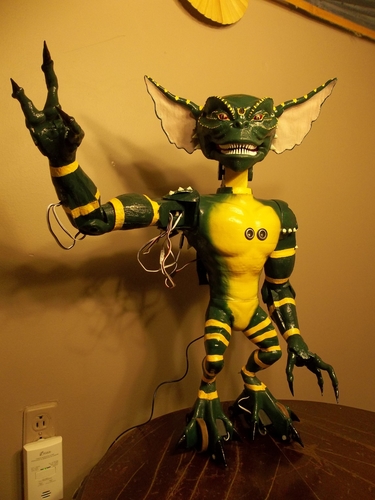
This is GIZMO, the robotic IMP. Since I first saw the Imps movie in 1985, I've wanted an Imp. (These creatures inspired a sequel, dozens of dolls and even a few video games.) The problem is, they are mythical creatures. It came down to 3 "C"s... * Capture (chances of success 0.0005%) How many Yetis, Leprechauns & Fairies are caught? * Conjure (chances of success 10%) Lifetime study of Dark arts & unsavory sacrifices required... * Create (chances of success 75%) Design, 3D print, assemble and program I chose the Create option (even though computers and I don't get along) Thanks to the ROBOT v5 from ROBOTICS INC., I believe I can bring my creation to life. My hopes are that he will be joystick controlled, and eventually be an A.I. autonomous companion. The robotics camera has 720x480 resolution at 25fps with no latency. It is capable of color tracking, object recognition, facial recognition and more. The robotv5 boasts 250MHz of 32-bit processing (ARM Cortex-M4 & Microchip PIC33), 5 volt tolerant I/O, energy efficient digital switching power supply, Wi-Fi connectivity with security, embedded web server, amplified digital audio with speaker, 3 I²C ports, 3 x UARTs, 24 multi-use servo/digital/serial ports, 73 servos (Dynamixel & PWM), 8 analog ports, and integrated video. Ultra sonic sensor lets him "see" obstacles up to 7ft away. Additional parts required for this project are: *1 ROBOT v5 developer kit (contents: 1 robotv5, plug in bracket, camera, ultrasonic sensor, 4 HDD servos, 2 continuous servos, servo extension cables, battery pack...) * 4 more HDD servos * 4 micro HDD servos * 1 tower pro SG90 servo (for jaw) * camera extension cable * 10 more servo extension cables (for arms) * 12 x drywall screws (8 to assemble torso & 4 to attach stabilizers) * 6 bearings (608, for inline feet support and stabilizers) * several tubes of crazy glue (Gel is highly recommended) * unbelievable amount of patience Special Thanks to: 3D modeller Hoinz for the original model @ https://www.thingiverse.com/th... and to fellow Pinshaper richard swika, whose comment on my Krampus project pointed me towards the ROBOTICS INC. system and made all this possible. Special notes: * you must 3D print 2 of the wheel models & glue on a rubber band strip, DO NOT STRETCH the rubber band while gluing in place, you want the rubber to be "spongey" for best traction * use servo horns provided with servos (shoulders, elbows, upper biceps...) * some parts have alternate choices (neck bracket, wheels) they use the servo horns in place of 3D printing the sprocketed parts) * added stabilizers (forgot to include in assembly video, sorry. the bearings, too) * hand file the bottom corners of neck 3/8" to properly fit collar * drill a 3/8" hole in back of both shoulder blades to pass the arm wires through the passage provided * make sure to fully trim and sand all components for best performance results ** If anyone needs assistance, simply ask videos first sign of life, head and jaw, joystick controlled @ servo test @ Assembly video
With this file you will be able to print GADGET the robotic GREMLIN with your 3D printer. Click on the button and save the file on your computer to work, edit or customize your design. You can also find more 3D designs for printers on GADGET the robotic GREMLIN.