Galileo Pendulum clock Mk I
thingiverse
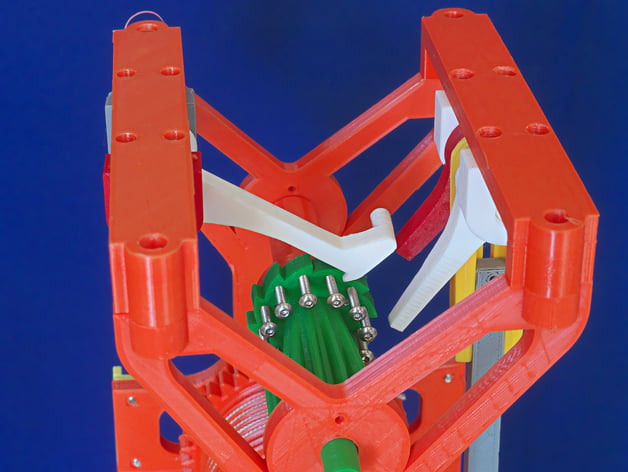
Something sparked my interest in the Galileo Pendulum Clock and I had a look on-line, found some photos, and decided to have a go at designing and making a 3D printed version. This is the result. This is not an easy project to make because many of the parts must be printed flat, or close to it. Also it is fairly demanding to assemble as all the moving parts have to be able to move freely - but without excessive play. I've uploaded the photos I worked from. Designed in Moi (Moment of Inspiration), simulated in SimLab Composer Mechanical and made in PLA, mostly on an original Ultimaker. A simulation of the escapement mechanism is here: https://youtu.be/S2S6WjdXjyc And a video of the finished article in action is here: https://youtu.be/M2qSRCdEmJI Print Settings Printer Brand: Ultimaker Printer: Ultimaker Original Rafts: No Supports: No Resolution: 0.2mm Infill: 20%-40% Notes: Material used - PLA for all parts. I think that the softer ABS would be less satisfactory for most of the rotating parts which need to rotate freely. The exception is the pawl which shouldn't be too 'bouncy'. I made the pawl in PLA, but a softer grade - Polymaker's PolyMax. Note that I changed to this fairly early in the development phase and it's possible that later design changes may mean that regular PLA would be OK for the pawl. As I've mentioned above it's important to keep the parts flat and I found BuildTak helpful for this - especially as my Ultimaker Original does NOT have a heated build plate. On the wider parts I used a brim. Post-Printing The design size I use for shafts and the holes in which they rotate is the same. eg 8mm for both. I rely on shrinkage to bring the shaft a little under 8mm and use a straight hand reamer to bring the holes very close to 8mm dead. I't would be struggle with reamers, I think. I also recommend a tapered reamer to open the start of hole intended for screws, Talking of which, all screws are 3mm Button Head Caps Screws. Those in the ratchet are 15mm long - 12-off. The remaining screws are all 10mm long - about 40! Also, you'll need lead shot (fishing weights) for the bottle weight. I used assorted sizes to get as much weight into the bottle as possible. Weight of bottle and lead (excluding the cap) - 643gm. I did start of with a weight at the end of the pendulum but that proved counter productive. I did have to increase the bottle size so I could make it heavier. Let me know if you think that you need an even longer bottle. If your pendulum runs out of puff you need more weight - or a shorter pendulum. How I Designed This I started with the photos of the metal models (I've uploaded those photos) and went from there. Once I had an escapement design I ran it as a simulation (unsuccessfully) in SimLab Composer Mechanical and refined the design until it would simulate. I've provided a link to that simulation. I cheated a little on the gear spacing. In the interest of making everything as 'free' as possible the gears are 1mm further apart than the intersection of their PCDs.
With this file you will be able to print Galileo Pendulum clock Mk I with your 3D printer. Click on the button and save the file on your computer to work, edit or customize your design. You can also find more 3D designs for printers on Galileo Pendulum clock Mk I.