Garmin Approach R10 - Leveling Stand w/ Laser Dot attachment
thingiverse
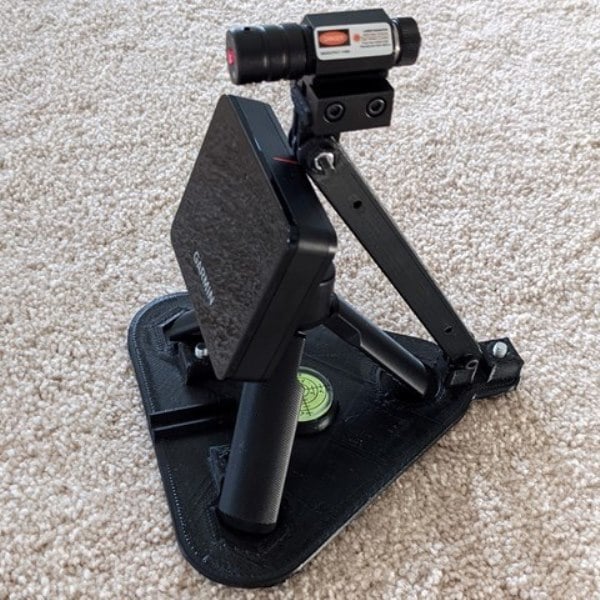
**++FINAL++** Leveling stand for Garmin Approach R10 with attachment for laser. The laser dot will mark the ball placement for consistent distance, and help with keeping target line perpendicular to R10 face. Should make it a no-brainer for ball placement. Post suggestions in the comments and I can make changes. I can post the F3D if folks want to modify. UPDATE 01: Added alignment stick (8mm) holder to front of base plate. UPDATE 02: Increased height of arm holder to clear bubble level, allows arm to fold flat for storage. Just realized the leveling screw will be in the way... UPDATE 03: Flip-flopped back hex nut insert and gopro arm mount UPDATE 04: Changed front tripod pads to hexagon shape for tripod legs. Should help with keeping the face perpendicular to the target line. UPDATE 05: Added Ryobi Cube attachment UPDATE 06: Added 1/4-20 screw hole to Ryobi attachment to convert to a Universal attachment for laser levels, phone mounts. **NOTE:** *Optimal to print universal attachment with leading edge flat on print bed. Helps with GoPro tine stregth. Needs support for back lip.* See Comments for additional notes. **Usage:** Put the R10 on leveled plate, measure or estimate the 6-8' (ie. two 60 wedge lengths), point the laser dot. Happy hitting! **Assembly notes (parts list below):** -- Insert 1/4 20 nut into 3 square inserts on top of plate. This should capture the nut for the screw -- Screw 1/4 20 leveling feet or screw through nuts. 2" screw or leveling foot would probably work best. -- OPTIONAL - Use a nylock on top of leveling foot/screw for grip above plate. Plan to generate a knob for better grip at a later time. -- Insert Bubble Level (32mm diameter x 7mm thickness) into plate. -- Attach Arm to Plate (see GoPro style connector). Use M4 screw and nut. -- Attach Picatanny connector to Arm -- Attach picatinny mounted laser dot to picatinny connector **Parts list:** *Laser (Picatinny mount):* *+Red+* https://www.amazon.com/gp/product/B072N581ZQ/ref=ppx_yo_dt_b_search_asin_title?ie=UTF8&psc=1 *+Green+* https://www.amazon.com/Meirui-Compact-Picatinny-Rechargeable-Tactical/dp/B093QH119L/ref=pd_sbs_12/134-0565352-7845057?pd_rd_w=jSXhF&pf_rd_p=a8064901-fa56-4ccb-8289-d246cf57993b&pf_rd_r=RVJZ9CA85428XBS6NGWN&pd_rd_r=4315fd4e-3c47-4fb8-992a-e7c0f0b057c9&pd_rd_wg=SafDn&pd_rd_i=B093QH119L&psc=1 *Laser w/flashlight:* https://www.amazon.com/Feyachi-LF-38-Flashlight-Weapon-Picatinny/dp/B083L94HNQ/ref=sr_1_11?dchild=1&keywords=flashlight+with+laser&qid=1632718769&s=sporting-goods&sr=1-11 *Bubble Level - 32x7mm:* https://www.amazon.com/gp/product/B07RKK22BF/ref=ppx_yo_dt_b_asin_title_o03_s00?ie=UTF8&psc=1 *Nut (qty 3) - 1/4"-20:* https://www.amazon.com/Hillman-150003-Coarse-Thread-Pieces/dp/B000BPEPNW/ref=sr_1_3?c=ts&dchild=1&keywords=Hex+Nuts&qid=1632718444&refinements=p_n_feature_fourteen_browse-bin%3A11433968011&s=industrial&sr=1-3&ts_id=16409981 *Leveling Feet (qty 3) - 1/4"-20x1"* https://www.amazon.com/Furniture-Adjustable-Levelers-Leveling-Super-Deals-Shop/dp/B07L2F9ZZY/ref=pd_sbs_4/131-7431291-5802142?pd_rd_w=0sniy&pf_rd_p=8b76d7a7-ab83-4ddc-a92d-e3e33bfdbf03&pf_rd_r=SW6TDBJQ2YX0QW4M962N&pd_rd_r=e3151337-2020-42fc-a6b4-042ec58afb05&pd_rd_wg=TZBFY&pd_rd_i=B07L2F9ZZY&th=1 *Screw / Bolt (qty 3) - 1/4"-20x1:* https://www.homedepot.com/p/Everbilt-1-4-in-20-x-1-in-Zinc-Plated-Hex-Bolt-800596/204633241 *Ryobi Laser Cube* https://www.ryobitools.com/products/details/33287171880 **Post if printed. HAPPY HITTING!**
With this file you will be able to print Garmin Approach R10 - Leveling Stand w/ Laser Dot attachment with your 3D printer. Click on the button and save the file on your computer to work, edit or customize your design. You can also find more 3D designs for printers on Garmin Approach R10 - Leveling Stand w/ Laser Dot attachment.