Garmin Varia mount for Ibera bike rack
prusaprinters
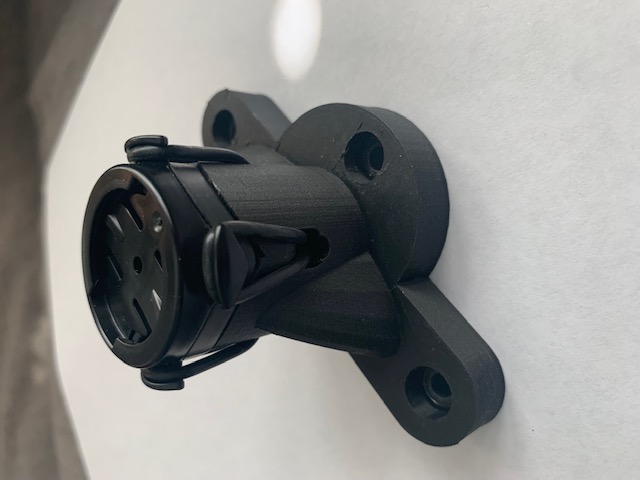
<p>I needed to solve 2 problems:</p><ol><li>Move my Varia bike radar away from the seat/seat post area, as its rear-facing view will be obscured by a trunk bag</li><li>Keep the Varia far enough away from the tire that it won't interfere with an added rear fender</li></ol><p>The Ibera bike rack has a convenient rear-facing plate for mounting gadgets. Using Tinkercad I designed a mount that would line up well with the Ibera rear mounting plate (and it's existing holes) and push the Varia mount point back about 2 inches away from the rear mounting plate. </p><h3>Print Settings</h3><ul><li>Printer: Prusa MK3S</li><li>Rafts: No</li><li>Supports: No</li><li>Resolution: 0.1mm</li><li>Infill: 15%</li><li>Perimeters: 4</li><li>Ironing: On, all top surfaces</li><li>Filament: Hatchbox Carbon Fiber PLA</li></ul><h3>Parts</h3><ul><li>1 - Plastic Garmin mount designed to mount a Garmin to a flat surface. Most Garmin devices are shipped with multiple mounts, so you may not need to purchase one of these.</li><li>1 - Formed rubber Garmin mount. This is the rubber piece that fits into the plastic Garmin mount and keeps the Garmin mount from sliding around when rubber-banded to a stem or seat post. Garmin devices usually come with more than 1 of these.</li><li>2 - Rubber bands used to mount a Garmin to a stem or seat post. Garmin devices come with extra bands, so you may already have these.</li><li>3 - M5x0.8 16mm socket head cap screws, stainless or anodized steel. These are the same bolts used to hold on most water bottle cages. Flanged bolts may not fit in the mounting holes. My local bike shop mechanic gave me some from the parts bin. (Thanks Brian!)</li><li>3 - M5 fender washers. These are the larger washers shown in the parts picture.</li><li>3 - M5 washers. These are the smaller washers shown in the parts picture.</li><li>3 - M5 nyloc nuts. You could also use a regular M5 nut if you replaced the above M5 washers with lock washers instead.</li></ul><p>All metal parts should be stainless steel or rust-resistant, as they will be exposed to inclement weather. Using 2 washer sizes is probably redundant, but I liked how it looked. :-)</p><h3>Assembly</h3><p>The Garmin mount parts (plastic and rubber pieces) need to be strapped to the printed mount, and it's easiest to do this first. Push the first rubber band through one of the band slots (on the side of the printed mount) from the outside into the cavity underneath the mount. Then, using a small tool like an allen wrench, push/pull the end of the band through the opposite band slot, so that the band is now hanging out on both sides of the printed mount. Repeat with the second rubber band, running it through the remaining 2 opposing band slots.</p><p>Now that the rubber bands are in place, put the 2 Garmin mount pieces together (the plastic and rubber piece.) They should nest together nicely. Then put those pieces on the top of the printed mount, with the rubber Garmin piece sandwiched between the printed mount and the Garmin mount. The top of the printed mount is contoured to fit the base of the rubber Garmin mount, so the parts should fit together snugly. Make sure the slots in the Garmin mount are on the left and right, rather than the top and bottom…when you attach the Varia to the mount, you'll put it in the mount sideways and then rotate the Varia down to lock it into the Garmin mount. After the Garmin mount pieces are in place atop the printed mount, stretched the bands over the Garmin mount hooks so the bands are holding the Garmin mount firmly to the printed mount.</p><h3>Mounting</h3><p>In order to use all 3 mounting holes, you must drill a hole for the top mounting screw. The rack is aluminum, so you won't need a special drill bit…any bit with the same diameter of the M5 bolt should work. The best way to make sure the drilled hole is positioned correctly is to attach the printed mount in place with the 2 existing holes (on either side of the mount plate) then use the printed mount as your drill guide. If the bolt won't slide through the resulting hole easily, take the printed mount back off and widen the hole until the bolt will go through the hole easily but without a lot of extra wiggle room.</p>
With this file you will be able to print Garmin Varia mount for Ibera bike rack with your 3D printer. Click on the button and save the file on your computer to work, edit or customize your design. You can also find more 3D designs for printers on Garmin Varia mount for Ibera bike rack.