Gear Driven Yarn Winder
thingiverse
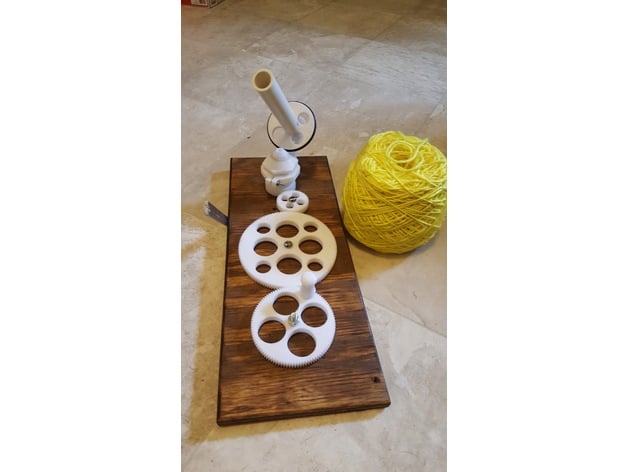
This is a yarn winder designed to be assembled without bearings or belts. I did have to use a giant O-ring, but a rubber band should work as well. I'll be redesigning to use gears on the carriage as well. The goal is to minimize the number of "store-bought" parts or atleast keep them to easily available parts that will be in any hardware store. You will need: Five 5/16 carriage bolts and nuts. You can get away using all 3 inch bolts, but having three shorter ones will keep you from banging your hands on the protruding bolts. 6 inches of 3/4 PVC pipe. I'll be redesigning to make this part printed as well. Rubber Band Something to use as a base. I used a piece of plywood, rounded the edges with a router and stained it. 5/16 inch drill bit and drill EDIT Jan 2017 - I've added gears that use 608 bearings to the mix, again, you'll print two small gears, one big one and one medium. I'll be reworking this design as I have time. Planning to add: Bevel gear on cone and bobbin. slide for gears to bolt into to make them mesh more consistently. How I Designed This I printed bbrown1951's yarn winder but didn't have any bearings or belts laying around. I kept his carriage mechanism but laid out a series of gears to drive it instead of using a belt. Assembly Instructions Using a bolt as a guide to line them up, glue one of the small gears to the bottom of the 50.8mm pulley doodad. the two halves of the carriage need to be glued together, see the photo to see how they fit together. You can glue the carriage to the pulley mechanism or use a small bolt. Drill a hole through the board and fix the pulley and carriage assembly in place using a small washer to offset it from the board. The cone has a place for a 5/16 nut, screw this down on top of the carriage assembly. The carriage should spin freely, the cone should stay put. I used some Loctite once I had the cone where I wanted it. The next hole should be 50mm away from the first hole, but I found it best to place the small gear in place, meshing with the carriage assembly gear and mark the hole. Use another small bolt to attach the gear to the board, again using a small printed washer to offset it from the board. You can do the same with the next two gears, marking the holes and drilling them to make the gears mesh. Before attaching the final gear, attach the handle to the gear. Bolt the large spacer onto the carriage, the square shoulders of the carriage bolt should fit into the groove. Use a three inch bolt. You should have a grooved pulley, a PVC adapter and a piece of PVC pipe left over. Glue the adapter into the pulley and slide the pipe over it to complete the bobbin assembly. The "bobbin" slides over the bolt on the carriage and rides on the cone. As the carriage spins, the bobbin should roll along the cone, spinning the bobbin. Again, the cone should not spin, just the carriage underneath it and the bobbin above. I've not yet designed a yarn guide, there are a couple of other yarn winders out there that have a yarn guide. I just used a piece of aluminum that I had laying around. The yarn needs to roll onto the bobbin from a consistent height to make a tight cake of yarn. There are spaces for 608 bearings in the carriage and the bobbin. If you have them, it'll make things roll smoother. If you don't, I wouldn't worry about it. Use the "no-bearing" version of the part. The whole idea of 3d printing a yarn winder is that, if it breaks down, you can reprint the broken part and move on.
With this file you will be able to print Gear Driven Yarn Winder with your 3D printer. Click on the button and save the file on your computer to work, edit or customize your design. You can also find more 3D designs for printers on Gear Driven Yarn Winder.