GEARED BOWDEN EXTRUDER
thingiverse
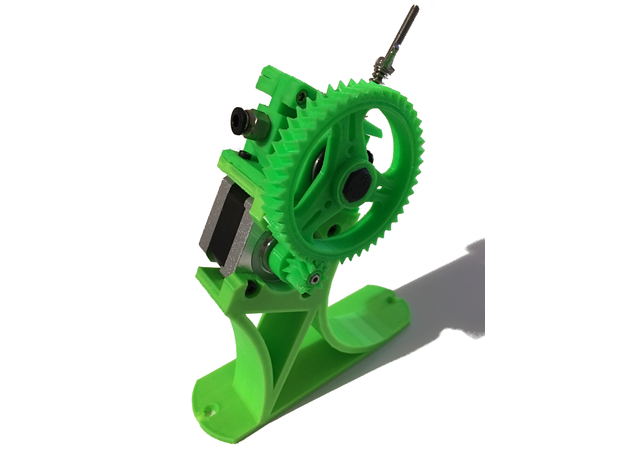
UPDATE: I've remixed this design to mount on a 20/20 aluminium extrusion https://www.thingiverse.com/thing:2596124 UPDATE: So I have finally got around to sorting the support structure out for this design. It is much sturdier than the previous design and the fixing holes are in a better position. UPDATE: I had the fixing post for the idler block randomly snap mid way through a print last night. Looking at the design this was a weak point. As a result I have made the fixing post wider. Hopefully this will reduce the likelihood of this happening again. So this is my take on a Wade's Extruder. If you look at http://reprap.org/wiki/Wade's_Geared_Extruder you will find a description of all the components. I've made a couple of amendments to the general design such as having a hinged idler block which is put under load with a single bolt / spring. I didn't see the benefit of having four, in fact I thought it was a disadvantage. The idler pulley is held in place with a 16mm M8 cap head bolt rather than a section of threaded rod or bar. It means you don't have to cut anything. All the pulleys are also fully held. I see that many people only partially hold them due to issues with support while printing as far as I can tell. I got round this issue by bolting the extruder block to the motor support with 8mm M3 bolts and captive nuts in the motor support. Tolerances are tight and I found a pair of long nosed pliers usuful to push the nuts into place. .All pieces can be printed without support. The hobbed bolt is the cheapest one I could find on Aliexpress ( https://www.aliexpress.com/item/3D-printer-accessory-Wade-s-extruder-hobbed-bolt-reprap-M8-wire-feed-teeth-space-1mm-for/32387428107.html?spm=2114.13010608.0.55.de7dUS ) and the setting out of the extruder block is to suit. The design allows just enough room for a nyloc nut. The motor mount / support is just a temporary solution at present. Eventually the extruder will be mounted on an enclosure frame but at present it is screwed down to the bench. The motor fixing holes aren;t quite in the right position. They were off a previous design and mean that you can't get at them with the gears in place. Not too much of an issue though as you can just bolt the extruder block straight to the mount after the gears are installed. The small gear and the outer toothed ring of the large gear were originally designed by someone else but I'm afraid I can't remember where they came from. If they are your design thank you very much, you saved me a ton of time. I think I have tested this design for 100 hours or so and must have fed 350m of filament through it. It works amazingly well and the only problem I have had with it was a failed pneu fitting which decided to release the Bowden tube 10 hours into a print resulting in much swearing. I've found you don't even need to lift the idler block to change filament. Once you get the compression of the spring right you can just insert filament and press extrude. There were a load more build photos but for some reason Thingiverse has decided to eat them or something and won't diplay them. Will try again at some point.
With this file you will be able to print GEARED BOWDEN EXTRUDER with your 3D printer. Click on the button and save the file on your computer to work, edit or customize your design. You can also find more 3D designs for printers on GEARED BOWDEN EXTRUDER.