Geeetech A10 (v3) Z-Stabilizer Rods
thingiverse
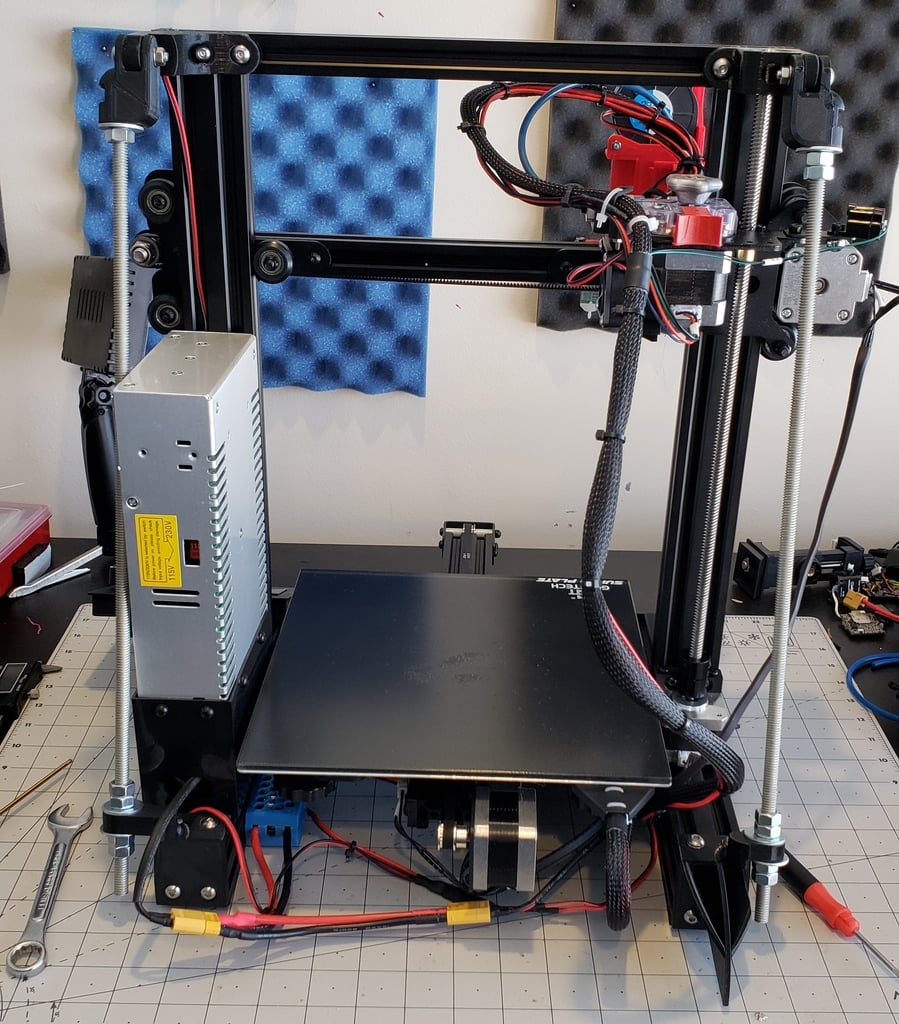
This is a set of Z axis stabilizer rods for the Geeetech A10 version 3. They help to reduce ghosting in your prints, especially tall prints. May fit other printers as well, like the Ender 3, as it is a remix of peed6687 design for the Ender 3. I really liked peed6687 design, but it had a few issues for my Geeetech A10. 1. The stock power supply sticks out, from the side about 10mm, making the original brackets not usable on the right side 2. The location the bottom left bracket mounts to would mean I lose my anti-snag. 3. The location the top left side bracket mounts to is the same location the lead screw stabilizer is located at. So, I would lose it as well. So, I decided to remix the original to address these issues. **Files Available** (I have printed them all, but the ones I am currently using are in **bold**) - Bottom mount - Left.STL - This is the original bottom mount for the left side - **Bottom mount - Left - Anti snag.STL**- The original bottom mount with anti-snag added (from Nerys design) - Bottom mount - Right.STL - This is the original design, simply a mirror image. Will not work with stock PSU - **Bottom mount - Right - extended.stl** - This is the extended bottom mount,to give room for the stock PSU - Top mount - Extrusion - Normal.STL - This is the original design, which attaches to the top extrusion, if you do not wish to have a lead screw stabilizer - **Top mount - Extrusion - Z Stabilizer.stl** - This is my remix, which allows you to keep a lead screw stabilizer. Requires skateboard bearing. - **Top mount - Extrusion-Extended.STL** - This is for the right side top, to give clearance for the PSU - **Top mount - Lead screw.STL** - Original design. Print 2, one for each side. **Parts Needed:** - **1 x "608" bearing** (This is if you wish to use the lead screw stabilizer bracket. It is a simple skateboard bearing 22mm x 7mm with an 8mm hole) - **2 x 5/16" (8mm) threaded rod 17" (430mm) long** (an 8mm lead screw can also be used, but they cost more. Especially when longer like these need to be) - **12 x 5/16" (8mm) hex nuts** (or 14 of them, see notes) - **6 x 5/16" (8mm) washers** (not 100% necessary, but I recommend them) - **4 x M5 12mm hex screws** (top extrusion bracket) - **8 x M5 2020 extrusion T nuts** (to attach top and bottom brackets to extrusion) - **4 x M5 15mm hex screws** (bottom bracket top screws) - **4 x M5 16mm hex screws** (bottom bracket's bottom screws) - **2 x M5 25mm hex screws** (to attach top mount lead screw bracket to top mount extrusion bracket) - **4 x M5 washers** (for 25mm screws. Not 100% necessary, but recommend using them) - **2 x M5 hex nuts** (for 25mm screws) - **A right angle** (to check that the Y and Z extrusions are perpendicular to each other, when tightening everything up) - **A hack saw** (To cut the rods to length) - **3mm hex screwdriver or allen key** - **1/2" wrench** (if using the 5/16" nuts. Otherwise, I believe it's a 12mm for the 8mm nuts. Don't quote me on that) **Bill of Materials** (the ones in **bold** I have purchased and used. Others are recommendations, if you don't wish to go to hardware store): - **Glarks 150Pcs M5 Stainless Steel Button Head Hex Socket Head Cap Bolts Screws Nuts Assortment Kit** : https://amzn.to/2EmuAzp - **CNBTR 10x6x4mm 20 Series Aluminum European Hammer HeadDrop In M5 T Nut Slot Pack of 50**: https://amzn.to/2GZL7Lr - **uxcell 100Pcs M5 x 1mm Stainless Steel Metric Flat Washer for Bolt Screw**: https://amzn.to/2Em6kgK - **Jeremywell 608-2RS Ball Bearing 8mm x 22mm x 7mm Rubber Sealed Deep Groove, Width Double Sealed (Pack of 10)**: https://amzn.to/2EokpKJ (these are also great for other things, like TUSH+ and fidgets) - **Stanley 45-912 8 Inch X 12 Inch Steel Carpenter'S Square**: https://amzn.to/2TblbCI - **NEEWER® Titanium Nitride TiNi Hex Driver Wrench 4 Piece Set 1.5mm/2mm/2.5mm/3.0mm**: https://amzn.to/2EnQ92t - Steel Fully Threaded Rod, Zinc Plated, 5/16"-24 Thread Size, 36" Length, Right Hand Threads: https://amzn.to/2E5xl6W (You will need hacksaw to cut the 2 x 17" pieces) - Hillman 150051 Fine Thread Finish Hex Nuts, 5/16 X 24-Inch, 100-Pack: https://amzn.to/2Eljz0Z - 5/16" Stainless Flat Washer, 3/4" Outside Diameter (100 Pack): https://amzn.to/2Elb9XN - Stanley STHT20138 Solid Frame High Tension Hacksaw (12in / 305mm): https://amzn.to/2EnPH4s - TEKTON 1/2-Inch Combination Wrench | 18257: https://amzn.to/2EmmqXA **Notes:** I purchased my threaded rods, 5/16 nuts and washers, all from Lowe's (local hardware), as they are a lot cheaper (~$7) and you can buy just the number you need. I figured I would give people a choice of Amazon, if they do not have a local hardware store near them. I already own a hacksaw and plenty of wrenches. Again, just wanted you to know everything you need to complete this project. I used a total of 6 of the 5/16" nuts for each rod. I did this to use an extra nut as a fastener for the first one. You'll notice I have 2 nuts back to back on the bottom. This is not 100% necessary, but since nuts are cheap, I figured it's a good way to keep everything aligned after you get it all perpendicular to the Y and Z extrusions.Makes sure that the first nut doesn't move. You may wish to add 1 more extra nut, per side, to back up with the top one as well. I ran out of nuts, but will add them once I have a chance to run back to the hardware store ;) In order for you to get both screws tightened, on the left extrusion bracket, the Z lead screw will need to be removed. The screw closest to the edge is right behind the lead screw. Before taking off the lead screw, dry fit the part (if using the Z stabilizer bracket) and see where it lands on the X direction. To do this, bring the Z as high as it goes. This way, when the rod is off, you know where to tighten it, so that the lead screw does not get any unnecessary pressure on it.It should fall flat with the end of the extrusion, at least it does for me. Hope you like it:) **Please note:** Links in BOM are for my Amazon affiliate account. I would highly appreciate it if you could use these links, if buying from Amazon. No pressure, but it would surely help me buy me a cup of coffee. Or, if you prefer to drop me a cup of coffee via Paypal: https://paypal.me/nordicblue
With this file you will be able to print Geeetech A10 (v3) Z-Stabilizer Rods with your 3D printer. Click on the button and save the file on your computer to work, edit or customize your design. You can also find more 3D designs for printers on Geeetech A10 (v3) Z-Stabilizer Rods.