Geeetech Acrylic I3 Auto Bed Level BLTouch Mount
thingiverse
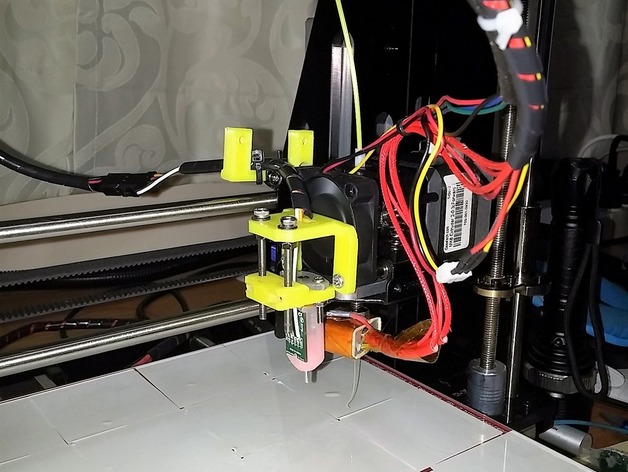
Wanted to be rid of that pesky manual bed leveling stuff. Bought a BLTouch. Could not find a thingy that suited my printer, so went and designed my own. CAUTION - THIS PROJECT REQUIRES A GOOD LEVEL OF SOLDERING ABILITY for the GT2560 board. Print Settings Printer: Geeetech Acrylic I3 Pro B Rafts: No Supports: No Resolution: Used a 0.4mm nozzle Infill: Standard Notes: A 0.3 or 0.2 nozzle may achieve finer detailed results that may not need post printing touch ups for the M3 nut slots in part 1. Post-Printing Needed to install A couple of M3 screws, I used some leftover 40mm ones a couple of 45mm+ M3 screws (shorten 50mm ones to suit) Some M3 washers 4 M3 hex nuts A soldering iron as the BLTouch needs to connect to stuff that do not have pin outs on the GT2560 board. And make sure you connect the Z axis end stop wiring the right way You may also need a 2.5mm drill and/or fine flat file. The two slots for the 2 of the M3 hex nuts on part 1 may need to widened and/or made a little higher to get the nuts in. Depends on what resolution you use and, I guess, how good your printer is getting fine detail. Perhaps a 0.2mm nozzle will do better. Push 2 M3 hex nuts into each slot of part 1 and align with the screw holes Mount part 2 on the fan (using the modified M3 50mm screws) Attach BLTouch unit to part 1. The unit's wires can be either way they will still go through the slot in part 2. Insert M3 40mm screws through holes in part 2 overhang, add one M3 hex nut and screw them up to almost the top. Feed the BLTouch wires through the slot of part 2 Slide parts up the M3 screws and screw them until the base of the BLTouch complies with the stated offset distance (it comes with a sheet). Follow the installation guide for the rest. Paste the link below to get the guide plus how to order, etc.https://plus.google.com/communities/109126963511513081214 How I Designed This Design was through some trial and error. Mod 3 worked the best. Why the screws? The guide states that any mount should be height adjustable. WHile the actual variation in height may be really only a few mm, I decided to just make it extremely variable. In case you are wondering what is that white stuff between the heated bed and the glass top, it is self adhesive thermal transfer tape. Very thin, extremely good thermal transfer characteristics and are not permanent adhesive (3M brand, bought on Ebay - you'll need 16 x 50x50 pads (or if available one 200x 200). No more stupid clips holding the glass on.
With this file you will be able to print Geeetech Acrylic I3 Auto Bed Level BLTouch Mount with your 3D printer. Click on the button and save the file on your computer to work, edit or customize your design. You can also find more 3D designs for printers on Geeetech Acrylic I3 Auto Bed Level BLTouch Mount.