Geeetech I3 A Pro: E3D V6 + Titan + Cooling
thingiverse
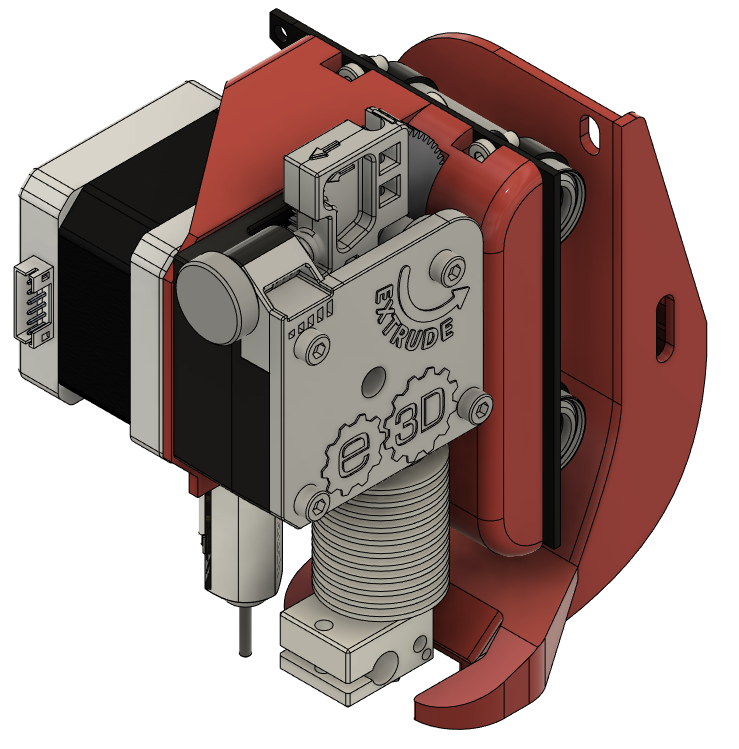
**UPDATE 05.2020** Uploaded a 20 tooth deflection pulley to replace the old ones and reduce ghosting. You need 4 x "MR93 W2.5" bearings. **UPDATE 02.2020** Did a complete overhaul to my previous version. I decided to use the original mounting-plate to install the x-carriage. No more need to disassemble the hole x-axis and the original belt-holder can be used too. Also adopted the „prusa bear cooling fan“ to my version.  ASSEMBLING COMING SOON!  As you can see on the picture, I installed "MaazaFin's Smooth X-axis". It is not necessary when you want to use my extruder-mount but I would recommend it. The orignal X-axis causes the Z-rods to bend, when tensioning your extruder belt. You can find it here: https://www.thingiverse.com/thing:1103976 Please do **not** use flexible couplers for your z-axis like this:  They behave like a spring when your steppermotors are going to move your x-axis up. Especially when you can not ensure that your x-axis is absolutely horizontal. Therefore your couplers will absorb torque from your steppermotors and can cause tilting in your x-axis. **UPDATE 07.2019** I was not really happy with the mount for the 3D-Touch. The space between nema-motor and 3D-Touch was too small. Very flat screws were needed to install the sensor. With the new version you can use normal m3 screws.  **UPDATE 06.2019** I created a new fan made of four parts instead of only one. Here are the reasons why: - Printing the fan (in one piece) with materials with less good bridging behavior like PETG is quite hard. I wanted the reduce the influence of a rough surface on the airflow. - Decided to adopt the "prusa bear fan bracket". With this, printing the hole cooling-fan in one piece is not really practical.  - By deviding it into four parts its much easier to print cause of the lesser printheight and the new alignment. - I also made all parts a bit thicker, so the fan isn't that fragile as before and the parts are easier to glue. **Credits:** First of all I have to say thx to "bliatun" for his great design and sharing his idea. His extruder mount is compact and easy to assemble. So I decided to adjust it to my "Geeetech I3 A Pro". **Goals to achieve:** - Get rid of that heavy MK8 extuder + stepper motor and safe weight - Gain more printquality by installing a E3D-V6 and have the possibility to cool filament - A wider range of useable printmaterials by installing a Titan extruder - Use a probe (BL-Touch) without printing an extra mount. **Notes:** - Please check alignment of the printed parts in your slicer software. - If possible print "Part 4" (nozzle cooling) in ABS - cause its close to the heaterblock. - If you are using the "17HS10-0704S" stepper motor, you have to switch the Connection wires (red + green) as shown in the picture!  - Also lower your voltage at your stepper driver to 0.5 volts. Thats enough for the pancake motor. - If possible use Loctite Super Glue 3, perfect for glueing PLA or PETG - Dont forget to recalibrate your esteps for your new extruder and check if you have enough tension between filament and the extruder gear. For more information goto: https://mattshub.com/2017/04/19/extruder-calibration/ **Assembling:** Goto bliatun's site for more instructions: https://www.thingiverse.com/thing:1857204
With this file you will be able to print Geeetech I3 A Pro: E3D V6 + Titan + Cooling with your 3D printer. Click on the button and save the file on your computer to work, edit or customize your design. You can also find more 3D designs for printers on Geeetech I3 A Pro: E3D V6 + Titan + Cooling.