Gemini Lunar Lander
prusaprinters
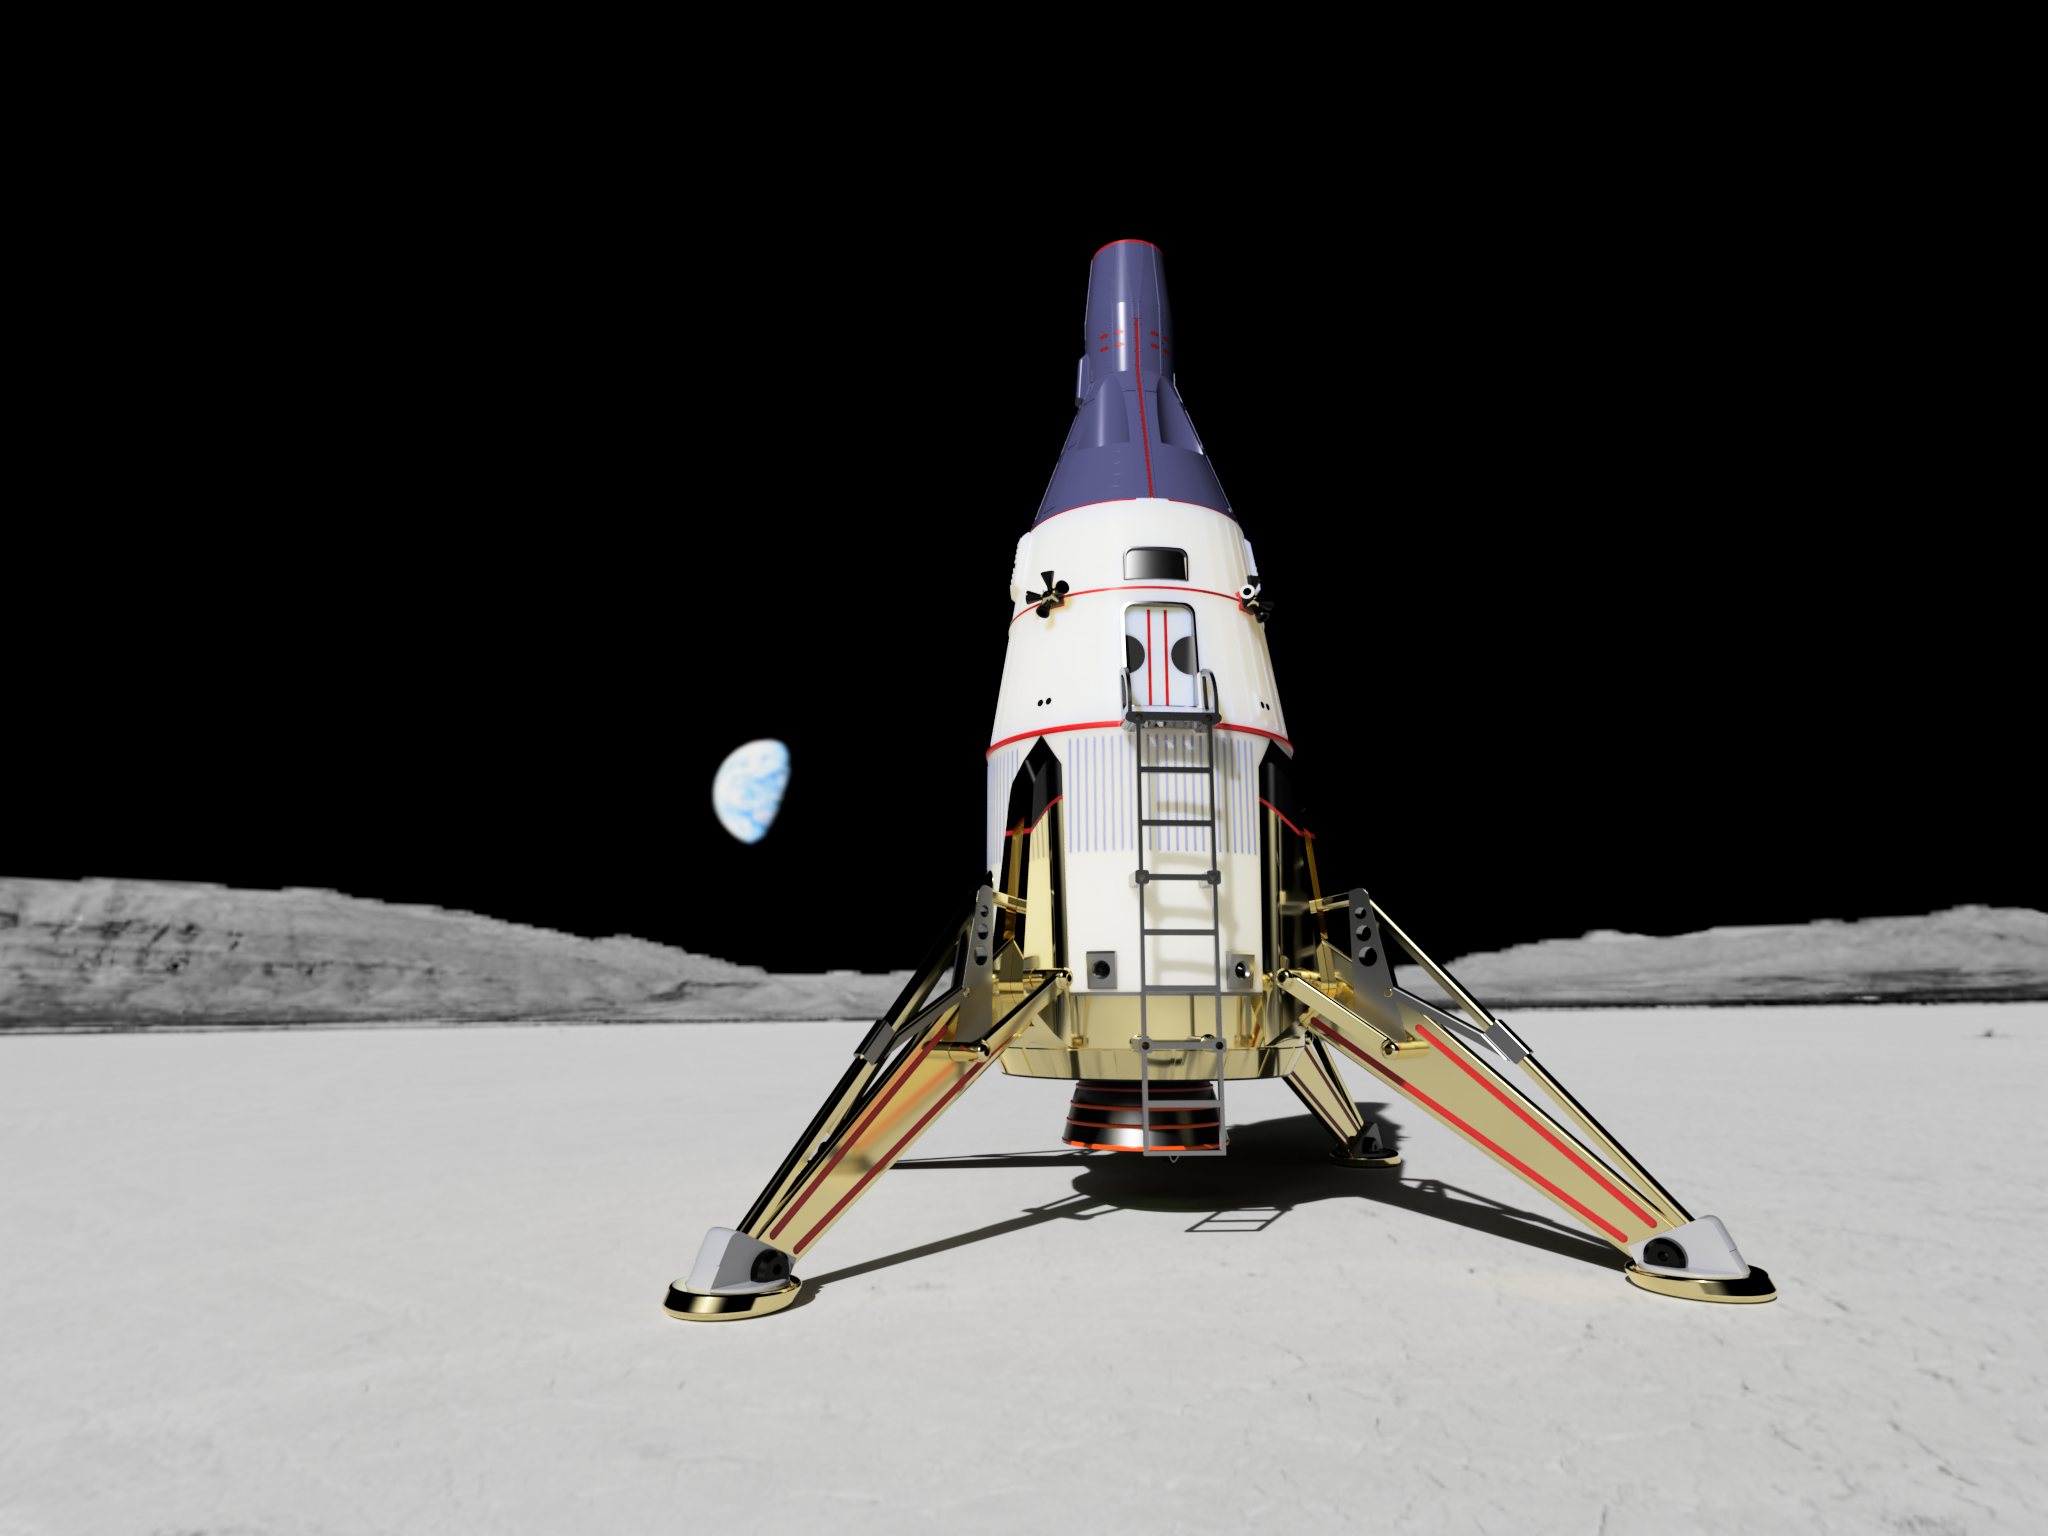
<h3>Gemini Lunar Lander</h3><figure class="image image-style-align-center"><img src="https://media.prusaprinters.org/media/prints/87671/rich_content/7a4cecc9-a6dc-4760-9e1d-0b4d749bc394/gemini_lander-16.png#%7B%22uuid%22%3A%22039c4e41-c645-4713-a2a9-a65930243e0e%22%2C%22w%22%3A2048%2C%22h%22%3A1536%7D"></figure><p><i><strong>UNTESTED FLYING MODEL ROCKET</strong></i></p><p>This is a remix of the SpaceX Dragon Lander. I'll be updating this assembly guide over the next few days but a lot of the techniques used in the<a href="https://www.prusaprinters.org/prints/84660-spacex-dragon-lander"> SpaceX Dragon Lander</a> are applicable here. </p><p>I designed that lander around <a href="https://www.thingiverse.com/mech-g/designs">Mech-G</a>'s <a href="https://www.thingiverse.com/thing:2670642">Vintage Mars Lander </a>design found on Thingiverse. It was a great starting point. </p><h4>Fictional History</h4><p>Using the Gemini spacecraft for a manned Lunar landing was considered as early as the original <a href="https://en.wikipedia.org/w/index.php?title=Mercury_Mark_II&action=edit&redlink=1">Mercury Mark II</a> proposal which led to the Gemini program.</p><p>This is a ‘reimagined’ direct ascent and single vehicle lander. This<a href="https://en.wikipedia.org/wiki/Advanced_Gemini#Lunar_landing"> “Advance Gemini” </a>project delivers men to the moon ahead of schedule, in one giant leap. </p><p>The "adapter section' of the Gemini is entered via a hatch in the heat shield and the final approach and landing is piloted from a chamber just below the capsule. </p><figure class="image image-style-align-center"><img src="https://media.prusaprinters.org/media/prints/87671/rich_content/018b5ffa-0882-46de-a404-554ae5280f86/gem-cutaway.jpg#%7B%22uuid%22%3A%22fe273a5f-446e-4c74-bca9-d69671d6be32%22%2C%22w%22%3A800%2C%22h%22%3A784%7D"></figure><h4><strong>Springy Legs</strong></h4><p>For the spring loaded legs, I used 7/32 x 1" springs extension springs - they came in an assortment pack I got from Amazon - but you can use rubber bands. <a href="https://www.amazon.com/gp/product/B000K7M36W/ref=ppx_yo_dt_b_search_asin_title?ie=UTF8&psc=1">Here is a link to the assortment pack</a>.</p><h4><strong>Filament pins</strong></h4><p>In many places I use ‘raw’ filament as hinge pins or means of strengthening a post (the spring posts or stand mount). You may find you need a small drill to round out the holes so the filament fits in.</p><p>The holes for the launch rod can be used as is or will accommodate a standard Estes launch rod tube. </p><figure class="image image-style-align-center"><img src="https://media.prusaprinters.org/media/prints/84660/rich_content/deca994e-01b3-4502-b728-05ddfa0c6cb9/cut-away-3.jpg#%7B%22uuid%22%3A%22699cf87c-7341-4984-ae27-e6744a2c0cad%22%2C%22w%22%3A636%2C%22h%22%3A608%7D"></figure><h4>The Control Thrusters</h4><p>The control thrusters are printed in a manner that allows them to be easily replaced.</p><figure class="image image-style-align-center"><img src="https://media.prusaprinters.org/media/prints/87671/rich_content/1128ed52-9b47-4f2f-a95b-96cdb3fe5d2d/image.png#%7B%22uuid%22%3A%22be1edbdf-cb3c-4199-8208-6e6394205bed%22%2C%22w%22%3A544%2C%22h%22%3A496%7D"></figure><p>They fit into the slots and a locking pin holds them in place. </p><figure class="image"><img src="https://media.prusaprinters.org/media/prints/87671/rich_content/72acafae-b69a-45fa-8493-e0b9e321ab3f/image.png#%7B%22uuid%22%3A%225ea23824-604a-48c7-8676-59b69b3ce8f3%22%2C%22w%22%3A578%2C%22h%22%3A520%7D"></figure><figure class="image image_resized" style="width:79.83%;"><img src="https://media.prusaprinters.org/media/prints/87671/rich_content/9735d358-a04b-4f28-8290-a8d1498dc1c7/image.png#%7B%22uuid%22%3A%22013e1027-b49f-4a80-b06f-f9e28ffd856f%22%2C%22w%22%3A693%2C%22h%22%3A569%7D"></figure><p>The control thrusters are very small and you should print them with supports. This can be a little tricky to remove them later but just be patient. </p><p><strong>The Leg Support Struts</strong> have small axles that need to be supported.</p><figure class="image image_resized" style="width:714px;"><img src="https://media.prusaprinters.org/media/prints/84660/rich_content/01b9b690-043a-4e02-ae80-546198b20ee6/thumbs/cover/800x446/jpg/supports-for-supprt-strut.webp"></figure><p><strong>The Nozzle </strong>will need the center supported when printing. </p><figure class="image image_resized" style="width:714px;"><img src="https://media.prusaprinters.org/media/prints/84660/rich_content/3aa8d445-0e6f-46c2-ba57-e1fe71a91a17/supports-for-nozzle.jpg"></figure><h4><strong>Screw that</strong></h4><p>In a couple places (nozzle and nose cap) I use small screws for assembly - an M1.7 Nickel-Plated Steel Phillips Pan Head. You don't have to use this exact screw - and if you want you can use glue for the nose cap (but not the nozzle). Anyway here is the <a href="https://www.amazon.com/gp/product/B07GB4TWHW/ref=ppx_yo_dt_b_search_asin_title?ie=UTF8&psc=1">screw assortment I draw from for this.</a></p><figure class="image image-style-align-center image_resized" style="width:54.38%;"><img src="https://media.prusaprinters.org/media/prints/87671/rich_content/953d3064-40ae-43d2-a989-3a51419c3f09/image.png#%7B%22uuid%22%3A%22a587f685-22d7-42e6-8ab8-7815cdff7b31%22%2C%22w%22%3A658%2C%22h%22%3A603%7D"></figure><h4> </h4><p>You may want to print a few of these or not fly it with the nozzle. I'm not certain how well it will hold up to the heat of the motor exhaust. </p><p>If you do fly with the nozzle it has to be put in place after the motor is inserted as it also acts to lock down the motor clip. </p><p><img src="https://media.prusaprinters.org/media/prints/84660/rich_content/6229361a-27df-4342-be1d-0d42f7b51fe0/nozzle.jpg#%7B%22uuid%22%3A%22e8d2c7b5-366f-4663-a26f-7c3db600fd74%22%2C%22w%22%3A869%2C%22h%22%3A549%7D"></p><h4>Main Tube Stop</h4><p>I've designed this to allow for repairs and easy changes, very few parts are glued in place and this is one of them. The Tube stop prevents the tube (that you have the parachute attached to) from pulling out of the rocket shell. The best approach to getting this in the proper location is to put the tube stop near the end of the tube and to push the Gemini upper shell down to the locking position. This will move the tube stop to the proper location and you can then glue it in place. </p><figure class="image"><img src="https://media.prusaprinters.org/media/prints/87671/rich_content/8a1b99f8-d704-49ba-ab5b-96659309129e/image.png#%7B%22uuid%22%3A%22894a240f-f71e-488a-8bcd-f30858e4a625%22%2C%22w%22%3A575%2C%22h%22%3A468%7D"></figure><h4><strong>Non-printed parts needed</strong></h4><ul><li>2 - <a href="https://www.amazon.com/Estes-3-BT-50-Body-Tubes/dp/B0161CFRTY/ref=sr_1_1?dchild=1&keywords=estes+Bt-50&qid=1635889650&s=arts-crafts&sr=1-1">BT-50 Body tube</a> 60mm (motor tube) and 194 mm (main tube)</li><li><a href="https://www.rocketryworks.com/plastic-parachute/">Plastic Parachute </a>(not sure what size just yet)</li><li><a href="https://www.amazon.com/Estes-Rockets-Engine-Accessory-Model/dp/B000RXY2HW/ref=sr_1_1?dchild=1&keywords=estes+engine+hook&qid=1635889360&s=arts-crafts&sr=1-1">Standard Estes Motor Hook</a></li><li><a href="https://www.amazon.com/gp/product/B07GB4TWHW/ref=ppx_yo_dt_b_search_asin_title?ie=UTF8&psc=1">Small pan head screws</a></li><li><a href="https://www.amazon.com/Estes-302320-Launch-Lug-Pack/dp/B009EZS252/ref=sr_1_1?crid=3684KMCGLI908&dchild=1&keywords=estes+launch+lug+pack&qid=1635889874&sprefix=estes+launch+lug%2Carts-crafts%2C231&sr=8-1">Launch Lug</a></li></ul><h4><strong>Printing Notes</strong></h4><ul><li>I printed the entire model with PLA at .2 layer height </li><li>Printing in color will take a few days in total and using Black in the Dragon section required me to to set the purge volume for the black to 500! (and even then I still got bleed)</li><li>Very Few parts need supports. The Gemini Shell, leg struts, nozzle and control nozzles.</li><li>The Gemini Shell benefits from the supports not only because of the internal nose cap end but because it gives the shell a greater footprint on the print bed. </li></ul><figure class="image"><img src="https://media.prusaprinters.org/media/prints/87671/rich_content/eac36b73-9eb5-47c9-bc26-e1bdc17edd0f/image.png#%7B%22uuid%22%3A%22377a85f6-8946-46c9-9187-e3469c2be20d%22%2C%22w%22%3A615%2C%22h%22%3A513%7D"></figure><h4> </h4><h4><strong>Nose Cap attachment</strong></h4><figure class="image"><img src="https://media.printables.com/media/prints/87671/rich_content/9d765110-a9a0-4c97-ae65-218618da8364/image.png#%7B%22uuid%22%3A%221c77b216-b1ee-423a-acf6-d9f04542c166%22%2C%22w%22%3A545%2C%22h%22%3A471%7D"></figure><p>Thread a nylon or <a href="https://www.amazon.com/gp/product/B07DP8ZV43/ref=ppx_yo_dt_b_search_asin_title?ie=UTF8&psc=1">strong thread</a> through the holes in the Nose Cap Attachment and make a loop, then glue the attachment plate into the nose cap. I used a CA glue. </p><p>I use an <a href="https://www.amazon.com/MOBOREST-Fishing-Accessories-Equipment-Connector/dp/B07S8WB9CP/ref=sr_1_5?keywords=fishing+line+swivel&qid=1649282704&sr=8-5">fishing line swivel</a> to clip the shock cord for the parachute onto the loop. </p><h4> </h4><h4><strong>Launch Pad Spacer</strong></h4><p>There are a zillion ways to offset a rocket like this on a launch rod, but because it was trivial, I designed a nice little spacer that gets the job done easily.</p><figure class="image image_resized" style="width:714px;"><img src="https://media.prusaprinters.org/media/prints/84660/rich_content/3af513ca-8258-45eb-8408-5adb39053678/thumbs/cover/800x939/jpg/20211103_174427.webp"></figure><h4><strong>Loading onto a launch pad</strong></h4><p>Because there is an air gap between the upper and lower launch guide openings, it will take a little practice to get it on the rod. It may pose a challenge on pads where the rod is at waist height or higher. If the Rod can be removed it would be easier to feed it through first then re-attached to the pad. I'll be looking into ways to improve this.</p><figure class="image image_resized" style="width:714px;"><img src="https://media.prusaprinters.org/media/prints/84660/rich_content/4d83dcf7-05a3-4bcd-96cc-bfedb8f9a601/launch-rod-cut-away.jpg"></figure><p> </p><h4>Display Stand</h4><figure class="image"><img src="https://media.prusaprinters.org/media/prints/87671/rich_content/e4def4f0-754a-4913-99d8-53453c1082af/gemini_lander-18.png#%7B%22uuid%22%3A%22482543d0-fe4f-4ba7-acba-21fc194ab595%22%2C%22w%22%3A831%2C%22h%22%3A1080%7D"></figure><p>The display stand (of course) can be printed in the colors of your choice. The central mount will insert into the 24mm motor mount and allow you to ‘enhance’ the display by putting a <a href="https://www.amazon.com/gp/product/B0814MDZKP/ref=ppx_yo_dt_b_asin_title_o01_s00?ie=UTF8&th=1">small LED flashlight </a>into the available chamber. </p><figure class="image image-style-align-center"><img src="https://media.prusaprinters.org/media/prints/87671/rich_content/920ef563-27ef-481f-a8cc-f34cedc35f36/image.png#%7B%22uuid%22%3A%2215773889-f38b-47cf-aaa9-57434f3f25e0%22%2C%22w%22%3A607%2C%22h%22%3A734%7D"></figure><figure class="image image-style-align-center"><img src="https://media.prusaprinters.org/media/prints/87671/rich_content/251e908c-ebd0-419e-9e42-37bd355511f1/20211201_160055.jpg#%7B%22uuid%22%3A%22c1f320bf-7547-405f-a21c-4348e8066fbf%22%2C%22w%22%3A2268%2C%22h%22%3A3252%7D"></figure><h3>Rocksim file</h3><p>I've added a Rocksim 9 file that will allow you to play with flight simulations. Remove the .TXT from the file name to make it easier to load.<img src="https://media.prusaprinters.org/media/prints/87671/rich_content/29defe92-b015-42ee-9fee-f36a57a48026/image.png#%7B%22uuid%22%3A%2225540b1b-7570-458d-a356-2a13c9cb46aa%22%2C%22w%22%3A976%2C%22h%22%3A349%7D"></p><p>In simulation this will fly on D motors to about 300'</p><h3><strong>FEEDBACK WANTED! </strong></h3><h4><strong>Because I live in a fire sensitive region of California, I've not test flown this. If you build and fly this PLEASE send videos, pictures and feedback!! </strong></h4>
With this file you will be able to print Gemini Lunar Lander with your 3D printer. Click on the button and save the file on your computer to work, edit or customize your design. You can also find more 3D designs for printers on Gemini Lunar Lander.