Gen6 (pre-deluxe) heat bead support w/ ATX power supply
thingiverse
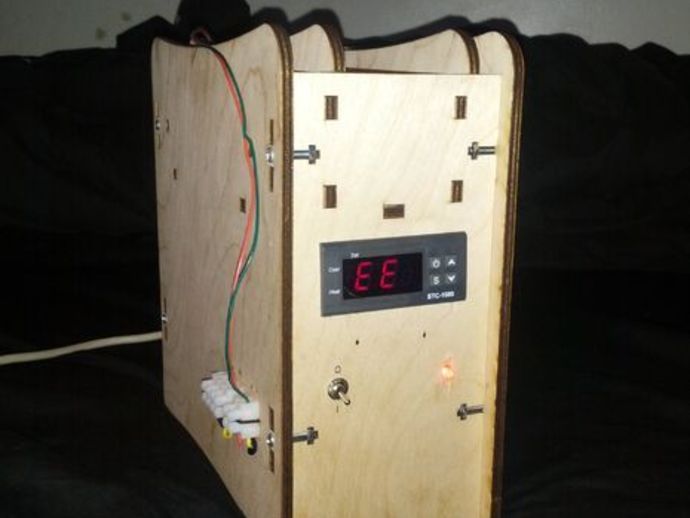
Figured I would share this on here, seeing what this site is all about. I also want to preface that I'm sure people can do this in their sleep, but I had a heck of a time finding an easy way to do this, and I figured I would share my set up. Also, the files are just an HTML file of the instruable, along with the image posted above. This project is to be used to control the heat bed of any 3D printer running Gen6, however, it can be used to run any 3D printer heat bed that can be properly powered with an ATX. This setup uses an ATX power supply, which also powers the Gen6 board. If you don't have an ATX power supply, it will be easy to implement one into a gen6 printer, or you could replace it with some other 12v power supply. The bread and butter of this is the PID heat controller. The markdown hates me, so have some raw link text to the one I used.http://www.ebay.com/itm/161040584256?ssPageName=STRK:MEWNX:IT&_trksid=p3984.m1439.l2649 The PID needs 110v to it, which I used from the ATX (just got some aptly rated wire from the ATX plug to it's input) to run. I then snagged a pair of the 12v/GND wires from the ATX to the heating switch, which also was in circuit with the heat bed. And, of course, the sensor from the PID is stuck on the bottom of the heatbed. If something here wasn't clear enough (which, I won't blame you, I suck at tuts) check out the instructable I have posted. And, again, enjoy the raw (pun intended) power of the linkhttp://www.instructables.com/id/Heatbed-temperature-controller-for-RepRap-using-Ge/ If you still need something, feel free to comment on this or the instructable page, or even private message me through either. Thanks for checking this out! Instructions Again, this is a fairly straight forward build. But to try and add a more step-by-step flow: 1)Acquire parts: PID controller w/ temp prob, power supply (ATX is recommanded, but you can use whatever will power your PID and heatbed) 2)Cut wires/Add wires: you can either cut off the plug ends for the ATX, and wire directly to the PID and heatbed, or buy new plugs and wire from the plugs. Either will work 3)Wire according to the PID controller: Your PID controller will come with a wire diagram. Hook the heatbed up the relay, the power up to the power, and the temperature probe to the temp probe hookups. 4)Test: Before you print, TEST IT. And test it in a safe place! If you can, test it on a strip with it's own fuse, so you don't pop your own breakers/break home fuses. Let it sit for a while, and keep a very close eye on it. I let mine site for 16 hours before I used it.
With this file you will be able to print Gen6 (pre-deluxe) heat bead support w/ ATX power supply with your 3D printer. Click on the button and save the file on your computer to work, edit or customize your design. You can also find more 3D designs for printers on Gen6 (pre-deluxe) heat bead support w/ ATX power supply.