Generic octoprint/octopi case for raspberry, 5V power supply and relay
prusaprinters
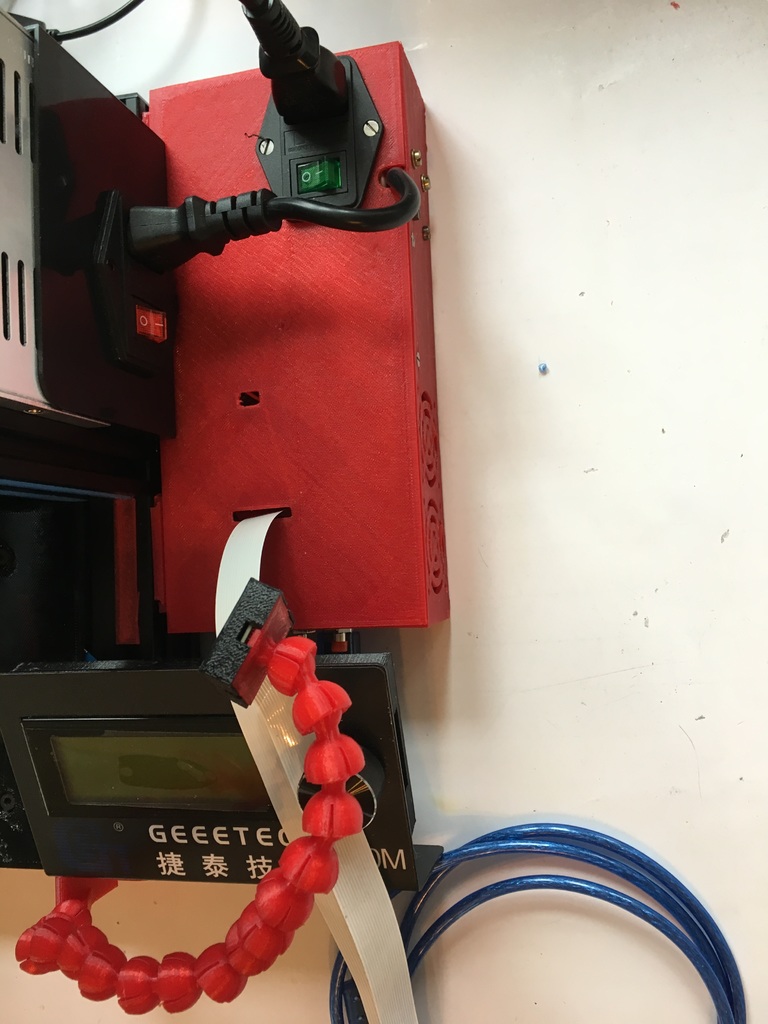
<p>This design it was done, to upgrade the A10, A10M, (Ender 3; not verified since I don’t have one at home, so if someone can verify if the design fits and inform me) and now also fitted it to my CR-10sPro and basically every printer when using the no attachment case, with the power relay feature to switch on/off the printer: <a href="https://github.com/caesar1111/Power-relay-for-octoprint-with-manual-buttons/blob/master/power-relay-for-octoprint-with-manual-buttons.md">https://github.com/caesar1111/Power-relay-for-octoprint-with-manual-buttons/blob/master/power-relay-for-octoprint-with-manual-buttons.md</a></p> <p>The design is featuring:</p> <ul> <li>A modular mock-up designed to feature most of the common Ender 3 type designs</li> <li>Base to mount the raspberry, the 5V power supply, the relay and the push buttons</li> <li>Lid to mount the IEC 3 Pin 320 C14 inlet and with cut-outs for the pi cam to be used with octoprint</li> <li>Snap in brackets to attach the base to the frame without screws (base comes with and without the attachment bracket rails)</li> </ul> <p>Additional parts needed:</p> <ul> <li>Raspberry pi (https://www.amazon.com/ELEMENT-Element14-Raspberry-Pi-Motherboard/dp/B07BDR5PDW/ref=sr_1_3?crid=ASCCJI9LHXLQ&keywords=raspberry+pi+3+b%2B&qid=1553938182&s=gateway&sprefix=ra%2Caps%2C315&sr=8-3)</li> <li>RS-25-5 power supply (e.g. https://www.amazon.com/MEAN-WELL-Switching-Resistance-Temperature/dp/B07BHQKNP1/ref=sr_1_1?keywords=rs+25-5&qid=1553617484&s=gateway&sr=8-1)</li> <li>2 channel relay 5V (e.g. https://www.amazon.com/Qunqi-Channel-Optocoupler-Expansion-Raspberry/dp/B078478SZ9/ref=sr_1_17?crid=CXURI6C091ZR&keywords=5v+relay&qid=1553608726&s=gateway&sprefix=5v+rel%2Caps%2C247&sr=8-17)</li> <li>3 pcs. push buttons (if possible with different colour) (e.g. https://www.amazon.com/URBEST-Momentary-Button-Switch-Pieces/dp/B01IU898QA/ref=sr_1_14?crid=2TF6BJU8SI5MC&keywords=button+electronic&qid=1553608797&s=gateway&sprefix=button+ele%2Caps%2C408&sr=8-14)</li> <li>Micro USB power cable (<a href="https://www.amazon.de/Delock-82697-Stecker-Kabelenden-schwarz/dp/B01A9GLG6Q/ref=sr_1_1?__mk_de_DE=%C3%85M%C3%85%C5%BD%C3%95%C3%91&crid=14JZ99DCT82ZP&keywords=micro+usb+stromkabel&qid=1553938388&s=gateway&sprefix=micro+usb+stromca%2Caps%2C173&sr=8-1&tag=thingiverse09-20">https://www.amazon.de/Delock-82697-Stecker-Kabelenden-schwarz/dp/B01A9GLG6Q/ref=sr_1_1?__mk_de_DE=%C3%85M%C3%85%C5%BD%C3%95%C3%91&crid=14JZ99DCT82ZP&keywords=micro+usb+stromkabel&qid=1553938388&s=gateway&sprefix=micro+usb+stromca%2Caps%2C173&sr=8-1</a>) (or just use a regular micro USB cable and clip of the USB side)</li> <li>Some female to female jumper wires (e.g. https://www.amazon.com/GenBasic-Solderless-Dupont-Compatible-Breadboard-Prototyping/dp/B01L5ULRUA/ref=sr_1_3?crid=1GVJ0KXXOGT7X&keywords=female+female+jumper+wires&qid=1553616573&s=gateway&sprefix=female+femal+jum%2Caps%2C266&sr=8-3)</li> <li>AC C13 power cord (https://www.amazon.com/10-Standard-Computer-Power-Cord/dp/B0002GRUIM/ref=sr_1_4?keywords=power+cord+c13&qid=1553939054&s=gateway&sr=8-4) or (<a href="https://www.amazon.de/Naths-Hardware-Kaltger%C3%A4tekabel-Kaltger%C3%A4testecker-Schutzkontakt/dp/B06XG6Z7NL/ref=sr_1_2?__mk_de_DE=%C3%85M%C3%85%C5%BD%C3%95%C3%91&keywords=c14+cabel&qid=1553939039&s=gateway&sr=8-2-spell&tag=thingiverse09-20">https://www.amazon.de/Naths-Hardware-Kaltger%C3%A4tekabel-Kaltger%C3%A4testecker-Schutzkontakt/dp/B06XG6Z7NL/ref=sr_1_2?__mk_de_DE=%C3%85M%C3%85%C5%BD%C3%95%C3%91&keywords=c14+cabel&qid=1553939039&s=gateway&sr=8-2-spell</a>) depending on your country you have to pick the right cord to match the requested wire diameters.</li> <li>Some wire terminals to ensure proper connections for the AC high voltage wiring (e.g. https://www.amazon.com/Glarks-Disconnect-Electrical-Solderless-Connectors/dp/B01E4RAVI0/ref=sr_1_8?keywords=wire+terminals&qid=1553608962&s=gateway&sr=8-8)</li> <li>6 pcs. M3x8 screws ISO 10642 (lid)</li> <li>4 pcs. M3x15-20 screws ISO 10642 (power cord bracket)</li> <li>2 pcs. M3x8 screws ISO 7380, ISO 4762 or similar (5V power supply)</li> <li>8 pcs. M2,5x8 screws ISO 7380, ISO 4762 or similar (raspberry and relay)</li> </ul> <p>Optional 2 cooling fans:</p> <ul> <li>2 pcs. 40mm x 40mm 5V fan (https://www.amazon.com/GDSTIME-Small-Brushless-Cooling-Cooler/dp/B00MYZAGBW/ref=sr_1_5?keywords=40x40+5v+fan&qid=1553942559&s=gateway&sr=8-5)</li> <li>8 pcs. M2,5x20 screws ISO 7380, ISO 4762 or similar (fan)</li> <li>8 pcs. M2,5 nut</li> </ul> <p>Assembly:</p> <p>assemble case as shown on pictures.</p> <p>you might want to widen the holes for the screws with a drill (depending on the printing quality you select) or (as I prefer to do) before assembling anything to the case, use a blow torch to warm up the screw brackets and screw in the screws to gently form a thread inside the brackets. Let i cool down for a few seconds and undo the screw again.</p> <p>snap rail clips into printer rails.</p> <p>lift printer and let the clips glide into the brackets of the case.</p> <h3>Release notes:</h3> <h3>V2</h3> <p>In the V2 files I added an improved clip (old one was snapping) and a base with a cut-out to take out the raspberry microSD card without disassembly.</p> <h3>V3</h3> <p>In the V3 files I changed the fan grid to vertical slots for easier printing</p> <p>In the V3 mockup (FreeCAD model 8) version of the model I included an adapter for the genue Meanwell RS-25-5 which only has two threats on the bottom.</p> <p>The V3 Railclip is more rigid and easier to clip onto the rail</p> <h3>V4</h3> <p>In the V4 files you will find a new base wich now allows for a direct mounting of the MW RS-25-5. also</p> <p>I improved the adapter plate for mounting the RS-25-5 to older V3 bases.</p> <p>Also you will find attachment plates which will mount on the CR-10sPro. In mounts on the right side of the case just in front of the power inlet. You just have to use 4mm longer M3 screws to srew the plates into the existing case holes.</p> <h3>Print Settings</h3> <p><strong>Printer:</strong></p> <p>CubeAnet8</p> <p><strong>Rafts:</strong></p> <p>Yes</p> <p><strong>Supports:</strong></p> <p>No</p> <p><strong>Resolution:</strong></p> <p>0,2</p> <p><strong>Infill:</strong></p> <p>50</p> <p><strong>Filament:</strong> Sunlu PETG</p> <p>red</p> <p><strong>Notes:</strong></p> <p>...care for a proper build plate adhesion to prevent warping.</p> <h3>How I Designed This</h3> <p><strong>freeCAD</strong></p> <p>as with all my designs, the freeCAD model is included, you you have the chance to fine tune to your specific requirements.</p> Category: 3D Printer Accessories
With this file you will be able to print Generic octoprint/octopi case for raspberry, 5V power supply and relay with your 3D printer. Click on the button and save the file on your computer to work, edit or customize your design. You can also find more 3D designs for printers on Generic octoprint/octopi case for raspberry, 5V power supply and relay.