George Nelson Spindle Clock
prusaprinters
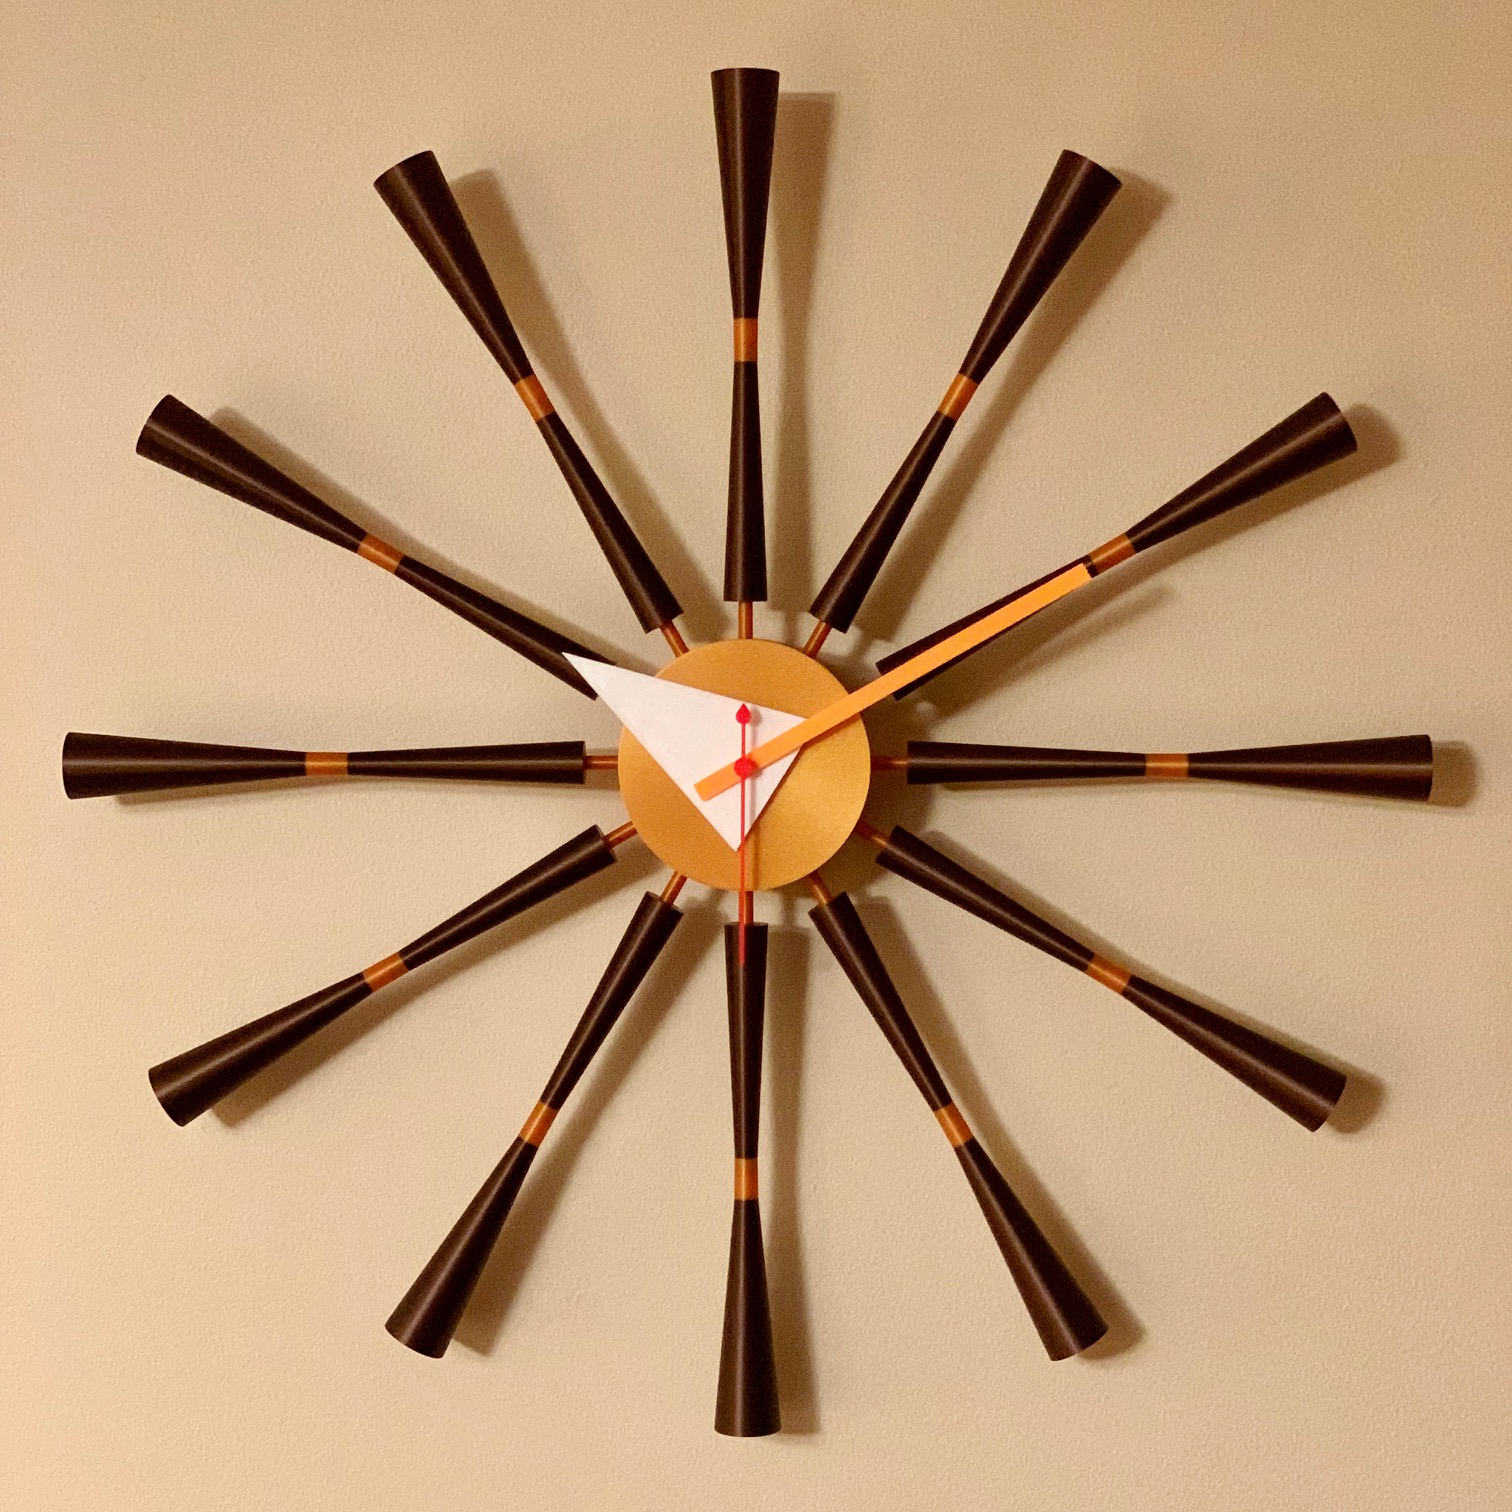
<p>As a fan of George Nelson’s design work, I decided to re-create his Vintage Spindle Clock and turn it into a 3D printing project. The model was drawn in Rhino 3D, Sliced in Prusa Slicer, and printed on a Prusa MK3 printer using MatterHackers Pro Series PLA. Someday I would like to own an original George Nelson clock, but for now I decided to build my own. More info on George Nelson can be found here - <a href="http://www.georgenelsonfoundation.org/">http://www.georgenelsonfoundation.org/</a></p><p> </p><p>Parts / Settings / Materials:</p><p>-Clock Casing – 1 needed, I used Gold Filament with 20% infill, Top & Bottom layer settings: Archimedean Cords, Seam Position set to Rear, Remove any debris from the nut pocket before inserting the nut.</p><p> </p><p>-Clock Spoke Connectors- 12 needed, I used Gold Filament with 100% infill, Top & Bottom layer settings: Archimedean Cords, Seam Position set to Rear.</p><p> </p><p>-Clock Retaining Ring – 1 needed, I used Gold Filament with 20% infill, Top & Bottom layer settings: Archimedean Cords, Seam Position set to Rear. This is used to lock all the Spoke Connectors in place and give the Clock Back a place to rest.</p><p> </p><p>-Clock Spoke Connector Glue Template- 1 needed, I used Black Filament with 20% infill. This is used to help with gluing all the Spoke Connectors in proper alignment. Let the build plate cool before removing.</p><p> </p><p>-Clock Spoke Top- 12 needed, I used Bronze Filament with 10% infill, Top & Bottom layer settings: Archimedean Cords, Seam Position set to Rear.</p><p> </p><p>-Clock Spoke Middle- 12 needed, I used Gold Filament with 15% infill, Top & Bottom layer settings: Archimedean Cords, Seam Position set to Rear.</p><p> </p><p>-Clock Spoke Bottom- 12 needed, I used Bronze Filament with 10% infill, Top & Bottom layer settings: Archimedean Cords, Seam Position set to Rear.</p><p> </p><p>-Clock Spoke Parts Glue Template- 1 needed, I used Black Filament with 20% infill. This is used to help with gluing all the Spoke Parts together. Let the build plate cool before removing. </p><p> </p><p>-Clock Spoke Glue Template- 4 needed, I used Black Filament with 20% infill. This is used to help with gluing all the Spokes in proper alignment. Let the build plate cool before removing. </p><p> </p><p>-Clock Back – 1 needed, I used Gold Filament with 20% infill, Top & Bottom layer settings: Archimedean Cords, Seam Position set to Rear. Remove any debris from the fastener pocket before inserting the fasteners.</p><p> </p><p>-Clock Hour Hand- 1 needed, I used White Filament with 100% infill, Top & Bottom layer settings: Rectilinear, Fill Angle 90. Let the build plate cool before removing.</p><p> </p><p>-Clock Minute Hand- 1 needed, I used Orange Filament with 100% infill, Top & Bottom layer settings: Rectilinear, Fill Angle 90. Let the build plate cool before removing.</p><p> </p><p>-Clock Second Hand- 1 needed, I used Red Filament with 100% infill, Top & Bottom layer settings: Concentric. Let the build plate cool before removing.</p><p> </p><p>Hardware:</p><p>- I used spare Prusa MK3 hardware: 2 M3nS Square nuts, and 2 M3x18 fasteners.</p><p>- I used a Hicarer High Torque Quartz Clock Movement. It measures 55.6mm X 55.6mm X 15.8mm with a thread depth of 6.7mm, and it uses 1 AA battery. I reused the second hand fitting and glued it into the 3D printed second hand. I will include the product link below so you can purchase the exact model. The hands for this clock were designed to fit this movement.</p><p><a href="https://www.amazon.com/Hicarer-Torque-Quartz-Movement-Replacement/dp/B07DKY3LP9/ref=sr_1_8?keywords=High%2BTorque%2Bclock%2Bmovement&qid=1550337416&s=gateway&sr=8-8&th=1">https://www.amazon.com/Hicarer-Torque-Quartz-Movement-Replacement/dp/B07DKY3LP9/ref=sr_1_8?keywords=High%2BTorque%2Bclock%2Bmovement&qid=1550337416&s=gateway&sr=8-8&th=1</a></p><p> </p><p>Assembly Instructions:</p><ul><li>Start with the Clock Casing, 2 M3ns nuts, all 12 Spoke Connectors, the Clock Retaining Ring, and the Spoke Connector Glue Template.</li></ul><p> </p><ul><li>Install the M3ns nuts into the nut pockets. Be sure to remove any debris from the nut pockets prior to install. Place a finger between the Clock Casing wall and the Support Column and gently apply pressure while installing the nuts so you don't break the support column. </li></ul><p> </p><ul><li>Install all 12 Spoke Connectors, then place glue around the notch and the end of each Spoke Connector. I used clear glue that allows time to set.</li></ul><p> </p><ul><li>Install the Clock Retaining Ring, securing all the Spoke Connectors in-place. </li></ul><p> </p><ul><li>Place the Clock Casing assembly (back facing up) in the Spoke Connector Glue Template to insure proper Spoke Connector alignment. Then rotate each Spoke Connector so that the print seam is facing the back of the clock.</li></ul><p> </p><ul><li>While the glue is setting on the Spoke Connectors, gather all the Spoke Parts (Top, Middle, and Bottom) and begin gluing them together using the Spoke Parts Glue Template to ensure proper alignment. Rotate each part so that the print seams line up.</li></ul><p> </p><ul><li>While the glue is setting on the all the Spoke Parts, gather the 4 Spoke Glue Templates and set them up around the Spoke Connector Glue Template.</li></ul><p> </p><ul><li>Next glue all 12 Clock Spokes onto the Spoke Connectors using the Spoke Glue Templates to insure proper alignment. Rotate each Spoke so that the print seam is facing the back of the clock.</li></ul><p> </p><ul><li>Once all the glue on the Spokes has set you can lift the clock away from the Glue Templates and install the Clock Movement using the supplied locking nut.</li></ul><p> </p><ul><li>Once the movement is installed you can install the Clock Back using the 2 M3x18 fasteners. Be sure to remove any debris from the fastener pockets before installing the fasteners. Also align the opening of the Clock Back with the battery port on the Clock Movement so it can be accessed.</li></ul><p> </p><ul><li>Next install the Clock Hands, Hour Hand first, than Minute Hand, and then Second Hand. Install the AA battery and then set the time.</li></ul><p> </p><ul><li>You're all done! Time to find a nice place to mount it. Remember to take a picture and share it!</li></ul><p> </p><p>*Non-Commercial License- Make one for yourself or as a gift to give to friends and family.</p>
With this file you will be able to print George Nelson Spindle Clock with your 3D printer. Click on the button and save the file on your computer to work, edit or customize your design. You can also find more 3D designs for printers on George Nelson Spindle Clock.