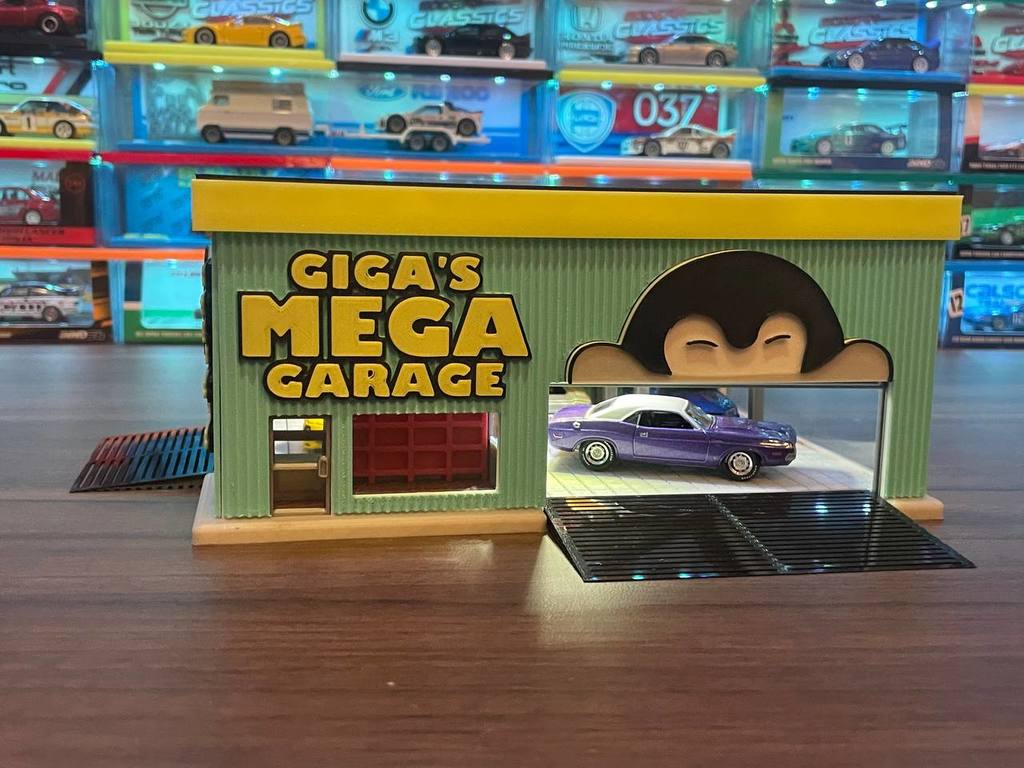
Giga's Mega Garage (Generic 1/64 Garage)
thingiverse
###Any suggestion is welcomed! Feel free to join my Facebook group to let me know what you want: https://www.facebook.com/groups/1115757609295068 ###Custom display base are also available from $5! Contact me to discuss what you want! ###If you like my work, you can support me through Patreon: https://www.patreon.com/gigapenguin3dprints/posts ###Compiled RAR file is available in download section! ###Update 1: 14/12/22 Added new front walls, front deco and flat base: - FlatBaseMain - Pillar Holes + No Office - FrontDecoBuild - No Office - FrontWall - No Office ###Update 1: 2/12/22 Added new walls, decoration walls and roof: - LeftWalls - No Doors - BackWalls - No Windows - Side Deco - No Windows - BackDeco - No Windows - Roof4 - SLANT - Frame - Tight Fit Description ==================== This is designed as an expanded version of my Giga's Garage that was released before: https://www.thingiverse.com/thing:5430180 The new Giga's Mega Garage is more than double the size of the old design and it could comfortably fits up to 6 cars inside the garage. The garage has also been redesigned to look more like a full shop instead of having 1 wall missing. ###Plain version and no penguin art version is available too! The cars I used in the photos are: - Mazda RX7 A Spec (Tarmac Works/Global64) - 1970 Dodge Challenger RT (Greenlight) - Nissan Skyline GT-R R34 (Mini GT) - Ruf CTR Anniversary (Mini GT) - Lamborghini Countach 25th Anniversary (Tomica Premium) - BMW M4 (Mini GT) - Lamborghini Huracan LBWK (Mini GT) - Datsun Z (Kaido House/Mini GT) - Datsun 510 (Kaido House/Mini GT) - 1969 Dodge Charger RT (Tomica Unlimited) - Mitsubishi Lancer Evo 7 (Tomica Unlimited) - Lamborghini Aventador LB V2 (Mini GT) - Nissan GT-R LBWK (Mini GT) - Nissan S15 LBWK (Mini GT) - Dodge Charger SRT8 Police (Matchbox) The flat base is made to fit specific cars for myself, If you wish to have a display base tweaked to fit to a different car from a different brand, please send me these dimension for the display base holes: https://imgur.com/5T6mb2L I have also included flat base with no holes that could be used for any cars. The display base is separated into many parts for easy printing, build and colour swap. The following are all the parts and variants included in this design: ###Floor & Base Parts: 1) Base (Base - Combined.STL, Base - Combined + Service Hole.STL, Base - Split Pt1.STL & Base - Split Pt2.STL) 2) Flat Base (FlatBaseMain.STL, FlatBaseMain - Pillar Holes.STL, FlatBaseMain - Pillar Holes + Service Hole.STL & FlatBaseMain - No Pillar Holes.STL) 3) Office Flat Base (FlatBaseOffice.STL) ###Main Walls Parts: 1) Back Wall (BackWall.STL) 2) Front Wall (FrontWall.STL) 3) Side Garage Door Wall (LeftWall.STL) 4) Right Wall (RightWall.STL & RightWall - Opened.STL) 5) Office Partition Wall (OfficeWall2.STL) ###Main Walls Decoration Parts: 1) Front Decoration (FrontDecoBuild.STL, FrontDeco - Plain.STL, FrontDecoBuild - No Penguin.STL) 2) Side Garage Door Wall Decoration (SideDoorDeco.STL, SideDoorDeco - No Penguin.STL & SideDoorDecoBuild.STL) 3) Right Wall Decoration (SideDeco.STL & SideDeco - LargeWindow.STL) 4) Back Wall Decoration (BackDeco.STL) ###Garage Doors Parts: 1) Door Guides (DoorGuide.STL) 2) Garage Door (GarageDoor - Front.STL & GarageDoor2.STL) 3) Lock Hook (Hook2.STL) 4) Hook Holder (HookThingFixed.STL & HookThingFixed2.STL) 5) Hook Pin (Pin2.STL) ###Car Lifts Parts: 1) Car Lift Base (CarLiftBase - Countach.STL, CarLiftBase - No Holes + Thin.STL & CarLiftBase2.STL) 2) Car Lift Pillar (CarLiftLegsSingleShortenV2.STL) 3) Car Lift Lock (LockThing3.STL) 4) Car Lift Pillar Cap (PillarCap2.STL) ###Roof Parts: 1) Roof Frame (Roof4 - SLANT - Plain.STL & Roof5 - SLANT - Pattern.STL) 2) Roof Cover For LED Light (LED Cover.STL) 3) Roof Cover No LED (No LED Cover.STL, No LED Cover2.STL & No LED Cover3.STL) ###Interior Prop Parts: 1) Exterior Office Door (Door.STL) 2) Interior Office Door (Door2.STL) 3) Storage Box (GarageBox2.STL & GarageBox3.STL) 4) Staircase Handrail (HandRail1.STL) 5) Office Top Handrail (HandRail2.STL) 6) Office Roof (OfficeRoofBuild.STL) 7) Ramps (Ramps.STL & Ramps2.STL) 8) Ramp Extension (RampExtension1.STL & RampExtension2.STL) 9) Rim Rack (RimRack.STL) 10) Office Shelf (Shelf.STL) 11) Staircase (StairsBottom3.STL) 12) Office Table (Table.STL) 13) Tyre Rack (TyreRack.STL) 14) Tyre Prop (TyreProp.STL) 15) Small Shelf (OfficeTopShelf.STL) Parts Variations ==================== ###Base There is a total of 3 variation of base: 1) Base - Combined: Single piece base 2) Base - Split Pt1 & 2: Base split into 2 pieces for easy printing (request from Facebook member) 3) Base - Combined + Service Hole: Under the car lifts there is a service hole (request from Facebook member) ###Flat Base There is a total of 4 variation: 1) FlatBaseMain: Standard flat base with tying holes for the cars 2) FlatBaseMain - Pillar Holes: No tying holes but pillar holes included 3) FlatBaseMain - Pillar Holes + Service Hole: No tying holes but pillar holes and service hole is included 4) FlatBaseMain - No Pillar Holes: No tying holes, pillar holes and service holes. Not meant for car lifts or use standalone car lifts from here: https://www.thingiverse.com/thing:5436505 ###Car Lift Base There is a total of 3 variation: 1) CarLiftBase - Countach: Designed holes for Tomica Premium Lamborghini Countach 25th Anniversary 2) CarLiftBase - No Holes + Thin: Easy to print and no holes version, has a gape for the car wheels so it wont roll off easily. It will fit most Hot Wheels 3) CarLiftBase2: Have tying holes that fit most Hot Wheels. Print Settings ==================== Nozzle size = 0.3 mm (Should be printable with 0.4) Layer height = 0.2 mm Filament change layer for colours on "FlatBaseMain.STL": 1) Start (Gaps colour, mine is in black) 2) Layer 6 (Overall tiles colour, mine is in white) Filament change layer for colours on "OfficeFlatBase.STL": 1) Start (Gaps colours, mine is in black) 2) Layer 6 (Floor panels colour, mine is in white) Filament change layer for colours on "FrontDecoBuild.STL & SideDecoBuild.STL": 1) Start (Wall colours, mine is in teal) 2) Layer 9 (Shop name outline, mine is in black) 3) Layer 14 (Shop name lettering colours, mine is in yellow) *No penguin art variant stops here! 4) Layer 19 (Penguin face colours, mine is in white) 5) Layer 24 (Penguin tummy colours, mine is in grey) 6) Layer 20 (Penguin head and eyes colours, mine is in black) Assembly ==================== ###Flat Base and Base To allign the flat base, It is highly recommended that you print the back wall first. Place the back wall into the base then fit the flat base on to it, you can use the car lifts pillar to lock the position of the flat base. ###Building The right side walls and front walls of the building should fit into the gap between the flat base and base. The "glass" seen in my photos are made with PVC sheet, I double side tape mine on to the walls. If you have printed the exterior office door, it is recommended to tape it or glue it now. ###Office Area Office wall will slide into guide on the front wall, then use the side garage door to slide between all the walls. The side garage door has a gap to lock the office walls in place. The office flat base will slide nicely into the office space after the walls are installed. It is recommended to tape or glue the interior office door to the office wall now, best to have the office table and shelf printed too to place on the flat base. The "glass" seen in my photos are made with PVC sheet, I double side tape mine on to the walls. Office roof can be printed at a later stage, it will fit on top of the office walls and cover a part of the staircase. ###Car Lifts The car lifts pillars will fit nicely into the holes cut through the flat base and on the base. It maybe slightly loose when place into it, I highly recommend have a car lift base printed and lock at the lower position to all 4 piece of the pillars as allignment. Put some super glue in all holes and place the pillars with the car lift base on it. Too much glue might over spill to the car lift base. ###Roofs There are 2 roof frames, one is flat with no pattern and the second one has similar pattern to the decoration walls. Both will work on the display. The Roof cover will slide into the frame, glue/tape is optional. There are a total of 4 roof covers, 3 "glass" roof for no LED build and 1 LED light build. The LED build uses a small LED that is meant for car interior, it has a build in battery so I just use the LED glue on to the base as seen in my photos. ###Building Decoration All decoration parts are printed and tape on to the walls. If you prefer a different design or uses printed paper design, all decoration walls can be skipped. ###Garage Door Print the door guides first, the guides will fit into the gap in provided on the flat base, align it as straight as possible with the garage door walls. The garage door will slide nicely in between the guides. The door locks will need to be printed and tape/glue on to the walls, the hook will secure the garage door at a position. ###Others Interior props are just mini shelfs and you can put them at wherever you think it fits best. The ramp extensions are to increase the length of the ramps so that cars can easily roll in and out of the garage, the original was too steep for most cars to gets on. If you are unsure on how to assemble them, please send me a message or leave a comment. Others ==================== Feel free to send me any feedback on how to improve the design. Suggestion on display base designs are welcomed too. I can be contacted through Instagram or Twitter too: Twitter: https://twitter.com/Giga_Penguin Instagram: https://www.instagram.com/GigaPenguin3DPrinting/ Facebook: https://www.facebook.com/groups/1115757609295068/
With this file you will be able to print Giga's Mega Garage (Generic 1/64 Garage) with your 3D printer. Click on the button and save the file on your computer to work, edit or customize your design. You can also find more 3D designs for printers on Giga's Mega Garage (Generic 1/64 Garage) .