Glow in the Dark Robotic Clock
prusaprinters
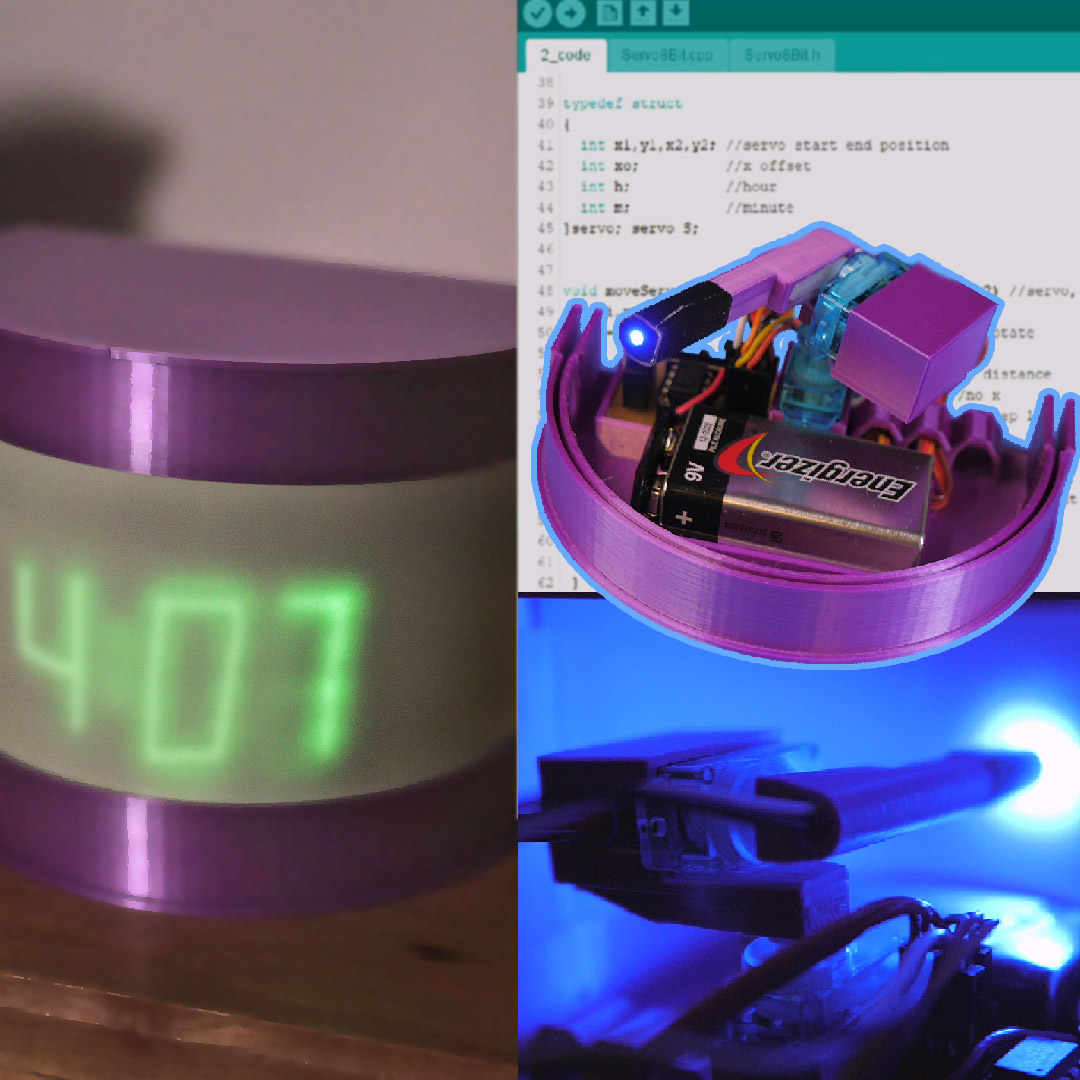
<p>I spent a lot of time creating the YouTube video so watch it too for assembly and how it works!</p><figure class="media"><oembed url="https://www.youtube.com/watch?v=WlYbBn4rgSI"></oembed></figure><p>This is my clock design I made for the Prusa clocks contest. My idea is to robotically control a light to draw the current time on a glow in the dark screen. </p><p>This project involved 3D printing, circuit board design, and microcontroller programming. I'm happy with how it turned out and had a lot of fun making it and I hope you enjoy watching the video! </p><p><strong>Materials</strong></p><p>Note: Read and follow all safety instructions and wear proper PPE.</p><p>1 7805 5V regulator</p><p>1 ATtiny85 microcontroller</p><p>2 LS-0006 servo (or similar type and dimensions)</p><p>1 Mini 3 pin switch</p><p>1 Blue LED</p><p>1 9V battery and connector</p><p>1 3 Pin jumper wire</p><p>1 Glow in The Dark Sticker A5 Paper 5pcs (Amazon)</p><p>1 Overhead Projector Sheets (Amazon)</p><p>3D Printed file attached. (0.2mm layer height. 20% infill. No supports)</p><p><strong>PCB</strong></p><p>These parts aren't going to move on their own, so we need to create the circuit board. I like to use a CNC machine to drill out the holes, carve out the traces, and cut out the board. Load the program onto the microcontroller and solder the components. </p><figure class="image image_resized" style="width:29.98%;"><img src="https://media.prusaprinters.org/media/prints/68660/rich_content/93a2bf01-e74a-49ea-8b3c-83c121f5cf39/q10.png#%7B%22uuid%22%3A%22e2db3150-b1fd-4f3a-866d-dd507b159c0f%22%2C%22w%22%3A1080%2C%22h%22%3A1080%7D"></figure><p><strong>3D Pint and assemble</strong></p><p>Solder the led to the wires and insert them into the 3D printed holder. Wrap the tip in dark electrical tape to prevent the light from leaking through.</p><p>The servo arm's need to be rigid so superglue the arm into position on the 3D print.</p><p>We need to know where the center position is on the servos so I programmed the servos to go to the middle 90 degrees at the startup so mark this with a sharpie and attached the 3D printed parts.</p><p>The loose wires can be inserted into the loops on the left side if needed.</p><figure class="image image_resized" style="width:37.07%;"><img src="https://media.prusaprinters.org/media/prints/68660/rich_content/5a9edc9c-0478-4f10-8a1d-7f71357d35c1/16.jpg#%7B%22uuid%22%3A%222031b8ba-69a2-4c7f-9cfe-d6f591bfe898%22%2C%22w%22%3A1080%2C%22h%22%3A1080%7D"></figure><p><strong>Glow in the Dark Paper</strong></p><p>The screen that the light will project onto is this glow in the dark sheet is like a big sticker and very sticky so I carefully stuck it onto the clear plastic sheet and cut it out. Dimensions: 150mm x 75mm.</p><figure class="image image_resized" style="width:37.91%;"><img src="https://media.prusaprinters.org/media/prints/68660/rich_content/58079127-b94b-450d-9fd3-53abec188529/15.jpg#%7B%22uuid%22%3A%22fbb7af11-c617-4b18-9894-790df0f7320a%22%2C%22w%22%3A1028%2C%22h%22%3A1028%7D"></figure><p><strong>Finish!</strong></p><p>The build is complete and you can load the the code I attached and watch the light draw out the time. It's mesmerizing to watch and I am very happy this all came together and works! Thank you so much for watching the video and follow me at YouTube - 3DSage for more fun projects!</p><p>www.youtube.com/c/3dsage</p><figure class="image image_resized" style="width:45.6%;"><img src="https://media.prusaprinters.org/media/prints/68660/rich_content/cd794063-56c0-40a1-a6d0-9089532bc707/cover_square.jpg#%7B%22uuid%22%3A%22017a7748-0069-4ff8-9659-d309ef49aa87%22%2C%22w%22%3A1080%2C%22h%22%3A1080%7D"></figure>
With this file you will be able to print Glow in the Dark Robotic Clock with your 3D printer. Click on the button and save the file on your computer to work, edit or customize your design. You can also find more 3D designs for printers on Glow in the Dark Robotic Clock.