GM Screen
thingiverse
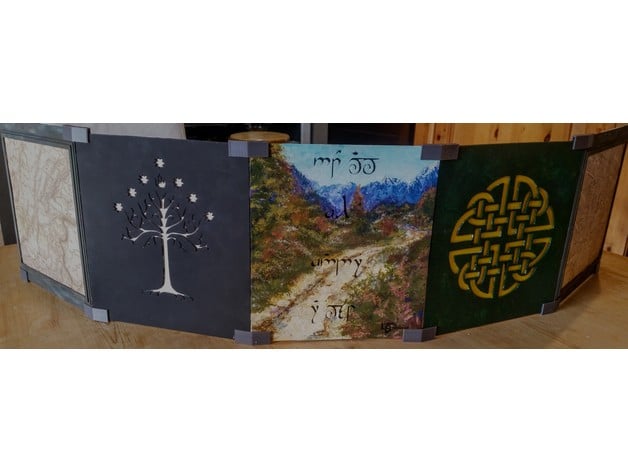
Please post pictures of your makes. I'm excited that so many have added this to their Gaming Collections! I saw "Recycled CD Cases: Doll's House // Toy Shelves" http://www.thingiverse.com/thing:1307851 and immediately wished we still had all of our CD cases. Then I realized these CD Case Clips could be Re-Mixed to help me build a better Game Master Screen! I joined the "OpenSCAD" Thingiverse Group, which helped me to learn OpenSCAD basics in one month (Dec 2016). I could not have done this design Re-Mix without the help of several members of the Group. A HUGE shout out to http://www.thingiverse.com/wd5gnr for all the help he has given me. Al, I could not have done this without you and your Kindle Book [https://www.amazon.com/OpenSCAD-3D-Printing-Al-Williams-ebook/dp/B00I6K19OM]! Special Thanks to: --- Source of Elvish Runes for "Not all who wander are lost..."http://derhobbit-film.de/rune_generator.shtml ---Source of "White Tree of Gondor" imagehttps://en.wikipedia.org/wiki/File:Blason_Gondor.svg (This image is used solely for personal enjoyment) Since I cited the image/file sources, I did not include The White Tree of Gondor, the Celtic Roundel 3, or the Not All Who Wander Are Lost .stl's in this set of files. Decoration is personal and this Thing is the base for GM self-expression. I have published The White tree of Gondor as a stencil already and will publish the Remix of the Celtic Roundel 3 and the Not All Who Wander... as stencils in the next day or so. Print Settings Printer: Prusa i3 MK2 Rafts: No Supports: Yes Resolution: Normal, Used Prusa's 'Default Support Settings' in their customized version of Slic3r Infill: Everything Prints as 'Solid' Notes: Only the Map Frame requires supports. All prints used a 5mm Brim. The Screen takes most of the print bed space and the corners curl up if the print gets exposed to cold drafts. I used a glue stick to ensure the print adhered to the bed. Post-Printing To Paint or Not... I wanted to print this in Black filament and use the panels immediately, but my husband had other ideas. I primed the panels with Gesso. Some panels printed rough and the gesso filled the problem areas (paint, dry, sand - repeat as needed). The water based "Wood Putty" (found at most home improvement stores) would work as well. After the panels were prepared, I used Acrylic paint to decorate the panels. The center panel is my original artwork. How I Designed This The Need My husband is an amazing Game Master, but his file folder screen was woefully inadequate. The next game session, the file folders had been customized with scissors and included taped on, space-saving upgrades. The aesthetics were still awful though. The Goals Easy to put together and use. Easy to take apart and store. Easy on the eyes. The Prototype I pulled one of the CD Clips from http://www.thingiverse.com/thing:1307851 into Prusa's customized Slic3r to do some cut and paste work, The U-Channel became narrower and was re-arranged into a 135 degree angle (ideal for a 5-panel screen arrangement). I used cardboard to make five panels and put the screen together with the Re-Mixed Clips. This worked okay, so I drafted a small sample panel (40mm wide x 60mm tall x 1.75mm thick) and a fresh Clip U-Channel Unit in OpenSCAD and printed 6 small test panels and 8 clips as a proof of concept. The Final Design The basic GM Screen dimensions are: 194mm wide x 210mm tall x 1.7mm thick. The U-Channel is 5.4mm wide x 10 mm high x 1.8mm thick sides. The 1.8mm groove that receives the panel is slightly larger than the panels. The extra 0.1mm is just enough to hold a panel securely and leaves room for any paint layers. I also made simple hooks and double-sided hooks to hang on the top edge of the screens. The double-sided hooks will stabilize a wobbling screen if used at the bottom edge - an unanticipated bonus! Bonus Feature! A Frame and Insert Panel Design I had a new screen idea a few days ago, but there is a small compatibility issue. The GM Screen Map Frame is 215mm high (the Original GM Screen is 210mm high). Since the two screen designs can still be used together, I'm including those files as well. GM Screen Map Frame: 194mm wide, 215mm high, 1.7mm thick where the clips hold the frames togther GM Map Screen Insert: 178mm wide, 174mm high, 1.5mm thick You can make the insert from cardboard if you like. I tried this and prefer the printed insert. It may be okay to make it as thin as 1mm, but I have not tested this yet. See the documentation in the 'GM Map Screen Insert' OpenSCAD file for directions and suggestions for mounting the panel in the Frame. The short answer: Friction holds it in place okay. I'm working through a possible toggle clip solution. Meanwhile, blue tape works great and is the simplest solution. Custom Section Print Times Sometimes it's nice to know how long it took someone else to print a file. We keep a running log by our printer. It makes it easier to take turns! NORMAL resolution (0.2), 5mm Brim, SUPPORTS if needed Set of four 135 degree Clips - 1:06 GM Map Frame Screen - 3:28 GM Map Screen Insert - 5:17 Double-Sided Hooks, group of 12 - 0:50 Basic Hooks, set of 12 - 0:36
With this file you will be able to print GM Screen with your 3D printer. Click on the button and save the file on your computer to work, edit or customize your design. You can also find more 3D designs for printers on GM Screen.