Golden Age Starman Gravity Rod - parts for internal lighting
thingiverse
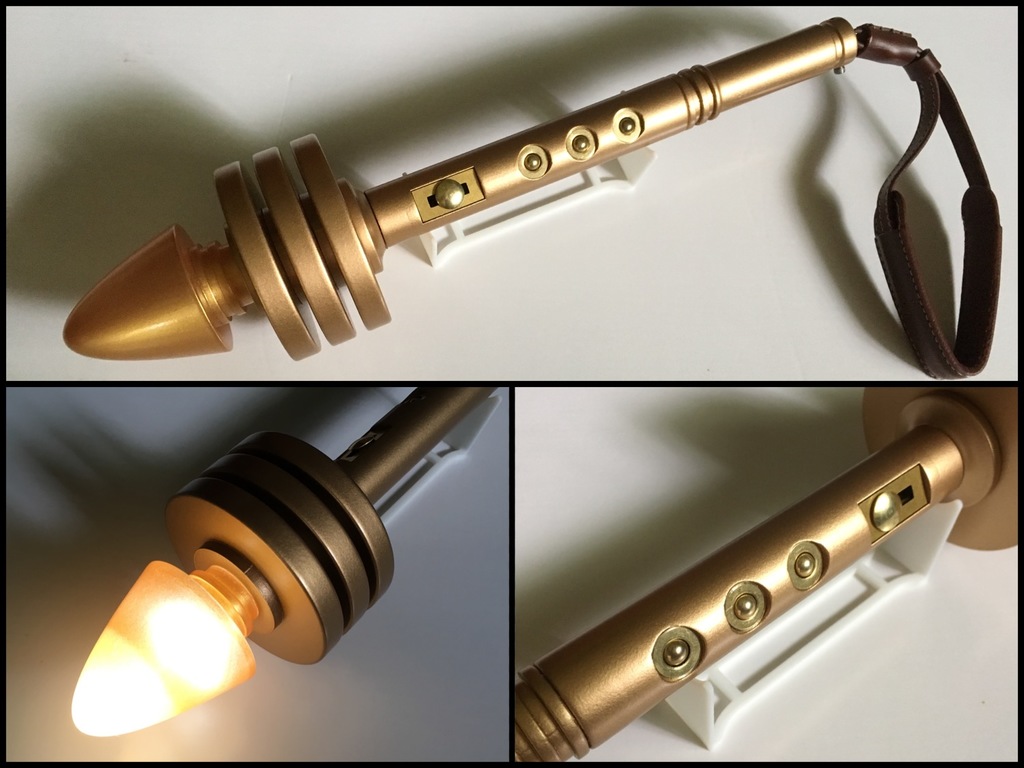
Here's a remix of bzkeyes's fantastic Gravity/Cosmic Rod. I added a channel for wiring to several pieces, as well as a hollow area in the pommel for a small LiPo battery and charger board (harvested from a slim rechargeable penlight). grav rod structure tube.stl Gravity-Rod_Bottom_hollow.stl Gravity-Rod_Grip_hole.stl Gravity-Rod_Link_Coil_hole.stl (refer to the original design for the remainder of files not included here) Enhanced button assemblies are included - they're designed to hold a common 6 mm pushbutton switch: https://www.amazon.com/gp/product/B01913QOEM/ An 8-32 brass acorn nut is set over the switch actuator to act as a switch cap. On my build I used some washers as the button bezels but printed parts are included as well. This button assembly can also be used on a static build or with the original files (only one of the switches on my build is connected to the flashlight circuit). grav rod switch base.stl grav rod switch bezel.stl Instead of a separate lanyard cap, the end of Gravity-Rod_Bottom_hollow has a hole sized for threading to accept a 3/4" long 4-40 screw (you will need a 4-40 tap). This screw runs through the end of the lanyard loop or a small ring attached to the same and allows access to the charging port when removed. Here is a link to the simple USB flashlight (only the circuit board within was used): https://www.amazon.com/gp/product/B078ZFJ3Z7/ I trimmed the board just past the end of the battery. Solder contacts are present further down to attach wires which were then run through the wire channel in the body: When fitting the battery and charger board, I needed some additional room at the inner top of the Gravity-Rod_Bottom_hollow piece so that the board would fit far enough in as to not interfere with the lanyard loop - insert a Dremel bit into the small end at an angle to grind out additional material. After assembly a small piece of acetate was placed between the micro-USB port and the lanyard loop to prevent damage. To allow the emitter to glow, I printed it and the Emitter_Ring in clear resin. The emitter piece was modified to be shelled within ChiTuBox and I added a 10 mm hole at the center of the recess in its base to allow the inside to be cleaned - this also gave a space for the flashlight LED to be inserted into. After sanding the resin smooth, thin coats of gold paint were applied with no primer such that when reflecting light from outside, the emitter would appear gold, but would still permit the bright flashlight LED glow from within to pass through (think about how mirrored sunglasses behave when a light is held behind them). Only one other small change from the original design - instead of the printed slider head piece, I used a brass-plated thumbtack inserted into a small hole drilled into the slider block.
With this file you will be able to print Golden Age Starman Gravity Rod - parts for internal lighting with your 3D printer. Click on the button and save the file on your computer to work, edit or customize your design. You can also find more 3D designs for printers on Golden Age Starman Gravity Rod - parts for internal lighting.