GoldiBox Fluid Sluice Box (Model #6) - Bazooka Style
thingiverse
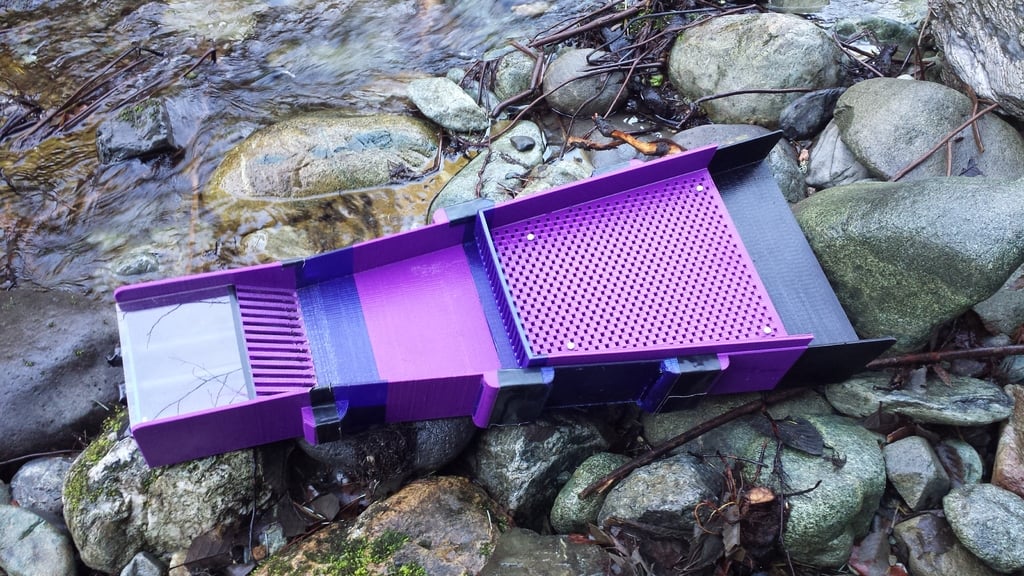
This is model #6 from my GoldiBox series of sluice boxes and prospecting tools, a full-sized Bazooka-style fluid sluice box that's a workhorse. When I know I'll be processing a lot of material, this is the sluice I turn to. This GoldiBox measures 33.5 inches long and 12.5 inches wide at the flare, making it capable of processing material extremely fast in medium to heavy flow. This GoldiBox model recovers both fine gold and coarse gold. In the picture with the pan and heavies, you can see the impressive amount of concentrates in the trap after running unclassified material through it. The classifier is a convenient feature for running clay- and mud-laden material and is also helpful when processing smaller material without fast flow. The fluid box will boil in slower flow if you reduce the size of the material, which is when the classifier comes in handy. But if you have strong flow, just shovel away without the classifier. All the pictures showing gold in this posting were taken using this GoldiBox, and the gold was recovered in Butte Creek (Magalia, CA), just a few miles from home. Video of the GoldiBox (model #6) setup: https://youtu.be/FY2Imx1B2us Notes: This is a large print that will take a couple of days to complete. Print orientation & part quantities: Please refer to the image for correct model orientation on the build surface. Post Printing: The flare pieces and main body have integrated biscuit joints to join everything together, requiring epoxy. I recommend using Gorilla Glue Epoxy or some other 2-part epoxy when joining the pieces together. The Gorilla Glue 2-part epoxy has proven reliable and effective in the joints for over three years under heavy use. All parts are printed in PETG. Black, dark blue, dark green, and purple provide the best contrast for gold. The classifier requires (4) M5 x 25 mm bolts that serve as legs. In the photos, you can see I used clear acrylic for the top shelf instead of "part 9-Top Shelf," which allowed me to see what was happening in the trap. This is optional; if you don't use acrylic, then print (1) "top shelf" piece and epoxy it in place. I sourced the acrylic from Home Depot. The end piece (wall) needs to be epoxied into the main body/trap, which has a groove to accept the rear wall. Install the pipes before epoxying the rear wall in the trap. The trap requires (3) x 8" pieces of 1/2" PVC with (3) couplers and (3) threaded end caps. The couplers are slip-fit to threaded male nipples, and the end caps are threaded to screw on the ends of the couplers. Only glue the couplers to the PVC; the end caps just screw on. This design allows for rapid cleaning of the pipes should they become clogged with debris from the inlet side (small stones, moss, etc.). Simply unscrew the endcaps and wash through with water. Holes need to be drilled in the PVC pipes: I recommend 0.20 inches holes spaced 1.5 inches apart facing down in the trap. Do not drill the holes through both sides of the pipe; drill only one side of each pipe the entire length. The pipes are fitted into the openings of the main body rear wall and front wall with the drill holes facing down, as shown in the image. If you print this, please post a picture or video of your make. It will encourage me to continue developing new ones. Also, please click on the 'like' icon. If you're interested in a medium-sized fluid sluice box, check out GoldiBox Model #5 here: https://www.thingiverse.com/thing:4202056 Happy Prospecting!!!!
With this file you will be able to print GoldiBox Fluid Sluice Box (Model #6) - Bazooka Style with your 3D printer. Click on the button and save the file on your computer to work, edit or customize your design. You can also find more 3D designs for printers on GoldiBox Fluid Sluice Box (Model #6) - Bazooka Style.