Governor Game
pinshape
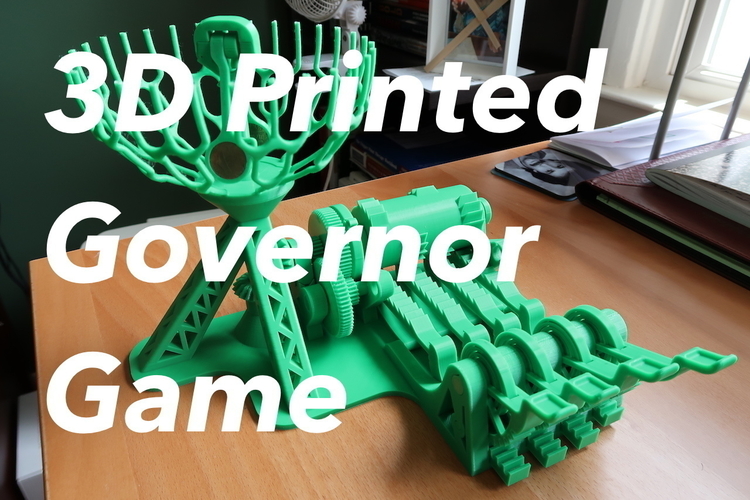
This model was specifically developed for the Pinshape Mechanical Design Competition. To see an explanation of what it does, how to put it together, and how to win the game, see the video below: Design Notes Page 1 of my notes are simply the design requirements. Certain elements that I wanted to drive the design. This includes minimal support material when printing, minimal bluing and non-3d printed parts when assembling, and so on and so forth. The first sketches I made were centered around the input mechanism and the "winning" indicator. And the first problem presented itself. How were we going to turn speed into winning? As the user pushed faster and faster on the levers, somehow that increase in speed needed to indicate something both visually and audibly. That's when flyball governors came to mind. Except this governor wasn't going to open or close a valve like on old steam engines. THIS governor was going to make noise. Page 3 is me refining the ideas of the input mechanism to include springs, as well as the first scale sketches of the governor mechanism. I learned two things with my first governor experiment. One, moderate rotational force was adequate for raising and lowering the arms. Two, my governor needed to be much smaller in order to keep the "noise cage" printable. MUCH smaller. Page 4 shows ways to reduce the overall size and a to-scale sketch of the desired noise cage. Keeping the input mechanism support, glue, and fastener free was a definite challenge. Page 5 shows lots of different ideas and the evolution of certain ideas. On page 6 I finally get to the print-in-place hinge design. This includes the first real design ideas for the rack (of the rack and pinion design) that will translate a user's input into rotational motion. After figuring out that I needed to step up the RPM going to the governor, I sketched a simle gearbox that would be easy to print without supports and that I could work into my design easily. That work is on page 7. Print Settings These models were printed on the Original Prusa i3 MK2 out of Hatchbox Green PLA filament. Due to variations in printers and filaments, certain aspects of this design (sliding contact joints, gear meshes, snap fits, etc.) may not perform as they did for me. In an effort to reduce that risk, you will find all my slicer settings below. Settings that were common between all prints: Layer Height: 0.2 [mm] Extrusion Multiplier: 1.00 Extrusion Width: 0.48 [mm] Retraction Distance: 0.8 [mm] Retraction Speed: 30.0 [mm] Coast at End: 0.20 [mm] First Layer Height: 100% First Layer Width: 95% First Layer Speed: 60% Temperature_First Layer: 195 [deg C] Temperature_All Other Layers: 190 [deg C] Temperature_Heated Bed: 55 [deg C] Cooling_First Layer: 0 [fan speed] Cooling_All Other Layers: 100 [fan speed] Filament diameter: 1.73 [mm] Settings for 90 Deg Gear_Governor, 90 Deg Gear_Output, Coupled Gear, Frame Clip, Frame Hood, Governor_Arm1&2, Governor_Clip, Governor_Flapper, Noise Cage, Rack_Hinged, and Spring Gear : Supports Disabled Wipe Nozzle Distance: 2.00 [mm] Top Solid Layers: 3 Bottom Solid Layers: 3 Perimeter Shells: 3 Infill: 20% Printing Speed: 40 [mm/s] Outline Underspeed: 80% X/Y Axis Movement Speed: 80 [mm/s] Settings for the all Shafts: No Supports Wipe Nozzle Disabled Top Solid Layers: 6 Bottom Solid Layers: 6 Perimeter Shells: 3 Infill Percentage: 20% Adjust Printing Speed for Layers Below {time} Disabled Printing Speed: 25 [mm/s] Outline Underspeed: 80% X/Y Axis Movement Speed: 40 [mm/s] Settings for the Frame and Hood: Supports Disabled Wipe Nozzle Distance: 2.00 [mm] Top Solid Layers: 3 Bottom Solid Layers: 3 Perimeter Shells: 2 Infill: 20% Printing Speed: 40 [mm/s] Outline Underspeed: 80% X/Y Axis Movement Speed: 80 [mm/s] Settings for the Rack Pins, Limit Pin, and Governor_Pin: Supports Disabled Wipe Nozzle Disabled Top Solid Layers: 3 Bottom Solid Layers: 3 Perimeter Shells: 3 Infill: 20% Adjust Printing Speed for Layers Below {time} Disabled Printing Speed: 25 [mm/s] Outline Underspeed: 80% X/Y Axis Movement Speed: 40 [mm/s] Settings for the Pinions: Supports Enabled Support Infill Percentage: 30% Extra Inflation Distance: 1.40 [mm] Wipe Nozzle Distance: 2.00 [mm] Top Solid Layers: 3 Bottom Solid Layers: 3 Perimeter Shells: 3 Infill: 20% Printing Speed: 40 [mm/s] Outline Underspeed: 80% X/Y Axis Movement Speed: 80 [mm/s] Settings for the Rhythm Hub: Supports Disabled Wipe Nozzle Distance: 2.00 [mm] Top Solid Layers: 3 Bottom Solid Layers: 3 Perimeter Shells: 3 Infill: 15% Printing Speed: 40 [mm/s] Outline Underspeed: 80% X/Y Axis Movement Speed: 80 [mm/s] Settings for the Springs: No supports Wipe Nozzle Distance: 2.00 [mm] Top Solid Layers: 3 Bottom Solid Layers: 3 Perimeter Shells: 3 Infill: 100% Printing Speed: 40 [mm/s] Outline Underspeed: 80% X/Y Axis Movement Speed: 80 [mm/s]
With this file you will be able to print Governor Game with your 3D printer. Click on the button and save the file on your computer to work, edit or customize your design. You can also find more 3D designs for printers on Governor Game.