GRAVITRAX; UP (a.k.a.: “The Light House”)
prusaprinters
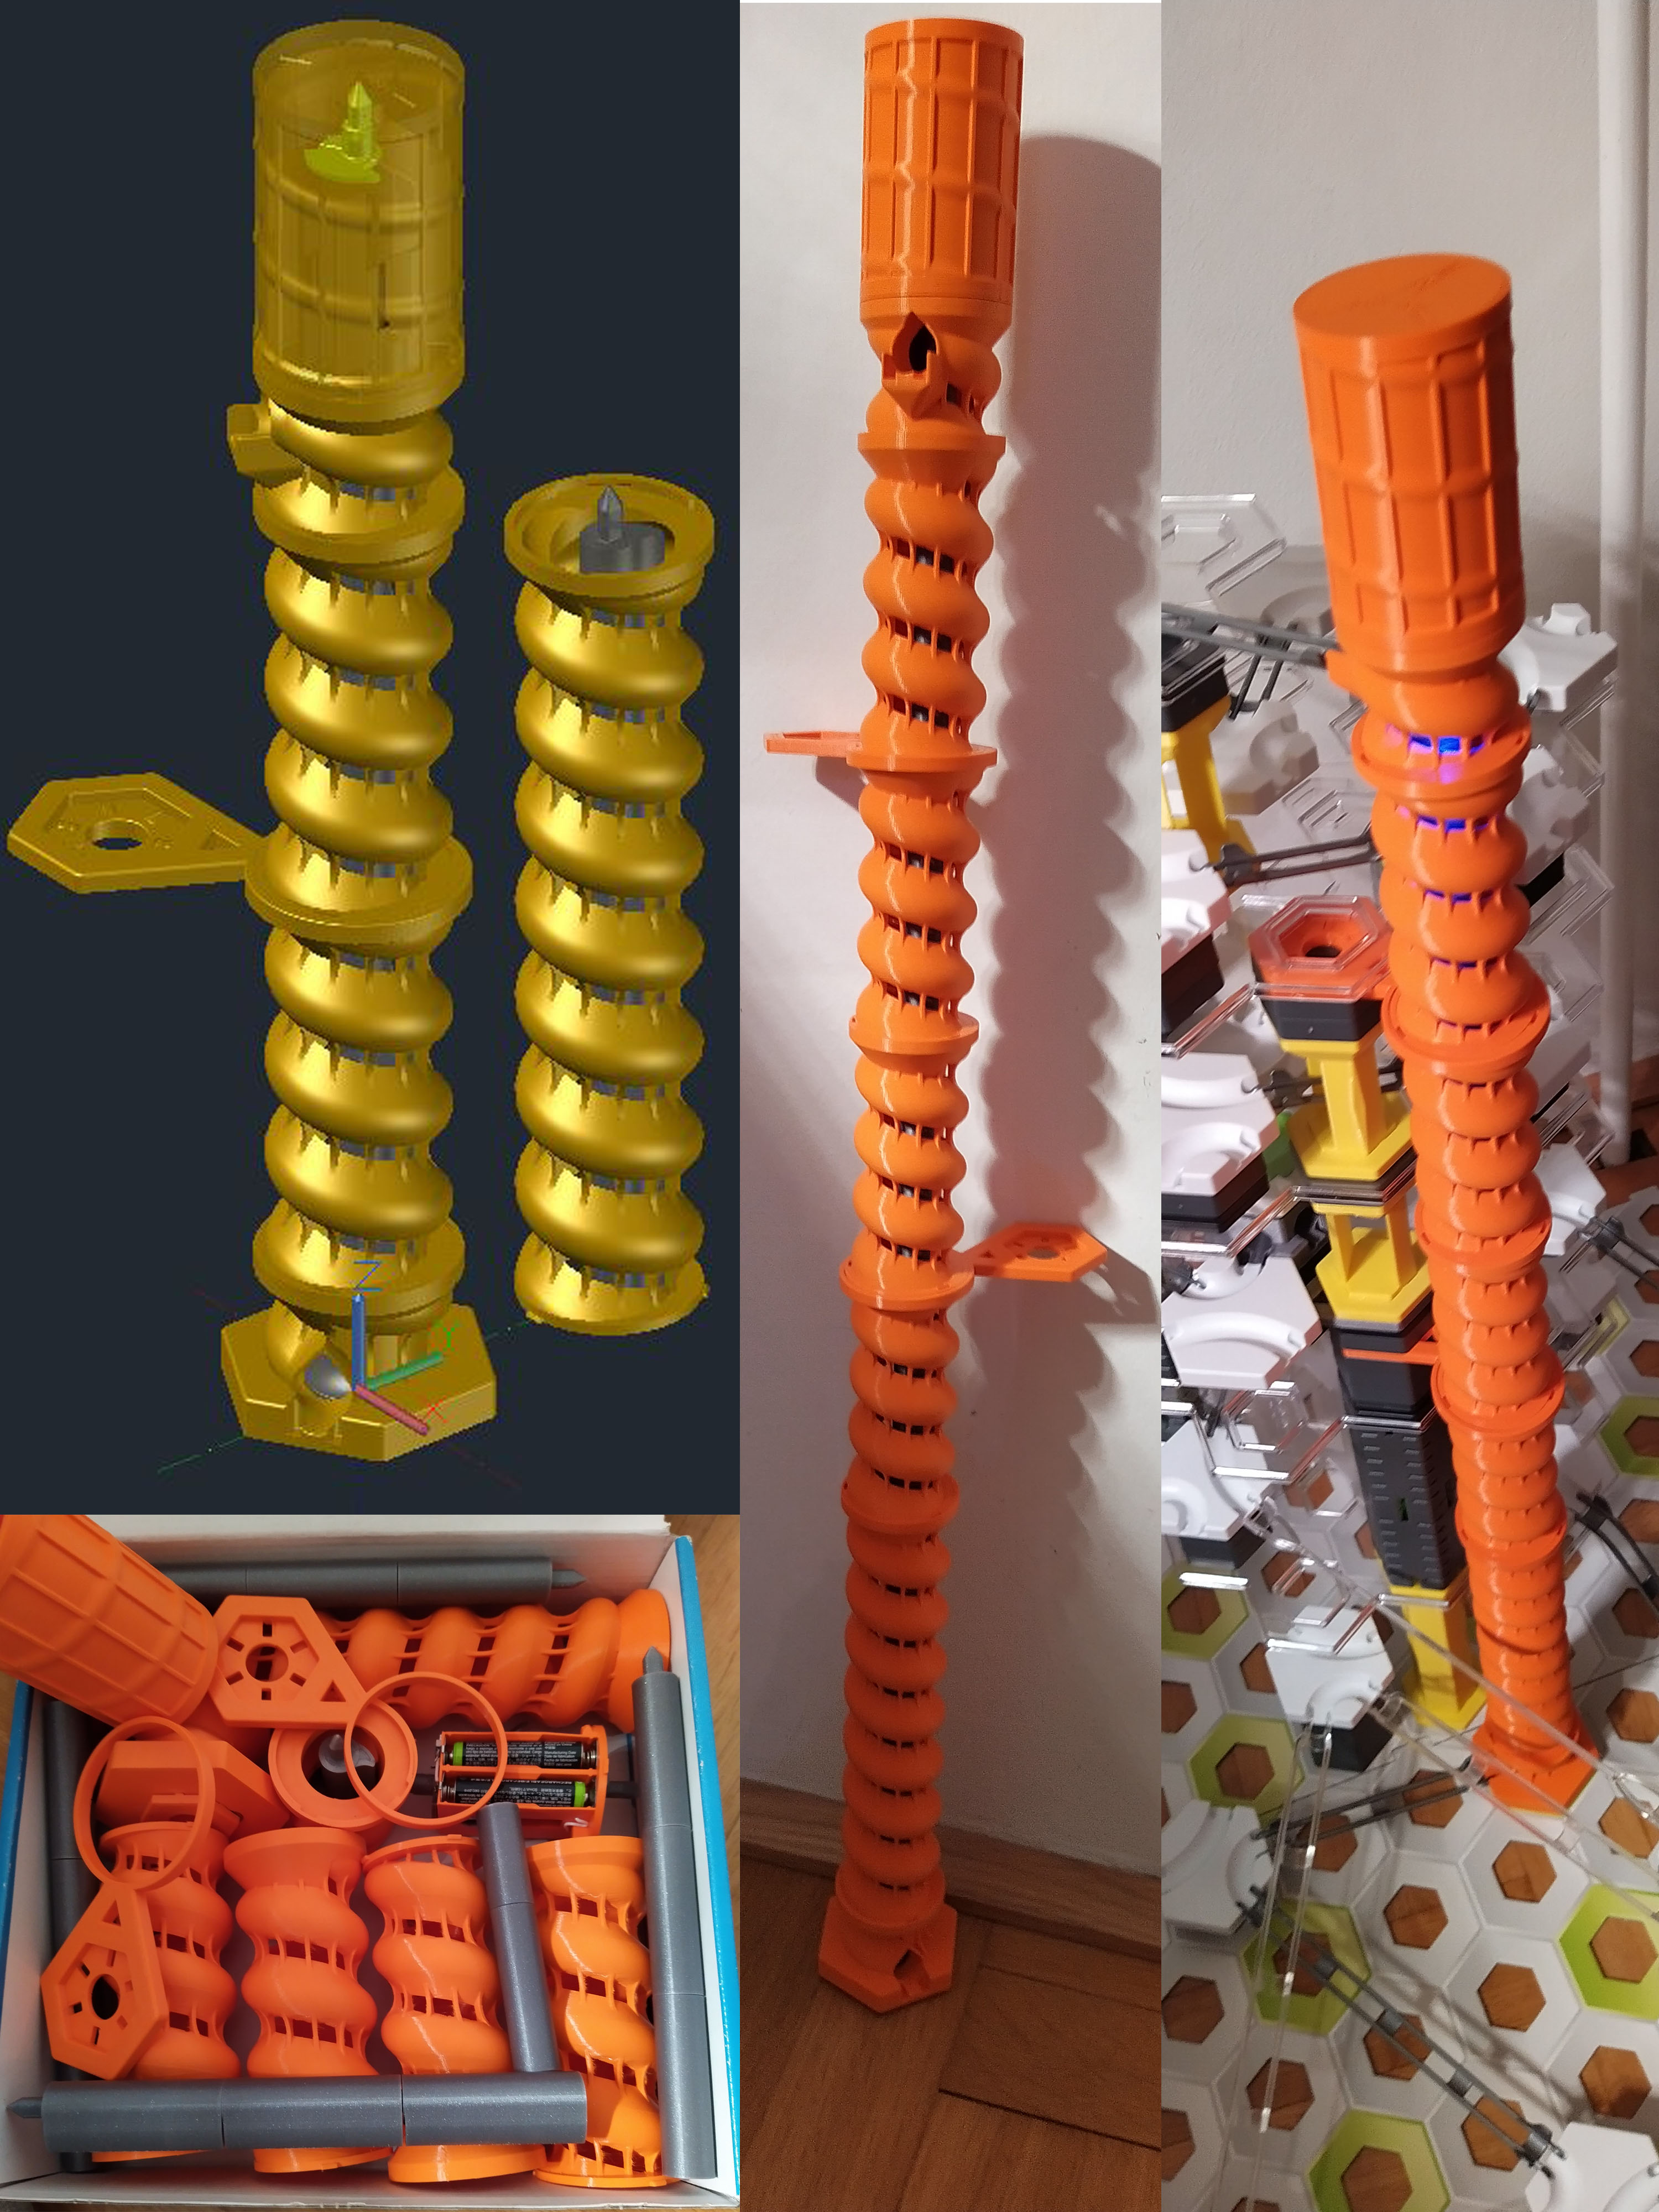
<h3><strong>GRAVITRAX</strong>; UP (a.k.a. “The Light House”)</h3><h4>Content below:</h4><ul><li>Gravitrax; UP, General</li><li>G-Code details</li><li>Additional materials</li><li>Assembly instruction Battery & Motor House</li><li>Assembly instruction General</li><li>Confirming Prints (other filaments)</li><li>Suggestions & Improvements</li></ul><h3><strong>GRAVITRAX; UP </strong>is a<strong> LIFT </strong>battery-operated, extendable to your needs</h3><ul><li>Includes multiple parts, some prints to be repeated</li><li>Bottom and Stabilizer have footplates that clicks in the bottom</li><li>Functions as intended, full continue run time on 4 fully charged AAA batteries is tested at 1 hr 16 minutes</li><li>Tested, fitted and used with my own Gravitrax set</li></ul><p>More to come, if you like it and you are rich enough then <a href="https://www.paypal.com/paypalme/nigeke1962"><strong>Paypal Me</strong></a>, else just enjoy!</p><h3><strong>G-code details:</strong></h3><ul><li><strong>Printer: Prusa MK3/S/S+</strong></li><li>Material: PLA (1.75mm); weight and length for each part see table</li><li>Print settings:<ul><li>Nozzle 0.4 mm</li><li>Extruder 210 C°</li><li>Heated bed 60 C°</li><li>Layer 0.15 mm</li><li>Infill: Grid 15%</li><li>Adhesion: Skirt/Brim (See Table)</li></ul></li><li>Print time (est.): Print time for each part see table</li><li>Software: Cura v.4.12.0</li><li>Stl file: exported from dwg</li></ul><figure class="table"><table><tbody><tr><td style="height:25.85pt;width:170pt;"><strong>Part</strong></td><td style="width:57pt;"><strong>PLA weight</strong><br><strong>(in gr)</strong></td><td style="border-left-style:none;width:55pt;"><strong>PLA length</strong><br><strong>(in m)</strong></td><td style="border-left-style:none;width:48pt;"><strong>Adhesion</strong><br><strong>(Skirt/Brim)</strong></td><td style="border-left-style:none;width:53pt;"><strong>Print Time</strong><br><strong>(hrs.min)</strong></td></tr><tr><td style="height:14.3pt;">01.Bottom & Top</td><td>44</td><td style="border-left-style:none;">14.88</td><td style="border-left-style:none;">Skirt</td><td style="border-left-style:none;">5.43</td></tr><tr><td style="border-top-style:none;height:14.3pt;">02.Bottom & Top Drive Rods</td><td style="border-top-style:none;">11</td><td style="border-left-style:none;border-top-style:none;">3.75</td><td style="border-left-style:none;border-top-style:none;">Brim</td><td style="border-left-style:none;border-top-style:none;">1.25</td></tr><tr><td style="border-top-style:none;height:14.3pt;">03.Column 100 mm (2pc)</td><td style="border-top-style:none;">46</td><td style="border-left-style:none;border-top-style:none;">15.26</td><td style="border-left-style:none;border-top-style:none;">Skirt</td><td style="border-left-style:none;border-top-style:none;">7.24</td></tr><tr><td style="border-top-style:none;height:14.3pt;">04.Drive Rods 50 mm (2pc)</td><td style="border-top-style:none;">15</td><td style="border-left-style:none;border-top-style:none;">5.00</td><td style="border-left-style:none;border-top-style:none;">Brim</td><td style="border-left-style:none;border-top-style:none;">1.49</td></tr><tr><td style="border-top-style:none;height:14.3pt;">05.Battery & Motor House</td><td style="border-top-style:none;">17</td><td style="border-left-style:none;border-top-style:none;">5.69</td><td style="border-left-style:none;border-top-style:none;">Skirt</td><td style="border-left-style:none;border-top-style:none;">2.45</td></tr><tr><td style="border-top-style:none;height:14.3pt;">06.Drive Pin, Motor Lock, Switch Dial</td><td style="border-top-style:none;">3</td><td style="border-left-style:none;border-top-style:none;">1.02</td><td style="border-left-style:none;border-top-style:none;">Brim</td><td style="border-left-style:none;border-top-style:none;">0.32</td></tr><tr><td style="border-top-style:none;height:14.3pt;">07.Top Cover (Light House)</td><td style="border-top-style:none;">20</td><td style="border-left-style:none;border-top-style:none;">9.66</td><td style="border-left-style:none;border-top-style:none;">Skirt</td><td style="border-left-style:none;border-top-style:none;">3.52</td></tr><tr><td style="border-top-style:none;height:14.3pt;">08.Column 200 mm</td><td style="border-top-style:none;">39</td><td style="border-left-style:none;border-top-style:none;">13.06</td><td style="border-left-style:none;border-top-style:none;">Skirt</td><td style="border-left-style:none;border-top-style:none;">6.39</td></tr><tr><td style="border-top-style:none;height:14.95pt;">09.Stabilizer</td><td style="border-top-style:none;">11</td><td style="border-left-style:none;border-top-style:none;">3.69</td><td style="border-left-style:none;border-top-style:none;">Skirt</td><td style="border-left-style:none;border-top-style:none;">1.25</td></tr><tr><td>confirming print(Skirt)</td><td>163</td><td>54.52</td><td>Skirt</td><td>24.15</td></tr><tr><td>confirming print(Brim)</td><td>58</td><td>19.29</td><td>Brim</td><td>7.04</td></tr></tbody></table></figure><h3> </h3><h3>Additional materials (incl. links)<img class="image-style-align-right" src="https://media.prusaprinters.org/media/prints/109797/rich_content/a6dcc675-d0d8-4193-a5dc-7b25fa8d36a9/gravitraxup20211231r21finaladditional-materials.jpg#%7B%22uuid%22%3A%22a4736331-42f3-478f-8188-dfcffe7481d5%22%2C%22w%22%3A1357%2C%22h%22%3A726%7D"></h3><ol><li>4 AAA Batteries (each 1.2 V; 800 mAh)</li><li>Shrink rap <i>(I hardly used it due to too small diameter)</i></li><li>Solder tin</li><li>Bit of copper wire <i>(Stripped ethernet cable has solid core)</i></li><li>3 V (3mm) LED <i>(Colour your choice; Diode fit correct +/- orientation (long wire anode (+))</i></li><li>100 Ohm Resistor <i>(To create voltage drop before LED)</i></li><li><a href="https://www.amazon.de/-/en/Yosoo-Torque-300RPM-Replacement-Motorized/dp/B01FHBN936/ref=sr_1_3?crid=YXBBF7KYJ3D&keywords=yosoo%2Bmini%2Bhigh%2Btorque%2B12%2Bv%2B100%2F200%2F300%2Brpm%2Bwith%2Bmetal%2Bgear%2Breplacement%2Bn20%2Bfor%2Brc%2Bcar%2C%2Brobot%2Bmodel%2C%2Bdiy%2C%2Bmotorized%2Btoy&qid=1641072203&sprefix=yosoo%2Bmini%2Bhigh%2Btorque%2B12v%2B100%2F200%2F300rpm%2Bwith%2Bmetal%2Bgear%2Breplacement%2Bn20%2Bfor%2Brc%2Bcar%2Brobot%2Bmodel%2Bdiy%2Bmotorised%2Btoy%2Caps%2C95&sr=8-3&th=1">Electro motor (DC<strong>): Yosoo Mini High Torque</strong> with Metal Gearbox (300 RPM; 3–12V)</a></li><li><a href="https://www.amazon.de/-/en/Positive-Negative-Conversion-Contacts-Batteries/dp/B0952R8439/ref=sr_1_1?crid=NN78BMGFMBV7&keywords=50+paar+aa+batterie+positiv+und+negativ+federn+aa+batterie+positiv+negativ&qid=1641072098&sprefix=50+pairs+aa+battery+positive+and+negative+springs+aa+battery+positive+negative%2Caps%2C106&sr=8-1">Battery Clips AA, Positive and Negative Springs</a> <i>(AA correct, can be used for AAA too)</i></li><li><a href="https://www.amazon.de/-/en/Youmile-Switches-Momentary-Button-Arduino/dp/B07YDFH7H3/ref=sr_1_2?crid=277KEORWX702&keywords=youmile+mikroschalter%2C+ac%2C+1+a%2C+125+v%2C+3-polig%2C+spdt%2C+20+st%C3%BCck&qid=1641072276&sprefix=youmile+pack+of+20+micro+switches+ac+1a+125v+3-pin+spdt%2Caps%2C101&sr=8-2">Micro Lever Switch</a> (1 A; 125 V; 3-Pin SPDT)</li><li><a href="https://www.amazon.de/-/en/Yizhet-Magnets-Magnetic-Whiteboard-Blackboard/dp/B08R5X5GQ8/ref=sr_1_3?crid=3SPMT2HD1DDQ1&keywords=yizhet+magnet+8x2+mm&qid=1641072318&sprefix=yizhet+magnets+8+x+2+mm+pack+of+50+mini%2Caps%2C111&sr=8-3">Button magnet</a>; Diameter 8 mm. thick 1.7 mm</li></ol><p><strong>Note: </strong></p><ul><li><i><strong>Last 4 items contain the hyperlinks to where you could buy those items</strong></i></li><li><i><strong>Please refer to uploaded pdf </strong>(GRAVITRAX.UP.20211231.r21(final).Additional Materials.pdf)</i></li></ul><h3>Assembly instruction Battery & Motor House</h3><ul><li><i><strong>Please refer to uploaded pdf (</strong>GRAVITRAX.UP.20211231.r21(final).Battery & Motor House Assembly.pdf)</i></li></ul><p><img class="image-style-align-left" src="https://media.prusaprinters.org/media/prints/109797/rich_content/880ee463-4f5b-4b7e-9118-acaf558d49ff/image.png#%7B%22uuid%22%3A%22a7973209-b6c2-4640-969d-5909941b1c06%22%2C%22w%22%3A1345%2C%22h%22%3A781%7D"></p><p> </p><figure class="image image-style-align-left"><img src="https://media.prusaprinters.org/media/prints/109797/rich_content/169209d2-2267-4f77-afb4-8e7e8d05cc0f/image.png#%7B%22uuid%22%3A%221767ea07-683d-4905-808d-01a3ba2f8239%22%2C%22w%22%3A1301%2C%22h%22%3A824%7D"></figure><p> </p><p> </p><h4> </h4><h4> </h4><h4> </h4><h4> </h4><h4> </h4><h4> </h4><h4> </h4><figure class="image image-style-align-left"><img src="https://media.prusaprinters.org/media/prints/109797/rich_content/c73986cc-8b13-4af6-a124-e87e6c5660c6/image.png#%7B%22uuid%22%3A%228eb989ac-3833-406e-a591-f8533a941a03%22%2C%22w%22%3A1223%2C%22h%22%3A466%7D"></figure><h4> </h4><h4> </h4><h4> </h4><h4> </h4><h4> </h4><h4> </h4><h4> </h4><h4> </h4><h4> </h4><h4> </h4><h4> </h4><h3>Assembly instruction General</h3><ul><li><i><strong>Please refer to uploaded pdf (</strong>GRAVITRAX.UP.20211231.r21(final).Assembly General.pdf)</i></li></ul><figure class="image image-style-align-left"><img src="https://media.prusaprinters.org/media/prints/109797/rich_content/3cd7785d-328c-4f9c-8908-5b1e13f23af0/image.png#%7B%22uuid%22%3A%2258b2c2de-3af0-4467-82be-a6bafb1420fd%22%2C%22w%22%3A1344%2C%22h%22%3A729%7D"></figure><h3> </h3><h3> </h3><h3> </h3><h3> </h3><h3> </h3><h3> </h3><h3> </h3><figure class="image image-style-align-left"><img src="https://media.prusaprinters.org/media/prints/109797/rich_content/86ac7fb8-2a64-47b1-a8cc-1efa70713708/image.png#%7B%22uuid%22%3A%2218b8d4fa-8c39-4f00-be40-83ad96bacb1d%22%2C%22w%22%3A1253%2C%22h%22%3A702%7D"></figure><h3> </h3><h3> </h3><h3> </h3><h3> </h3><h3> </h3><h3> </h3><h3> </h3><h3> </h3><figure class="image image-style-align-left"><img src="https://media.prusaprinters.org/media/prints/109797/rich_content/ef79e13b-5230-4ce6-99f3-e9df71255fdc/image.png#%7B%22uuid%22%3A%22033caa23-422d-4e4e-be43-3c728d7ad472%22%2C%22w%22%3A1249%2C%22h%22%3A712%7D"></figure><h3> </h3><p> </p><p> </p><p> </p><h3> </h3><h3> </h3><h3> </h3><h3> </h3><h3> </h3><h3>Confirming Prints (other filaments)</h3><ul><li><strong>Confirming prints: </strong>As there can be dimensional differences when other filaments are used, I wanted to practically confirm if my files result in dimensionally correct prints with other filaments. This as well as some part have to be with-in a 0.1 mm tolerance margin. To confirm I put all parts printed with skirt in one file and did same with all parts printed with brim. The gcode of the confirming prints are uploaded as: Confirming print(skirt) (24 hrs and 15 min print time; 163 gr; 54.52 m) and Confirming print(Brim) (7 hrs and 4 min print time; 58 gr.; 19.29 m) Then Printed it with Amazon Basicfil as generic filament. With reference to pictures below I can confirm that all parts fitted as intended so I am confident that dimensions stay correct when using other filaments. And look at that build plate adhesion, holding upside down worked also!</li></ul><figure class="image"><img src="https://media.prusaprinters.org/media/prints/109797/rich_content/bc735905-f962-4a91-8f75-1fe51b96dd36/image.png#%7B%22uuid%22%3A%2200278c46-9123-4ece-9791-6f12ca7ca383%22%2C%22w%22%3A1352%2C%22h%22%3A732%7D"></figure><ul><li><strong>Filament notes:</strong><ul><li>Used filaments<ul><li>ICE PLA obstinate orange</li><li>Prusament PLA “Galaxy Grey”</li><li>Amazon Basicfil PLA (Red & Blue)</li></ul></li><li>Other filaments tried:<ul><li>ICE PLA green (rubbish different from above; warping and adhesion prob.)</li><li>ICE PETG transparent (rough prints; <strong>not </strong>transparent!)</li><li>Amazon Basicfil PET clear (<strong>not</strong> clear at all, heat gun result in organic shapes)</li><li>SUNLU ABS transparent (clearest of them all, and <strong>still can't see a bloody thing</strong> even after 1 hr. acetone vapour bath and Acetone polishing)</li></ul></li></ul></li><li><strong>Clear/Transparent filaments (DO NOT EXIST!)</strong><ul><li>I wanted the helix to be transparent so one could see the ball move up within. Needless to say I have a big difference of opinion with filament manufacturers on what is clear or transparent (they should not be allowed to sell it under that naming). After:<ul><li>consulting many You Tube vid's</li><li>sanding fingers to the bone</li><li>getting high on Acetone</li><li>setting the house on fire with heat guns and</li><li>polishing a few kWh with the Dremel</li></ul></li><li>My advice is: unless you want to make sanding and polishing your hobby because you lack a car to clean, then don't even go near the stuff they call clear/transparent; “<strong>STAY AWAY FROM CLEAR OR TRANSPARANT FILAMENTS</strong>” it is a "<strong>SCAM</strong>" <i>(Anyway if you like some cheap nice clear/transparent filament, I have some 1700 meter on offer (ABS, PLA, PET, PETG) at affordable discounted rates!)</i></li></ul></li></ul><figure class="image"><img src="https://media.prusaprinters.org/media/prints/109797/rich_content/f318c8ee-70c8-433a-917c-c354cd4f8ed9/image.png#%7B%22uuid%22%3A%22e2e97a29-6a76-4113-ad83-7b1bda3a6f8b%22%2C%22w%22%3A1376%2C%22h%22%3A730%7D"></figure><ul><li> <strong>Rod straightness/noise/stability</strong><ul><li>One of the more difficult problems that occurred was printing straight drive rods. When not straight they can drag on the inside of the spiral and that makes lots of noise. In the end I put the problems down to build plate adhesion, warping and stress in original threaded-end design of the Drive Rods. Changed to a none stressed design and using the best filament available, in this case Prusament (Basicfil worked too), solved the problems. However really got stuck with trial and error and delayed the final outcome a lot.</li></ul></li></ul><h3>Suggestions & Improvements</h3><p>I am eager to know if anything requires to be improved on or corrected. And will appreciate any constructive comments, critique and/or suggestions for improvements.</p><p>In hind side the column should be bayonetted in the opposite direction of the rotation of the motor, they both are clockwise and can unwind when not sturdy attached. I did not have a problem with it but noticed it on one of the failed battery houses I printed. Not going to change that now as project took quite a bit of time. And I will gather comments, if any come, then evaluate if improving the model is required</p><h4>As a final word:</h4><p>With this PRUSA MK3/S/S+ the fun in 3DPrinting is back, however Prototyping is a bitch )); The picture below shows not even half of the waste, so imagine the wasted printing time! Sometimes you have to work through the frustration of that to get a great result in the end.</p><p><img class="image-style-align-left" src="https://media.prusaprinters.org/media/prints/109797/rich_content/895ac61c-8897-41da-9397-77bc07e6d5ca/img_20211229_010417.jpg#%7B%22uuid%22%3A%2296bbc104-ae18-4ebe-ba19-cd2682ac1810%22%2C%22w%22%3A4000%2C%22h%22%3A3000%7D"></p><p> </p><p> </p><p> </p>
With this file you will be able to print GRAVITRAX; UP (a.k.a.: “The Light House”) with your 3D printer. Click on the button and save the file on your computer to work, edit or customize your design. You can also find more 3D designs for printers on GRAVITRAX; UP (a.k.a.: “The Light House”).