Ground Screw Holder (Tiki Torch, Umbrella, Solar Lights, Pole, Etc.)
thingiverse
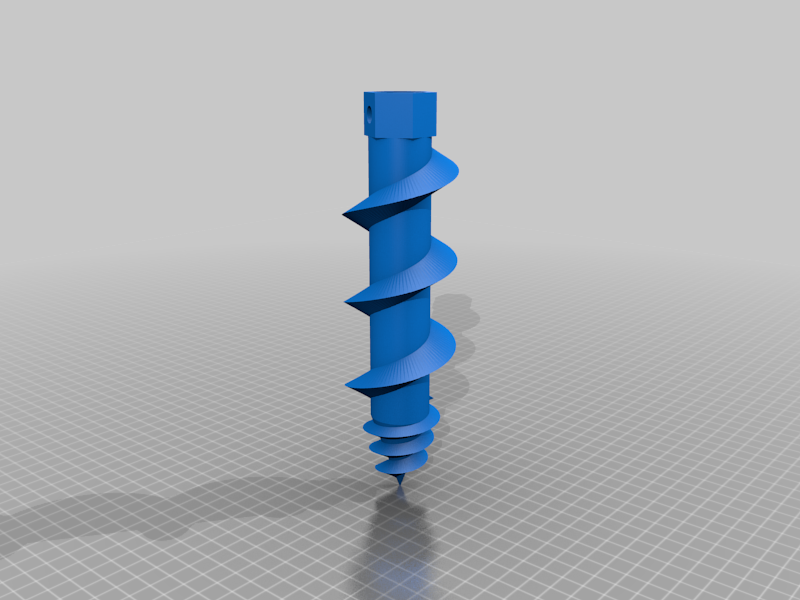
*** I do not want to come across as an erse, so I'm sure some will think I am when I say this - but I want to clearly point out that this is a CC ATTRIBUTION - _NON-COMMERCIAL_ - _NON-DERIVATIVE_ license - please let's enjoy the model, but please respect my wishes on this. *** So we bought these stupid Tiki Torches that had a thin round "pipe" for the post and with our clay ground there is no way to put them in without bending the thin metal nor would they stay stable (I did try drilling a hole and using a small PVC pipe, but that was not stable). So, I designed a spiral holder that I could use a socket wrench with to twist into the ground. The nut is 30mm. The diameter of the pole hole is 20mm. The reason I tagged it as work in progress, is I intend to make shim inserts to reduce the size of the hole so it could be used with a variety of pole diameters. When wrenching into the ground I used a 30mm socket, however, not everyone will have that, so the immediate solution is to use an adjustable wrench and then keep downward pressure when turning it with a block of wood. There are two caps; one is just a cap ("Cap.stl") and the other ("Cap quarter inch drive.stl") is a cap that will accept a 1/4" socket driver, so if you do not have a 30mm socket, but have 1/4 driver you can use the cap as the socket. :-) I will note I used a 1/2" drive but again, not everyone will have that; I plan to make two more caps, one that will accept a 3/8" driver and 1/2" driver. One thing I did that makes it initially easier to start into the ground, is I drilled a 3/4" hole about 6" into the ground then insert the auger into the hole and start wrenching - we have terribly hard clay soil so this made it easier, although I believe it should also work without doing this. Beyond doubling as a socket, the cap is intended to put over the nut in the winter or whenever you do not have anything in the holder to keep debris out. To print flip it 180 degrees so the nut is flat on the build plate. Enable a brim (I used 5mm). Enable support on build plate only - some slicers will build support all around the outer edge, but you don't need this; I used an overhang threshold of 37 degrees with pattern spacing of 0.5mm and contact z-distance of 0.1mm and set XY separation at 50% of line width. Look at the picture of it sitting on my build plate to see what it looked like; the super tiny thin supports DO work believe it or not as the brim holds them in place. The supports (other than brim) may NOT be needed, but I had problems with previous versions wobbling as it got higher, so you mileage may vary. The more I think about it, I really don't think the supports will be needed - let me know. :-) *VERY IMPORTANT: If you use supports do NOT allow the supports to go into the tube area or you will never get them out; I used a support blocker in PrusaSlicer (you could also say do not support bridges).* I printed with a Prusa MK3S at 0.20mm layer height, 0.45mm line width and 4 perimeters. The overall infill is 25% BUT I used 99% infill from layers 1 to 20 AND from layers 160 to top (I just use 999 for the top); the reason for this is these are the two areas that receive the most force/abuse going into the ground. You also might hit a rock and the 99% infill in the penetration point might keep it from breaking and the 99% infill at the nut would let you gently hammer it part way in to get started. I printed with PolyMax PLA. Since it will be in the ground temperature is not going to be an issue most likely, however, I see no reason PETG would not work if you wanted to use that. Strength-wise PolyMax PLA is supposed to be stronger than run of the mill PLA, so that might have helped me too. I have installed 4 of these and so far so good!! Hope people find this useful - I sure did. :-) Happy 3D printing. UPDATE (8/7/2020): The 1/4" drive cap does not work well in hard ground with a 1/4" socket driver - the cap strips out, or at least it does with PLA. I have hard clay for ground, but maybe for someone with softer dirt or lots of top soil, then maybe it would work. I'm coming up with an additional solution, stay tuned. :-) UPDATE (8/7/2020): I modified the holder to have a hole of 25mm (vs the previous 20mm). Then I created reducer/shims that allow the hole to be reduced in size by varying amounts - the STLs are named appropriately. So if you want to use it for the Tiki Torches I talked about, print the holder and a 20mm reducer. The holder (and caps) have also been modified to have a hole at the top that would allow you to push a small rope or string through it so it could be used like a tent stake or similar. UPDATE (8/8/2020): Since I had not test printed the reducers before uploading them, after test printing I found the OD was slightly too big to fit in the tube due to printing accuracy. I am printing new tests now (7:15am), but am immediately uploading the files even before done with the test print because the others ones for sure don't work :-). UPDATE (8/11/2020): Ok, finally got the reducer tubes sized correctly to fit and have tested printed them all and they DO fit. I just updated this page (9:18am EDT) so give thingiverse time to update. Note that the quarter inch drive cap does not really work in hard ground - might in softer ground. Working on another solution to screw it into the ground - remember, if you have a 30mm socket you can use that and that does work.
With this file you will be able to print Ground Screw Holder (Tiki Torch, Umbrella, Solar Lights, Pole, Etc.) with your 3D printer. Click on the button and save the file on your computer to work, edit or customize your design. You can also find more 3D designs for printers on Ground Screw Holder (Tiki Torch, Umbrella, Solar Lights, Pole, Etc.).