GT MK8 Auto level for Prusa i3 Pro B and Pro C or Mk8 setup
thingiverse
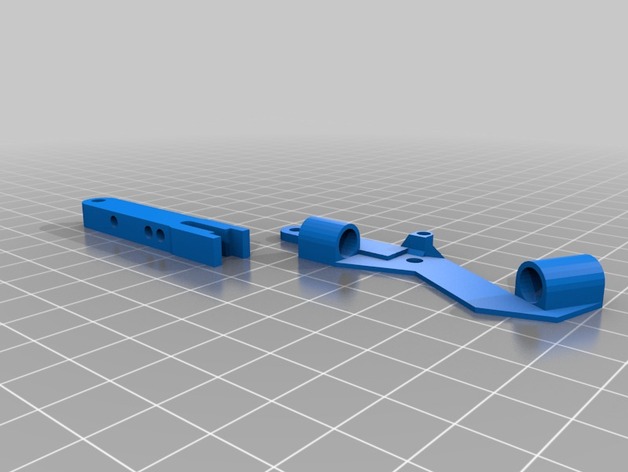
My First Practical 3D Printer Project for Anyone Using an MK8 Extruder! I've designed a useful part that fits perfectly onto the fan of an MK8 extruder, and also onto a Pro C dual extruder bracket - I'll show you this one after adding a second extruder to my Pro B. This practical part can be installed on GeeTech single-extruder Prusa i3 Pros (B, C, and others) with just some minor adjustments to certain firmware settings. Please check out my YouTube channel for the videos I made about this - my username is georgeroblesjr! You'll also find my firmware posted on my wordpress page at georgeroblesjr.wordpress.com. I'm happy to sell these parts or the required parts from my online store if you ask - or you can even buy a printer from me and enjoy top-notch tech support by checking out georges3dprinters.com! To get started with this 3D printer project, head over to YouTube to watch the videos I made about it: https://youtu.be/IcuFkOzr-5k (part 1) or https://youtu.be/WtjIAIQPWlc (part 2). Instructions for assembly: First, gather the necessary parts - 3-10mm x 6mm N52 magnets that can be bought online, 2-M3 x 16mm screws, 1-M3 x 12mm screw, 1-M3 flat washer, and a push-button switch from an old TV remote or just purchase one new for under $1. Next, push the magnets into their respective places. Now, remove the screws that hold the cooling fan onto the MK8 extruder (do it one screw at a time so it doesn't come apart) and insert them through the MK8 mounting bracket - then replace the screws and parts as usual. Next up, take your push-button switch and solder two wires to its leads. These wires will be attached to the z-min stop in place of the original z-axis min switch. Remove any obstacles from the original z-end stop, such as the screw that actuates it (in my case, it's on the x-axis motor bracket). Make sure you remove any obstructions and just get it out of the way. Take your Z probe arm with the slot closest to you - there should be holes on the side nearest to the edge at the bottom. Now, take one-M3 x 16mm screw and thread it through the furthest hole from the right into the arm till you see threads coming out. Next, grab another M3 x 16mm screw and thread it through the hole closest to you from the left until about 2mm of thread shows. Then place a M3 flat washer on an M3 x 12mm screw and feed it through the pivot point of the arm - where there's a slot for the switch. Mount the flat washer towards the MK8 mounting bracket using the upper-center raised-screw mount, and finally, attach the third magnet to the head of the screw closest to the switch. Now your assembly is done! All you need to do is adjust some screws, firmware, and type up some g-code for it to work properly.
With this file you will be able to print GT MK8 Auto level for Prusa i3 Pro B and Pro C or Mk8 setup with your 3D printer. Click on the button and save the file on your computer to work, edit or customize your design. You can also find more 3D designs for printers on GT MK8 Auto level for Prusa i3 Pro B and Pro C or Mk8 setup.