Guitar Fret Wire Bender
thingiverse
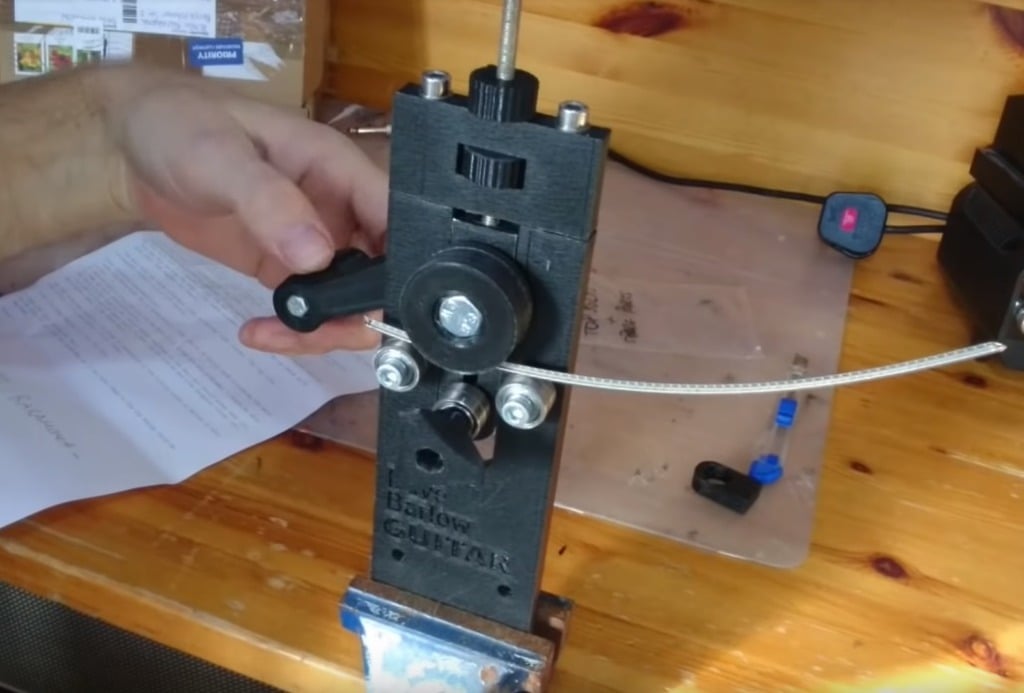
Here's a review of this tool on YouTube: https://www.youtube.com/watch?v=MXO_jLHvm8Y&t=3s Please read the print settings section below for important tips --------------------------------------------------------------------------------- This is version R1 of my guitar fret wire bender. It is a tool used by luthiers (guitar builders) to bend guitar fret wires to a specific radius. This model is based on a very common design known by most guitar building enthusiasts. A well known drawback of the original design is it's inability to curve the ends of the wire correctly. An additional, adjustable center roller was added to this design to counteract that. The usage of the tool should be self-explanatory but basically: You set the radius by adjusting the height of the lifter via the lower thumb screw. The top thumb screw is used to lock the height in place. *Note: tightening the lock screw may end up raising the lifter a bit due to backlash. You can compensate for this by always setting the radius moving the lifter downwards.* You can also use this tool to straighten a fret wire. For this you simply pass the wire along the main roller and then in between one of the lower rollers. *I just found this great tip on a youtube video myself. Search for "how to use a fret bender" on YouTube if you need more information*. **Additional hardware that you'll need to assemble this model:** - 1x M8x60mm Hex Bolt - 2x M8 Nuts - 2x M5x40mm Metric Machine Screw Bolt (the type with a cylindrical head and allen wrench slot) *or alternatively 2x M5x50mm Hex Bolts + 2x M5 Washers*. - 1x M5x30mm Hex Bolt - 1x M5x30 Wing Bolt - 3x M5x20mm Hex Bolts - 5x M5 Hex Nuts - 6x M5 Washers - 2x F688ZZ Bearings (flanged bearings) - 6x 625ZZ Bearings (no flange) - 1x M5x60mm Bolt (of any kind) or, alternatively, 1x M5 threaded rod cut to 60mm length. (*I recommend buying a threaded M5 rod and cutting it to length since M5x60mm bolts are uncommon and tend to be relatively expensive*). **Assembly Instructions:** **Main Roller:** Insert the M8 bolt into the "Main Roller Outer Side" part making sure that the nut slot is facing correctly towards the head of the bolt. It is a tight fit so you might find it hard to press it in by hand. If so, give it a few taps with a rubber mallet or hammer until it sits flush. Slide the Main Roller Spacer onto the bolt followed by the Main Roller Inner part (make sure that the flanged side is facing away from the main roller). **Lever / Lever Handle:** Snap the M8 nut into it's slot on the lever. Tap it in gently, if necessary. Insert an M5x20 bolt into the Lever Bearing Ring and then insert both into the Lever itself. Screw the Handle on the M5 bolt and tighten it against the bearing until it's snug. The Handle should be able to move loosely. **Lifter / Slider:** Snap the F688ZZ bearings onto each side of the lifter. Now pass the Main Roller construction through the lifter and screw on the Lever. Tighten everything together until there is no more play. The Lever should be able to move the main roller freely. Screw on the second M8 nut (as a counter nut) and tighten it while holding the the lever arm firmly with one hand. Screw one of the Adjustment Knobs onto the 60mm M5 rod/bolt. Hold the remaining Adjustment Knob in it's slot in the Top Body while screwing in the 60mm M5 bolt through the top (make sure that the bolt slots on the top body are facing up). Leave most of the bolt/rod protruding below. Now screw the 60mm bolt into the the lifter and tighten it until you feel it reach the bottom. This is designed to be a very tight fit to stop the bolt/thread from getting loose (*you may consider adding a tiny drop of superglue if you find it to be loose*). You can lock the adjustment knobs to hold the rod/bolt in place while you do this. **Adjustable Center Roller:** Insert one M5 nut into the Center Wheel Knob and make sure it sits flat at the bottom (*you can use a long M5 bolt as a helper*). Slide an M5 washer onto the wing bolt and then insert this through the long slot in the lifter through the side that faces the handle. Add another washer, then two 625ZZ bearings. Screw on the Center Wheel Knob. No need to make it tight at this point. Now insert the slider into the main body. It should be a nice tight fit with no play. You can sand or file the sides of the lifter body slightly in case it's too tight (do not sand the rails, though). **Main Body:** The upper portion of the main body has two slots that fit M5 nuts. Insert a nut on each slot making sure that they're angled correctly (*you will see what I mean if you look into the body*). Push them far enough in that you can see the center of the nut when looking through the bolt hole. Test it by Inserting an M5 bolt and making that it an be threaded through the nut. Slide an M5 washer then two 625ZZ bearings and then another M5 washer onto an M5x20mm bolt (*make this for both left and right sides*). Now screw the bolt into the main body (left and right from the lifter slot). Do not make this very tight since it is only screwed into a plastic part. *You may consider "tapping" the threads of these holes in the main body using an M5 bolt before doing this.* *You can replace the M5x20 hex bolts with metric machine bolts (no washer needed on the head side in this case). These have a cylindrical head that may match the center of the bearing better.* **Final Assembly:** Secure the Top Body onto the Main Body with the M5x40 metric machine bolts. Tighten until the top of the screws are flush. (*You can also use regular hex bolts with an M5 washer*)
With this file you will be able to print Guitar Fret Wire Bender with your 3D printer. Click on the button and save the file on your computer to work, edit or customize your design. You can also find more 3D designs for printers on Guitar Fret Wire Bender.