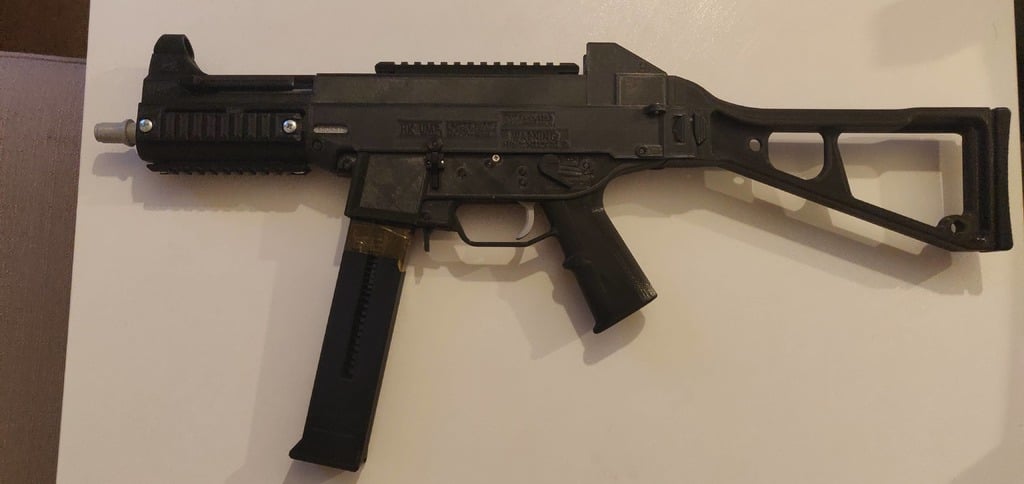
H&K UMP 45 (Prop)
thingiverse
WORK IN PROGRESS Modeled off of reference pictures, many dimensions are guesses. This is intended to be a NON-Firing, but bolt operable, replica. can be printed entirely in PLA (if possible, the charging handle and magazine spring is better printed in petg to retain its springyness) you will need a large print bed, I printed mine on a 300x300mm print bed. Test out the magazine spring, upper rear body and stock parts to see if your print area is large enough. printed with supports, with roof and floor supports enabled. 0.2mm layer height, 20% infil 300x300mm bed was used, Things to do: - Re-orientate STL files to match intended print orientation. - Re-design the spring rod to be printed horizontally and in less parts - Selector is a little loose, may need to adjust dimensions and/or spring length. - magazine spring is too weak to push up the bolt catch for empty magazines. - magazine needs work to improve feeding. - feeding and shell ejection still needs fine tuning, so dimensions for the barrel, bolt, magazine and extractor may change. More adjustments as I continue. You will need as of right now: 8x - M5x6x7 Threaded inserts 8x - M5x10 Pan head screw 3x - M4x10 Pan head screw 3x - M3x6 countersunk screw 1x - M2x10 screw (or anything else thin to use as a pin) springs: 8x - 9.1x34.9 compression spring (Spring rod) 2x - 9.5x19.1 compression spring (Stock, Magazine release) 2x - 5.6x25 extension spring (Sear, Hammer) 1x - 5.6x20 extension spring (Trigger) 1x - 7.1x19.1 compression spring (Trigger lever) 1x - 7.1x12.7 compression spring (Rear sight) you should be able to buy a spring kit from amazon which contains all these springs at various quantities, dimensions may vary slightly. ASSEMBLY: Lower body: 0. Remove any loose filament or imperfections on body parts that may prevent smooth operation. 1. Align lower body left/right and glue together. 2. Insert magazine release and magazine release spring, pin in place with magazine release pin 3. Glue bolt release button onto bolt release and pin in place using M2 screw. 4. Insert trigger spring into trigger, then insert trigger lever. 5. Insert trigger assembly into lower body and pin in place using body pin. 6. Insert index wheel into lower body, then insert spring + index plate alongside. 7. Insert slide into trigger assembly, then fix in place using selector Left/right. 8. Insert body pin above trigger assembly with trigger spring attached, then hook trigger spring onto trigger. 9. Screw sear spring onto sear with M3 countrersunk screw, then lock other end of sear spring into lowerbody with M3 countersunk screw and nut. 10. Insert body pin futherst forward for sear with hammer spring attached, then slide pin through sear and pin in place. 11. Screw hammer spring onto hammer with m3 countersunk screw then slide and pin inplace with body pin. 12. Insert unused body pin in the rear most hole. Upper body: 0. Remove any loose filament or imperfections on body parts that may prevent smooth operation. especially where the charging handle tube goes. (good idea to test fit what you can before glueing) 1. Align Upper Body Front left/right and glue togther. (use side rail holes and front sight pin to help with alignment) 2. Insert front sight and pin in place with front sight pin. 3. Insert barrel collar into Upper Body Rear Left and glue in place with superglue. 4. Align Upper Body Rear left/right and glue together. (use the Barrel pin, Front body pin and Rear body pin to help with alignment) 5. Insert rear sight spring into rear sight notch mock and pin into upper body using rear sight pin, screw down using M4 screw Stock: 1. Align Stock left/right and glue together. 2. Insert stock release button and stock release spring, and pin in place using stock release pin. (may need some sanding or lubricant for smooth operation) 3. Insert butt plate. Should be press fit, if loose add some glue. 4. Pin stock into upper body using stock pin. Spring rod: 1. Using glue, apply glue and attach spring rod 1 and 2 using spring rod pin. (spring rod 2 is symetric) 2. prepare spring rod springs by ensuring they slide upand down the rod easily. (may need to bend the ends outward slightly to prevent scratching) 3. Insert spring ring, follwed by 8 spring rod springs, then screw on spring rod cap with M4 screw to complete spring rod assembly. Bolt: 1. Align bolt left/right and glue together. Then slide extractor from rear of bolt towards the front, hook facing inwards. (will need to jiggle it a bit) complete assembly: 1. Slide charging handle tude into Upper body assembly with the wider screw hole facing up. 2. Slide charging handle into chargine handle tube, then align charging handle tube screw hole with the opening on the front upper body, insert M4 screw and screw in place. 3. Press down hammer in lower body until sear engages, and place stock in a folded position. 4. Hook lower body onto upper body and swing up into place. 5. Holding both lower and upper body together, drop in bolt from the rear then insert spring rod assembly. 6. Insert buttplate, push down and insert rear body pin, locking upper,lower body and butt plate in place. 7. screw on handrail and top rail using M5 screws. M5 threaded inserts should be used if the screws don't bite.
With this file you will be able to print H&K UMP 45 (Prop) with your 3D printer. Click on the button and save the file on your computer to work, edit or customize your design. You can also find more 3D designs for printers on H&K UMP 45 (Prop).