Haenau - Big Box
thingiverse
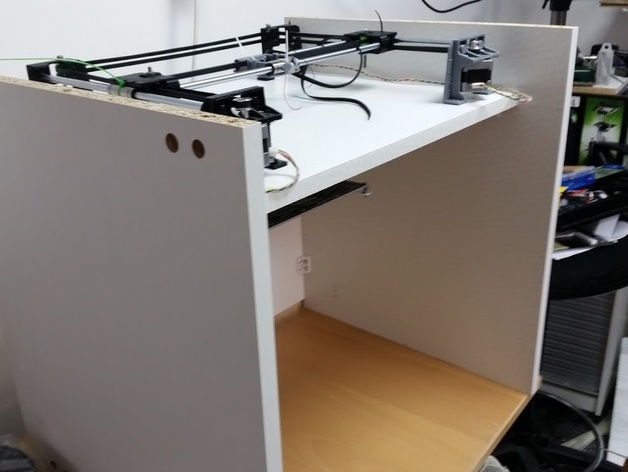
This is my CORE XY box printer, with as few as 10 parts, (really 6 parts, 4 parts printed twice!!) I have designed this to be truly simple, Needing only a hand drill, and a few drill bits, screwdriver, saw, and a good ruler. And most important super cheep, All the parts I have designed, to minimize construction complication. and almost any lengths (pairs - especially for X & Y) of 8 mm smooth rod. And no expensive 20*20, maker-beam, aluminium extrusions etc. A video of an early test: https://goo.gl/photos/ZvNmUdDvC9jRPmzk7 Although, with all the money you save, I would recommend getting a genuine E3D hot end. More info in a day or two. If you live in Swansea, then the prototype is in Swansea Hackspace,http://swansea.hackspace.org.uk/ How I Designed This Step 1: using one of the other sheets of wood, mark up perfectly parallel lines. Build up the box, I used a 'Shelf-pack' from B&Q, for £18, about 1/4 of the cost of a sheet of contiboard, of similar area. If anyone knows of an IKIA shelf pack, then let me know, I did have enough IKIA shelves to make a really compact version of this, but they got used for something else, about a week before I started building this. And as a bonus, perfectly square sides, and 18 mm thick. and much better quality 'wood'. a few screws, and small corner brackets (yes, I should of printed them, but I had them anyway). The only really complicated part is setting up the Z mounts, They have to be parallel in two dimensions, But if you use a spare shelf, then place it on-top, of the one you are marking out, align the dimension, then make sure the overlapping edges are flat, you have a perfect square line. As for the X-Y gantry, Assemble the parts, without any belts, place on the top, approximately where you want it to go, Double and tipple check that the print head can reach all four corners of the heated build plate, then, lightly mark the screw holes. Using your GOOD ruler (metal one if possible), measure from the front, and sides, making sure that the holes to be drilled are EXACTLY the same distance from front, and sides (same for the back) mark the holes, for the four outermost drill holes. check again it slides, and no collisions etc. Drill one hole, screw it down, check again ... if all good, drill and screw down (I recommend only screwing down the 4 outermost for the minuet, Now mark where to cut the cutout, I cut out only the minimum, with just enough to get my fingers down gap. More info later, and hopefully photos etc.
With this file you will be able to print Haenau - Big Box with your 3D printer. Click on the button and save the file on your computer to work, edit or customize your design. You can also find more 3D designs for printers on Haenau - Big Box.