Hair Bobbers
prusaprinters
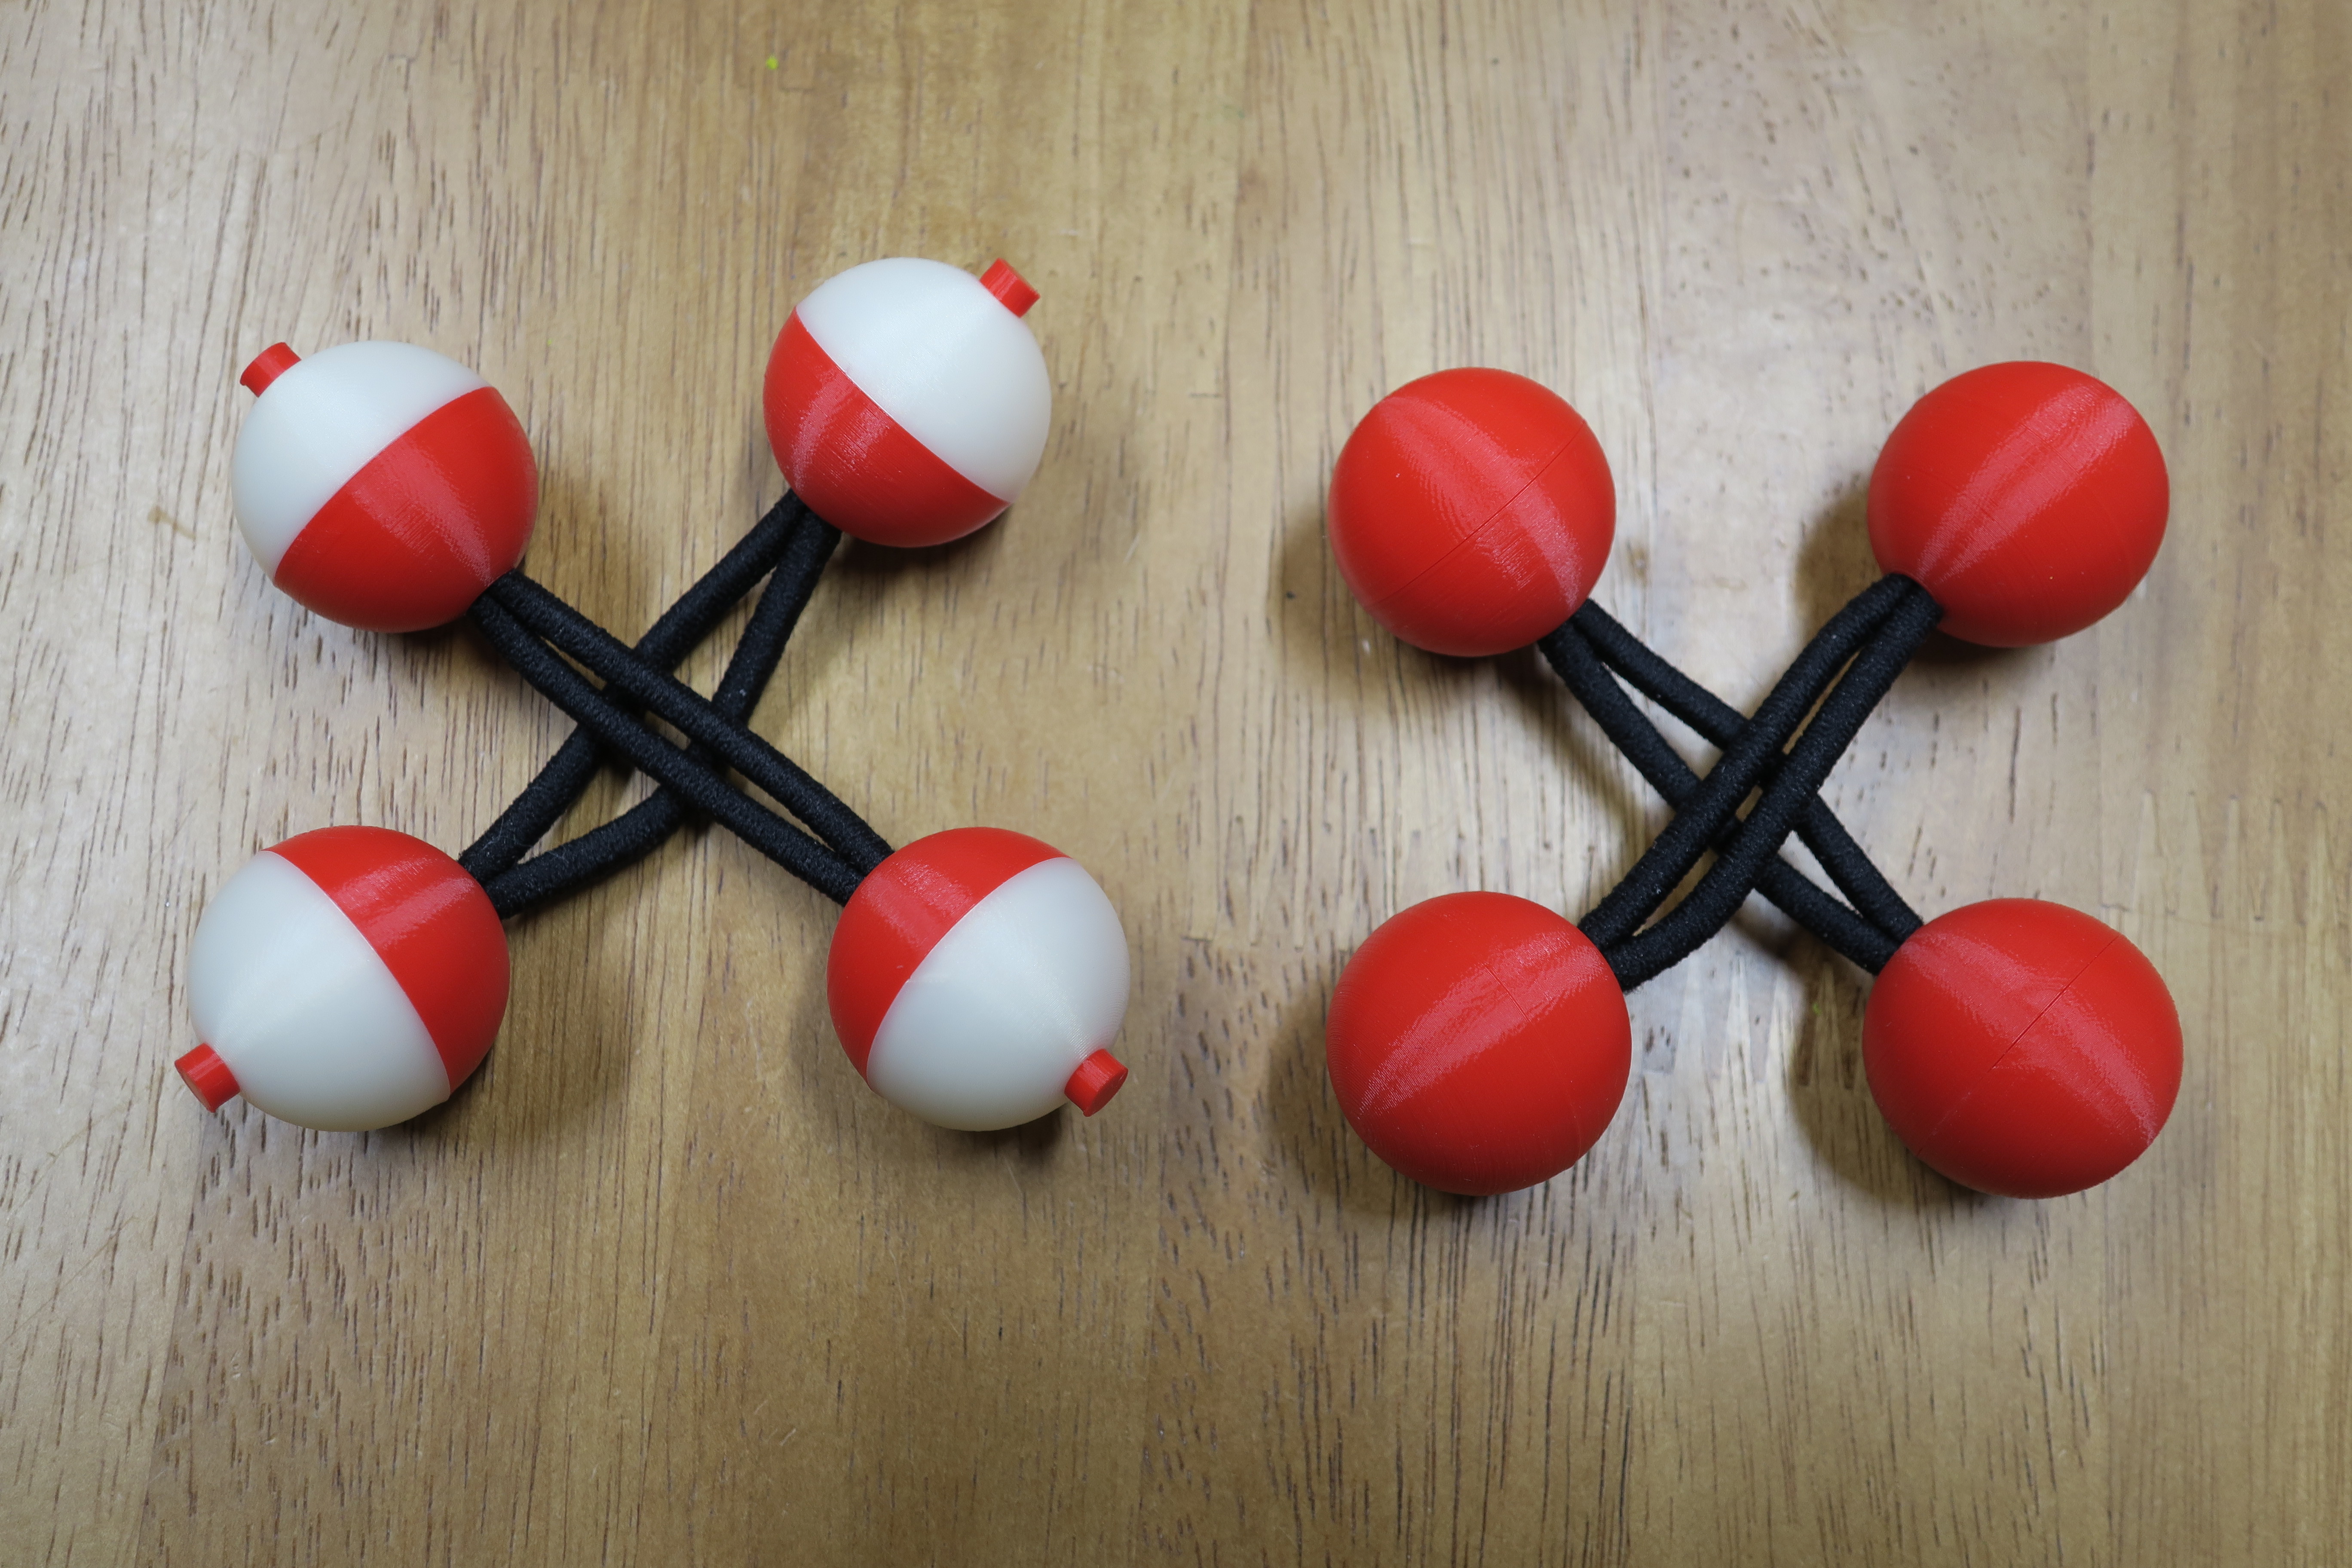
<p>For many years I had been trying to find large retro-style hair bobbles, but nothing matched what I was looking for. So I designed one myself around scünci brand “no damage” hair elastics (part numbers 17278 or 17829) and made it customizable. I tried mixing different colored top and bottoms, and realized that it kinda looked like a fishing bobber, so I created an additional top piece that has a little cylinder on it to optionally complete that look if you so desire. The normal spherical ones I designed are included here too!</p><p>For the fishing bobber style hair bobber pictured in the photos and build instructions, I used Prusament Vanilla White and Lipstick Red.</p><p>For instructions on how to perform a color change at a certain layer: <a href="https://help.prusa3d.com/article/color-change_1687">https://help.prusa3d.com/article/color-change_1687</a> (Or you can just use my 3MF files, which already have the color change added.)</p><h4>Additional requirements:</h4><ul><li>scünci no damage hair elastics part number 17278 or 17829 (or equivalent)</li><li>Super glue</li><li>A small piece of string (or a 3D printed wipe strip) to pull the elastic through the hole of the bobble</li></ul><h4>Recommended print settings:</h4><ul><li>0.1mm layer height</li><li>0.1mm first layer height</li><li>3 perimeters</li><li>15% infill</li><li>No supports</li><li>Optional: I slowed the print speed down to 25% using the dial on my Prusa MK3S+ for just the first layer, but that's just because I wanted a perfect finish on my first layers.</li></ul><h4>To make two fishing bobber bobbles print:</h4><figure class="table"><table><thead><tr><th>STL File</th><th>Color</th><th>Quantity</th></tr></thead><tbody><tr><td>artcfox_25mm_hair_bobble_pin_0.3_clearance.stl</td><td>White</td><td>4</td></tr><tr><td>artcfox_25mm_fishing_bobber_hair_bobble_top-white-red.stl</td><td>White→Red</td><td>4</td></tr><tr><td>artcfox_25mm_hair_bobble_bottom.stl</td><td>Red</td><td>4</td></tr></tbody></table></figure><p>Or to get all of my recommended settings and the color change:</p><figure class="table"><table><thead><tr><th>3MF File</th><th>Color</th></tr></thead><tbody><tr><td>Fishing_Bobber_Plate_1_White.3mf</td><td>White</td></tr><tr><td>Fishing_Bobber_Plate_2_White_Red.3mf</td><td>White→Red</td></tr><tr><td>Fishing_Bobber_Plate_3_Red.3mf</td><td>Red</td></tr></tbody></table></figure><p>Note: I found that when mixing top/bottom colors, things fit better with the 0.3mm clearance pins, as each color prints slightly different. If this still doesn't fit, try using the pin file with increased clearance. I also found that I get a better surface finish on the hemispheres if I print them on a plate by themselves, and the pins on a plate by themselves. You will need to print the top and bottom on separate plates due to the color change (3 plates total). I also enabled ironing of top surfaces only on the top plate with the color change so the top of the fishing bobber's cylinder gets a perfectly smooth surface.</p><h4>To make two normal spherical bobbles print:</h4><figure class="table"><table><thead><tr><th>STL File</th><th>Color</th><th>Quantity</th></tr></thead><tbody><tr><td>artcfox_25mm_hair_bobble_pin_0.2_clearance.stl</td><td>Any</td><td>4</td></tr><tr><td>artcfox_25mm_normal_spherical_hair_bobble_top.stl</td><td>Any</td><td>4</td></tr><tr><td>artcfox_25mm_hair_bobble_bottom.stl</td><td>Any</td><td>4</td></tr></tbody></table></figure><p>Or to get all of my recommended settings:</p><figure class="table"><table><thead><tr><th>3MF File</th><th>Color</th></tr></thead><tbody><tr><td>Normal_Spherical_Bobble_Plate_1.3mf</td><td>Any</td></tr><tr><td>Normal_Spherical_Bobble_Plate_2.3mf</td><td>Any</td></tr></tbody></table></figure><p>Note: I found that when using the same top/bottom color, I can get a perfect fit (less wobble when gluing the halves together) using the 0.2mm clearance pins. If this doesn't fit, try using a pin file with increased clearance. Since there is no color change here, you can print all the tops and bottoms on the same plate, and I found I get a better surface finish by printing the pins on a plate by themselves.</p><h4>Assembly:</h4><p>The assembly steps for the both styles are the same, so I'll just walk through the steps for the fishing bobber style hair bobble.</p><h5>Print and gather all required components</h5><figure class="image"><img src="https://media.printables.com/media/prints/220848/rich_content/48a6a4b0-6499-4066-ba8c-d67dfad65c39/img_8425.jpg#%7B%22uuid%22%3A%22d729eaab-9c4b-4eb0-b034-da7e8297fec3%22%2C%22w%22%3A5472%2C%22h%22%3A3648%7D"></figure><p>4x pins, 4x tops, 4x bottoms, a small piece of string (or 3D printed wipe strip), 2x hair elastics, super glue</p><h5>Test fit the pin by placing the side of the pin that was touching the print bed toward the hole in the red half (this keeps any potentially sharp edges away from the elastic).</h5><h5><img src="https://media.printables.com/media/prints/220848/rich_content/b09e53b6-0ffc-4561-9507-73bee7239559/img_8426.jpg#%7B%22uuid%22%3A%22d975d03e-b544-4904-8cb4-a52f5f369848%22%2C%22w%22%3A5472%2C%22h%22%3A3648%7D"></h5><h5>Align the top half with the pin, and press them together. Hold it up to the light to make sure there is not a gap. If there is, you can try squeezing them while wiggling them, or turn the top half 180 degrees to see if that's a better fit. If they still don't fit, you may have to print a set of pins with a bigger clearance.</h5><figure class="image"><img src="https://media.printables.com/media/prints/220848/rich_content/54dbce34-717c-4151-837f-3ef6d149b99b/img_8427.jpg#%7B%22uuid%22%3A%220f816555-eef4-49fc-b6dd-858ba51aea84%22%2C%22w%22%3A5472%2C%22h%22%3A3648%7D"></figure><h5>Remove the pin from the two halves and set it aside carefully so when the time comes you can place it back inside in the same orientation that gave you the best fit. Loop the string around the hair elastic near its seam. We will be pulling the seam inside the sphere, but we don't want it exactly on top of the pin, so align the string right next to the seam.</h5><figure class="image"><img src="https://media.printables.com/media/prints/220848/rich_content/d0c69589-1269-4a2a-bcd0-559527cfaae5/img_8430.jpg#%7B%22uuid%22%3A%2265cf95f0-72d8-417b-9db8-967023e769fc%22%2C%22w%22%3A5472%2C%22h%22%3A3648%7D"></figure><h5>Align the elastic with the curved part of the red half so when you pull it through using the string, it pops through the other side into the curved groove and the hole in the elastic is aligned with the cutout for the pin.</h5><figure class="image"><img src="https://media.printables.com/media/prints/220848/rich_content/780ce815-8dd9-447b-af75-36331d4cf3be/img_8432.jpg#%7B%22uuid%22%3A%226e6a3ed3-e197-49c4-9514-9344e81b567d%22%2C%22w%22%3A5472%2C%22h%22%3A3648%7D"></figure><h5>Place the pin through the hole in the elastic and into its cutout, making sure that the side that was touching the print bed is facing the hole (its potentially sharp edges facing in a safe direction). Once it is aligned, pull on the elastic from the other end to make sure that it grips the pin tight and that the seam of the elastic is inside, but not directly on top of the pin.</h5><figure class="image"><img src="https://media.printables.com/media/prints/220848/rich_content/c15ff509-3e54-44f7-8c9a-3addce52892a/img_8433.jpg#%7B%22uuid%22%3A%2211616681-3b01-45cc-a3c4-3116955af9e6%22%2C%22w%22%3A5472%2C%22h%22%3A3648%7D"></figure><h5>Carefully apply a drop of super glue in each corner between the elastic and the pin, and then spread that around the top and bottom of the pin and elastic, being careful to keep any glue away from the edges of the sphere so it doesn't ooze out and ruin the surface finish.</h5><figure class="image"><img src="https://media.printables.com/media/prints/220848/rich_content/b654d53d-03fe-4814-aec6-f31841b668be/img_8434.jpg#%7B%22uuid%22%3A%222585b350-575f-4508-819c-d5d367ae6494%22%2C%22w%22%3A5472%2C%22h%22%3A3648%7D"></figure><h5>Carefully align and place the top half on the bottom half and squeeze tightly, checking that the hemispheres are aligned by looking at it from multiple angles. If any super glue does leak out when you squeeze the two halves together, don't touch or smear it, just wait for it to dry and then carefully cut if off with a sharp blade.</h5><figure class="image"><img src="https://media.printables.com/media/prints/220848/rich_content/a5c89da0-7623-450c-a0ed-7d51e698c5b3/img_8435.jpg#%7B%22uuid%22%3A%22451f1b3b-42a6-4d4a-987f-a370808fa484%22%2C%22w%22%3A5472%2C%22h%22%3A3648%7D"></figure><h5>Set this aside for now, and wait for the glue to dry. Once dry, use the string to pull the other half of the elastic through the hole in another red piece making sure it is aligned with the curved channel.</h5><figure class="image"><img src="https://media.printables.com/media/prints/220848/rich_content/34375ed4-3077-4ad9-b6c3-461cd3124156/img_8436.jpg#%7B%22uuid%22%3A%22c1c4bf35-0229-4e5e-a9f8-732f6e0a97d4%22%2C%22w%22%3A5472%2C%22h%22%3A3648%7D"></figure><h5>Place the pin inside with the print bed side facing the hole, pull the elastic tight, and do another test fit with another top piece. Remember that orientation, and carefully apply super glue like you did before, and press the pieces together tightly (checking the alignment from multiple angles) until the super glue is dry. Repeat the same set of steps with the next set of 3D printed parts and the other hair elastic.</h5><figure class="image"><img src="https://media.printables.com/media/prints/220848/rich_content/a83ce017-5a14-4f56-940a-4168f55fbf46/img_8438.jpg#%7B%22uuid%22%3A%226e03b606-114e-4445-9713-3983061fc04b%22%2C%22w%22%3A5472%2C%22h%22%3A3648%7D"></figure><h5>Congratulations, you are done! Feel free to print out more in different colors, or customize the sizes using OpenSCAD, and don't forget to post a make so I can see yours!</h5><figure class="image"><img src="https://media.printables.com/media/prints/220848/rich_content/017ed207-a703-4397-aca7-4b6d554e97b3/img_8443.jpg#%7B%22uuid%22%3A%22c15c7265-06ba-4118-aefe-d2f41e7c3d2c%22%2C%22w%22%3A5472%2C%22h%22%3A3648%7D"></figure>
With this file you will be able to print Hair Bobbers with your 3D printer. Click on the button and save the file on your computer to work, edit or customize your design. You can also find more 3D designs for printers on Hair Bobbers.