half a raspberry with vine leaves how to tutorial
thingiverse
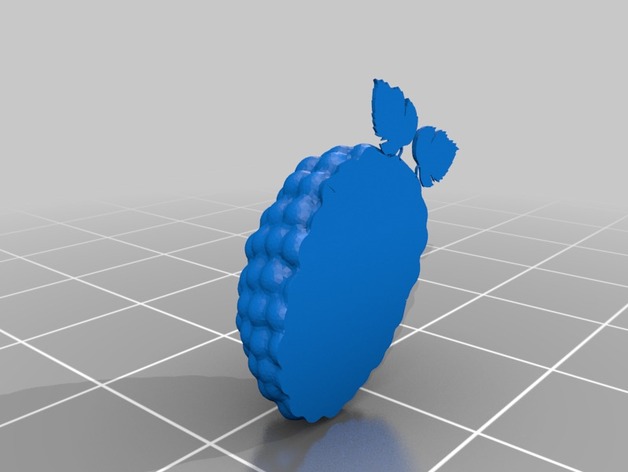
Human: A Quarter Raspberry with Vine Leaves\ntutorial on Instructions Page.\n\n \n \n Instructions\nMeshmixer & YouTube Tutorials ;)\nHere We Go.\nDownload\nSketchUp Make. http://www.sketchup.com/download\nAutodesk MeshMixer. http://www.meshmixer.com/download.html \ndownload "3D Animation - Raspberry, Rubus" from User "Rubus" on Google's 3D Warehouse by searching "Raspberry" https://3dwarehouse.sketchup.comhttps://3dwarehouse.sketchup.com/model.html?id=3252bc65933665184e08fc4ea39c13e7 \nopen in SketchUp, &\ndownload STL Plugin from Google's Extension Warehouse via "Window" in the Menu in Your SketchUp Program.\nThen Export as STL \nRepair this STL @ https://netfabb.azurewebsites.net/ \ndownload Vine Leaf Right by Miodragd (but My Repaired Edition) @Thingiverse http://www.thingiverse.com/thing:714034 \nopen the repaired "Raspberry" Model in MeshMixer\nthen Click "Import"\nit will Ask whether to "Append", "Replace", or "Cancel".\nChoose "Append"\ngo to your Repaired "Vine Leaf" STL, and Click "Open".\nMeshMixer Will Ask Whether or Not to Repair the New Models' Larger Faces. Choose Yes. \nNow the models are in MeshMixer, You Need to Know how too Navigate. Use YouTube Tutorials for Better Explanation than Mine;\nClick and Hold Right Mouse Bttn = Look Around (move the Camera)\nPressing "c" Centers the Screen to the point of Your Cursor at that Moment.\nZoom with Your Mouse Wheel Scroller. \nmorest Knowledge is for Later. lets go With This First.\nif You don't see a small Window called "Object Browser", Go to Menu, "View" and Click "Show Object Browser".\nyou Can See That the Object Browser contains your Two Imported Models.\nIgnore the Magnet Symbol Behind Your Model Name, click the "Eye" symbol on and off, just too see what it Does. its Handy for Later. \nNow resize Your Vine Leaf until proper size by\nselecting It in Your Object Browser\nclicking On "Edit" (left) Which makes a New Menu appear.\nin That New Menu, Choose "Transform".\nNow, for Each Axes, You Get a Straight Arrow, Which moves the Model along that Axes.\nand a bend colored Piece, Which Makes you Tilt your Model on that Axes. just click, hold, and drag.\n@the End of the Axes Indicator there is a Square Appendix, Which is used too stretch the Model on that particular Axes. \n@the Center of the Arrows, there is a small white Box. Click, Hold and Drag up or down to scale Your model.\ntest some, and Ctrl-Z ;)\nThese are the Basic Navigation you Need to Complete this Instructable, for Further Tutorials, Please refer too a search Engine :D \nSo scale your leaf, drag it into position, rotate it till its Cosy, and click Accept.\nNow Select that Leaf in Object Browser, and Mirror It by clicking "Edit" and "Mirror"\nmeshmixer Will Give you a Plane to pull in order to define the Mirroring point in Relation to the original object.\nif u Pull it Far enough, a New , mirrored Object will appear next to It.\nalso drag this new,mirrored Object\nNext Go to "Analysis" and Select "Flat Fill" and "Auto Repair All" \nand Before Exporting, We are going to "Reduce" the number of Faces by Going via "Select",\nselecting any Part in the Model by Clicking on the model\nand going via "Edit"in the Newly appeared Menu, too "Reduce"\nin this Case, You Want to select "Triangle Budget", Research the Rest ;)\nkeep the second Drop-down-menu On "Shape Preserving"\nAnd click the "Tri Count" slider Back until One Fourth (1/4) of the Slider.\nmakes sure "Preserve Boundaries" is Checked and\naccept. your Filesize just Went from +/-80.000kb to +/-7.000kb,\nwich is about the max filesize you can Comfortably load on a Windows PC running repetier with less then 4GB Ram memory.\nnow Click "Export" (left) \nNow Your Raspberry is Ready for 3D Printing.
With this file you will be able to print half a raspberry with vine leaves how to tutorial with your 3D printer. Click on the button and save the file on your computer to work, edit or customize your design. You can also find more 3D designs for printers on half a raspberry with vine leaves how to tutorial.