Pi Zero Node - Friction Fit
thingiverse
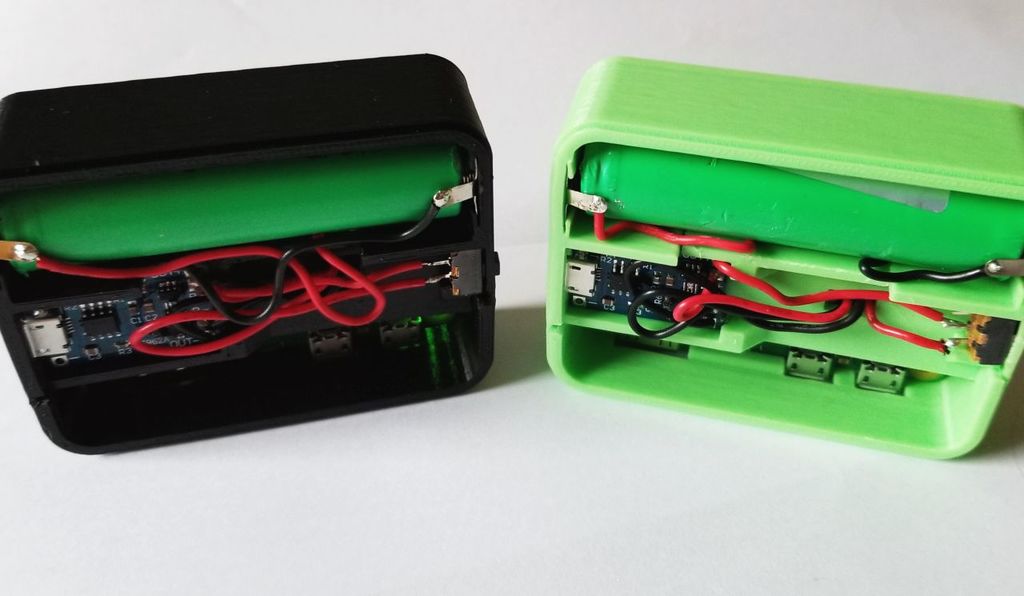
A nice, compact Pi Zero node case! Inspired by [blankdesign's node case](https://www.thingiverse.com/thing:2841417), this case is entirely friction fit and uses the flexibility of PLA to keep components in place. The USB charging slot will need to be adjusted if you use a small TP4056, but I also included the STEP file so it should not be difficult. Components list: Pi Zero / Pi Zero W 18650 Li-On Cell [SPDT Switch](https://www.amazon.com/gp/product/B007QAJST6/) [TP4056 Li-Ion Charger](https://www.amazon.com/gp/product/B01DRT4PWY/) [Silver Tone Metal Spring Connectors](https://www.ebay.com/itm/100pair-Silver-Tone-Metal-Spring-Battery-Contact-Plate-Set-For-AA-AAA-Batteries/202077747472) Assembly Instructions (Note: do not add an SD card to the Pi Zero until the end!): 1. Solder all connections except the SPDT switch. This means snaking the wires through the case insert hole to hide messy wiring. 2. Gently place the Pi Zero with the connector-side first, then push against friction tab to pop Pi Zero into place. 3. Place TP4056 into case-insert and hold against the plastic while placing the case-insert USB-charger side first into the case. 4. Push the spring terminals into the plastic inserts, ensuring you correctly orient the negative and positives. I find soldering the wires inside-to-out makes the lid fit easier. 5. Push the case-insert down with your thumb while sliding the SPDT switch into place. The case insert should keep the switch in place while you release tension, and hold the switch securely in place as you release. 6. Solder the SPDT switch so that the Out+ goes to the middle prong, and the Pi Zero 5v goes to the left prong. 7. Place in the 18650 cell into the case, ensuring with a multimeter that your terminals are correctly touching the cell ends. I found I had to add a small solder blob to the positive terminal to fit my 18650 connector. 8. Ensure the lid pressures down onto the bottom case, it should snugly snap into place. 9. Slide a Micro SD card into the Pi Zero through the opening, and power on the Pi Zero node. If you see blinking green lights, you should be ready to go!
With this file you will be able to print Pi Zero Node - Friction Fit with your 3D printer. Click on the button and save the file on your computer to work, edit or customize your design. You can also find more 3D designs for printers on Pi Zero Node - Friction Fit.