Han Solo Blastech DL-44 conversion parts
thingiverse
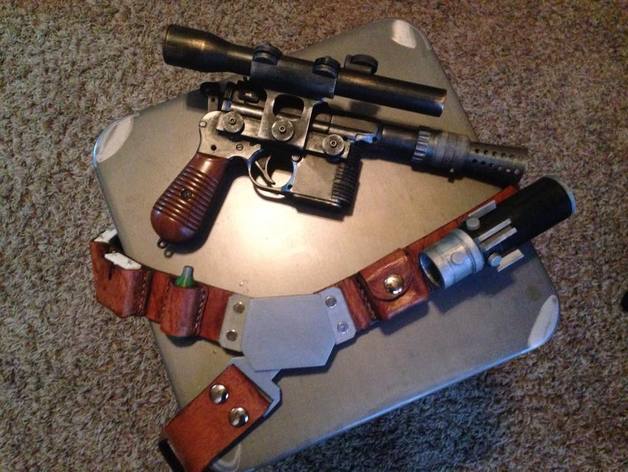
Others have provided similar sets of pieces to convert a Mauser replica into Han Solo's signature blaster. This is simply my take on the thing. Mine is based on an inexpensive, airsoft Mauser that I got on Amazon. Small update: I designed the parts so that I wouldn't have to use supports, which is what led me to split the scope mount and scope vertical rail into two parts that would then be glued back together. This glue joint, by it's very nature, creates a weak point that could break. So, I'm adding a unibody version of the scope mount as an option. I haven't printed one of these myself, so I don't know the best orientation for it, but it will definitely need to be printed with supports. Another update: A month or so ago, I uploaded a new version of the front heatsink. When I did, I completely and utterly failed to give proper credit to the originator of that model, Delphius. My sincerest apologies for this oversight on my part. Delphius's great work can be found here: http://www.thingiverse.com/thing:1245642 Instructions All pieces should print best in the orientation provided. Supports should not be needed. NOTE: The heat sink has supports built onto the model that should be removed before attaching. Print 2 of the scope top brackets. Glue the scope vertical rail to the scope mount. Glue the two halves of the scope together and then glue the scope adjustment mount to the top. The scope adjustment knob and scope rings will stay in place with tension alone. Attach the scope horizontal bar to the body of the replica gun by first attaching the the two widest knobs to be used as spacers and mounting points. Glue or screw these to the replica body, then attach the bar to the mounting points using the knurled knobs and M3 screws. Slide the vertical scope rail onto the dovetail, and secure it with the center knob and another m3 screw. You'll likely have to cut the barrel of the replica down to receive the barrel extension. Secure it in place, and attach the flash suppressor, using another M3 screw to hold it in place. I made the flash hider removable so that I could swap it out with an alternate version that has the end painted orange, should I ever decide to brandish it in public. The scope is held into the mount with the top scope brackets and M3 screws (I use M3s for everything). The heat sink will need to be glued in place.
With this file you will be able to print Han Solo Blastech DL-44 conversion parts with your 3D printer. Click on the button and save the file on your computer to work, edit or customize your design. You can also find more 3D designs for printers on Han Solo Blastech DL-44 conversion parts.