Hand Gestures
thingiverse
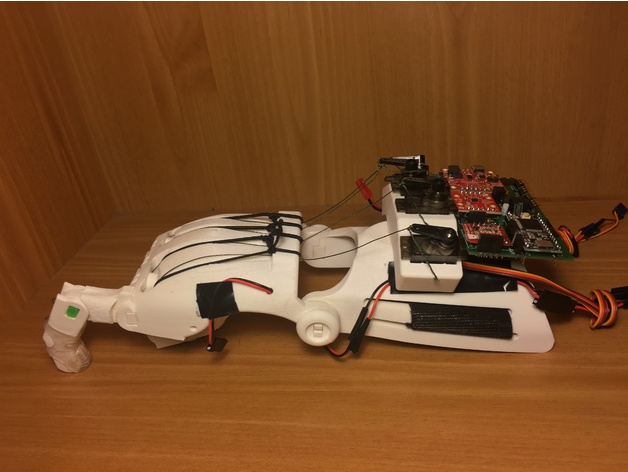
A Prosthetic Hand Driven by Servos is Remixed into a Gesture-Controlled Hand. The Raptor Reloaded hand is now capable of performing gestures, thanks to its new servo-driven design. It can be controlled either by detecting movements using an IMU or via an Android app over Bluetooth. Print Settings: * Printer: Fortus * Supports: Yes * Infill: 35% * Notes: + Print count: - 1: Palm - 1: Wrist_plate - 1: Servo_holder - 1: Retention_clip - 2: Wrist_pin - 2: Wrist_cap - 2: Knuckle_pin - 4: Finger_pin - 4: Finger_proximal - 4: Finger_tip Post-Printing: Assembling the Hand: Follow these assembly instructions to build your Raptor Reloaded hand: Instructables - Assembly-of-e-NABLEs-Raptor-Reloaded-Hand. You can purchase additional materials in a kit from 3D Universe - Raptor Hand by e-NABLE - Assembly Materials Kit. Stringing the Hand: General Breadboard Setup: The following equipment is used: + Microcontroller: Teensyduino 3.2 + IMU - 6DoF: Sparkfun, LSM6DS3 + Servos: SG90 + Flex Sensor: Sparkfun + Battery Babysitter: Sparkfun + BLE Nano, V1.5 Redbear Labs + Battery - 800mAh 3.7V: Venom Teensyduino Programming: The Teensyduino is programmed using the Arduino IDE. I used version 1.6.11. Download it here: https://www.arduino.cc/en/Main/Software. Follow this tutorial to install the "Teensy Loader application" and the "Teensyduino installer": https://www.pjrc.com/teensy/tutorial.html. Then, you can upload code to the Teensyduino. My final code running on the Teensyduino is here: Hand_Project.ino. BLE Nano programming: To download firmware on the BLE Nano without the MK20 USB board, we must upload it OTA. Follow these instructions to install "RedBearLab nRF51822 Boards" add-on to the Arduino IDE: https://github.com/RedBearLab/nRF51822-Arduino/#install-board-package-add-on. Download the nRF Connect app onto your Android phone: https://play.google.com/store/apps/details?id=no.nordicsemi.android.mcp&hl=en. Arduino Code: In Arduino, once you have the file you want to upload to the BLE Nano: + Choose your board (Tools > Board > nRF51822) + Upload the code My app was based off of one of Redbear Lab's example apps. The app searches for and connects to the BLE Nano, and then allows the user to begin sending gesture commands to the hand. What I would do differently: CAD Design: The two middle servos are just a little too close to not hit each other, when they sweep around. PCB Design: In my servo connections, I have the ground and power pins opposite to how they are ordered physically. I had to cut and re-solder the servo wires.
With this file you will be able to print Hand Gestures with your 3D printer. Click on the button and save the file on your computer to work, edit or customize your design. You can also find more 3D designs for printers on Hand Gestures.