Handheld GriGri
thingiverse
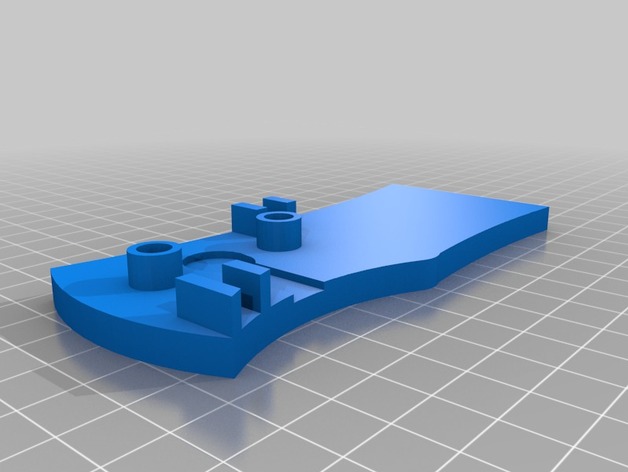
A simple Grigri model that can be used to teach friction and simple machines in the classroom. The lever needs to be put in the indented space. Paracord will have to be inserted through the top of the bottom half through the guides, and the be put under the first peg over the lever peg and around around the right of the final peg. (In the files you will find two GriGris, one being the original, and one being the one made in the tutorial.) Print Settings Printer: Da Vinci Jr. 1.0 Rafts: Doesn't Matter Supports: Doesn't Matter Resolution: excellent; highest resolution Infill: 90%-100% Notes: I printed this with 0.10 layer height. How I Designed This Step 1 Begin by making your handle. Feel free to be as simple or as creative as you like. It could be as easy as making a rectangle (example 1), or a grip that fits your hand like the one in the thumbnail. The dimensions are 2 1/2" x 3". example 1 Step 2 You will need to start by making four rectangles, one on each side (where the cord comes in and out), leaving 1/4" between and making the rectangles 1/8" wide. Step 3 You will now need to make three circles near the exit guide, one with a diameter of 3/8", then 3/16" away from that a circle with a diameter of 1/2", then 3/16" away other circle with a diameter of 1/2", and then finally 3/16" away from the middle circle, one with a diameter of 3/8" once again. Finally, make a small arc from the center of the middle circle 7/16" up. Step 4 Make two lines from the bottom of the middle circle all the way down. Step 5 Time for the easy part! Start by raising everything to 3/16". Step 6 Raise everything but the middle channel, arc, and peg by 1/16". Step 7 Raise the guides and pegs by 1/4". Step 8 Make small circles with a diameter of 3/16" in the middle of the two pegs. Step 9 Fill in the underside with one rectangle. Before After Step 10 Lower the peg circles by 1/2". Step 11 Make another rectangle with the same measurements, mark the holes on the plate, and then make holes where they correspond on the other pegs. Step 12 Raise the plate to 1/4" thick. Step 12 Make a shape that fits the circle in the middle perfectly, but shrink the waist some and make it a little longer than the original channel. Then raise it to 5/16". (Measurement is length of channel) (Measurement is length of the arm) Step 13 (FINAL) Make two circles, the same diameter of the holes, and raise them to 3/4". Final Assembly The lever is to be inserted to where it is caught by the indentation, then wind paracord through the top guide, around the right of the first peg, up through and around the lever peg, then down through the crack between the last and middle pegs, and finally out the guide. Lastly, lay on the top plate and put the bolts through both the plate and the center of the pegs. Finished! Project: The Handheld GriGri Project Name Friction through falling! Overview and Background By completing the project, students will gain an understanding of friction and be exposed to simple machines. Objectives Students are expected to learn the effects of friction in a pinched space. Audiences This Project is focused to students in the fourth and fifth grade of elementary school, ages 10-12. Subjects Science, Engineering, Physics. Skills Learned Students will have an understanding of friction, simple machines, and gravity towards weight when the project is completed. Lesson/Activity Lay the lever into the indented space, then give each student a length of 7 strand paracord, and have them wind it around the three pegs, as is shown in the diagram in the pictures. Then lay the top plate on the bottom plate so the holes line up, and put the pegs through both holes. When you pull up on the piece of rope on the top of the model, it won't move. When you push on the lever and then pull, however, it will move because there is a gap between the dowels. Duration This project will take about 1 school week if printers are working constantly. Preperation Students will need 3d printers with a new spool of filament, and a length of 550 paracord. Refrences Post-project go online and study the mechanics of a standard GriGri. Rubric & Assessment Students should have designed and made a working GriGri and be able to explain the mechanics. Extra points are to be rewarded due to creativity of design. Handouts & Assets Students will need nothing but 3d printing access, plenty of filament, and 550 paracord.
With this file you will be able to print Handheld GriGri with your 3D printer. Click on the button and save the file on your computer to work, edit or customize your design. You can also find more 3D designs for printers on Handheld GriGri.