Handlebar mount adapter for scooter, motorcycle (for phone cradles etc)
thingiverse
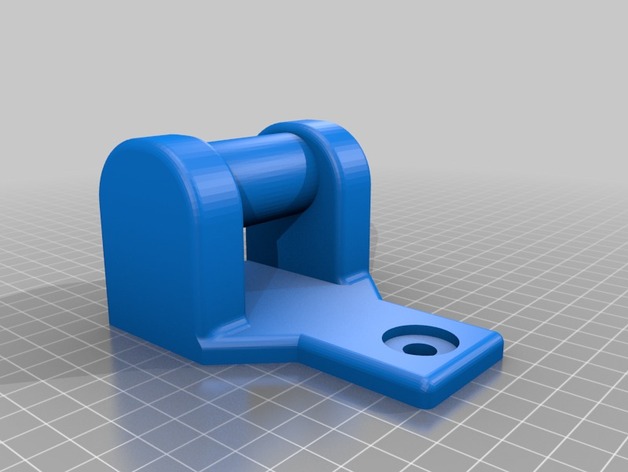
This mount allows you to use phone and GPS cradles with handlebar mounts on scooters with no handlebars. It attaches to a right mirror post. Due to vibration and stress, it needs to be reinforced with a T-shaped piece of metal underneath, otherwise plastic will most likely break. I used this mount with iOttie Active Edge mount and it works great! (http://www.iottie.com/Product/Detail/1619/iOttie-Active-Edge-Bar-Grip-Mount-For-Bike-And-Motorcycle-_-Black) BOM: 6 in. x 5 in. 14-Gauge T Strap, found at Home Depot, part #461407 Epoxy, I used a 5 minute one from Harbor Freight Washer (will add description) (Optional) Socket set screw (will add description) Your preferred cutoff tool, a few clamps, a drill with a large drill bit Print Settings Printer: Wanhao i3 Rafts: No Supports: Yes Infill: 40%+ Notes: Make sure to supports are enabled for "everywhere", not just touching the build plate: the crossbar needs to be printed with supports for obvious reasons. I printed with PETG, but ABS would probably work just as well. I don't think PLA would be strong enough. I printed with 40% infill, since I don't think adding more infill makes it any stronger. Post-Printing After the print Take the T strap and hold it to the bottom of the printed part. Mark the lines where the T strap needs to be cut - the "wings" of the strap should be near the center of the wider part of the print, and the stem of the strap should align with the longer part of the print. Cut the T strap with a hacksaw, dremel, oscillating multitool etc. Mix some epoxy, apply to the bottom of the printed part and clamp the T strap to the part. I also applied epoxy to the print itself to reinforce the parts under most stress (see picture). After the epoxy is fully dry, drill out a hole in the metal to match the hole in the print. To mount, insert the washer into the indentation, then take a mirror and insert it through the mount. Screw the mirror into the mirror post, clamping the mount in between. Align the mirror and tighten the nut at the top to secure the whole thing. If you're using iOttie Active Edge, you'll notice that the provided thumbscrew will prevent you from lowering the mount past a certain angle. If you'd like to tilt the cradle lower, you'll need to discard the thumbscrew and buy a socket screw mentioned in the BOM to replace it. Reinforce the risers with epoxy
With this file you will be able to print Handlebar mount adapter for scooter, motorcycle (for phone cradles etc) with your 3D printer. Click on the button and save the file on your computer to work, edit or customize your design. You can also find more 3D designs for printers on Handlebar mount adapter for scooter, motorcycle (for phone cradles etc).