Harrope Cable Cam GoPro v1.0
thingiverse
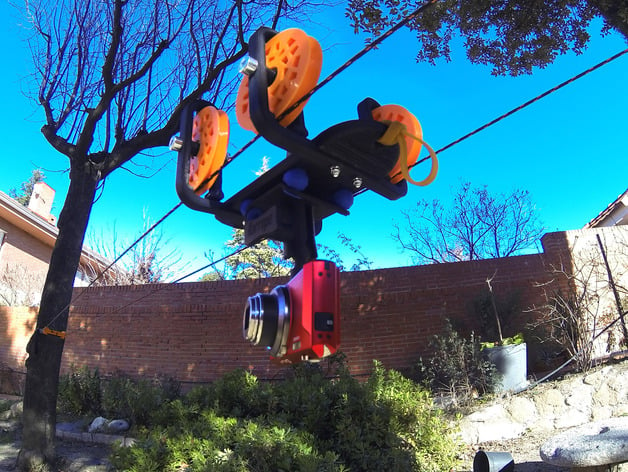
CHECK OUT OUR NEW SLIDER MOTORIZED!!http://harrope.com/en/s1-motorized-camera-slider-panning-motor/ Follow us:https://www.instagram.com/harropecamera/https://www.facebook.com/harropecam https://www.youtube.com/watch?t=1&v=EnPw_HfQdNk Designed by Guillermo Marotohttp://guillermomaroto.com/ How does it work? Engage your camera with the adapter (compatible with GoPro and screw), join the adapter with the cable cam, adjust the angle you want, press well and let it slide by the cords. You can regulate the speed with an auxiliary rope and your pickup, which will also allow you to move the camera without slope. What can we use it for? We can use it to make descents by bike, skateboarding, skiing, basketball games, weddings, events, canoeing, landscapes, careers and much more. The necessary kit to ride the cable cam is composed by: Cable cam with anti-vibration, multi-angle and hook GoPro cameras or screw. 2 rolls of rope as long as you need. Belts and tensioners to install the ropes. Picker with rope pusher for the cable cam. How to install it? The product includes everything you need for installation in less than 5 minutes. Hook a strap if the support is vertical (tree, column, etc.) or two belts if the support is horizontal (rail, branch, etc.). Enter the end of the rope through the separator and do the same with the second string. Engage the separator belt and the cord. Extend it the desired length. Place the second separator at the end of the course and engage with the other belts installed. Adjust the tension of the strings pulling the straps until it is tensed and leveled. Place the cable cam on the ropes in two seconds and start recording! Español ¿Cómo funciona? Enganchamos nuestra cámara con el adaptador (compatible con GoPro y tornillo), éste lo unimos a la tirolina, ajustamos el ángulo que queramos, apretamos bien y dejamos deslizar por las cuerdas. La velocidad la podremos regular con una cuerda auxiliar y nuestro recogedor, el cual también nos permitirá mover la cámara sin necesidad de pendiente. ¿Para qué la podemos utilizar? Podremos utilizarla para hacer descensos en bici, skate, sky, partidos de baloncesto, bodas, eventos, descenso en canoa, paisajes, carreras y muchas cosas más. El kit necesario para montar la tirolina se compone de: Carrito tirolina con antivibraciones, multiángulo y gancho para GoPro o cámaras con tornillo. 2 rollos de cuerda de la longitud que se desee. Correas y tensores para instalar las cuerdas. Recogedor con cuerda de empuje para la tirolina. ¿Cómo se instala? El producto incluye todo lo necesario para su instalacion en 5 minutos. Engancha una correa si el soporte es vertical (árbol, columna, etc) o dos correas si el soporte es horizontal (barandilla, rama, etc). Introduce la punta de la cuerda por el separador y haz lo mismo con la segunda cuerda. Engancha el separador a la correa y extiende la cuerda la longitud deseada. Coloca el segundo separador al final del recorrido y engancha con las otras correas instaladas. Ajusta la tension de las cuerdas tirando de las correas hasta que esté tenso y nivelado. Coloca la tirolina sobre las cuerdas en dos segundos y ¡a grabar! Print Settings Rafts: Yes Supports: No Resolution: 0.2mm/layer Infill: 50%
With this file you will be able to print Harrope Cable Cam GoPro v1.0 with your 3D printer. Click on the button and save the file on your computer to work, edit or customize your design. You can also find more 3D designs for printers on Harrope Cable Cam GoPro v1.0.