Hasbro TFA X-Wing Cannon Jig
thingiverse
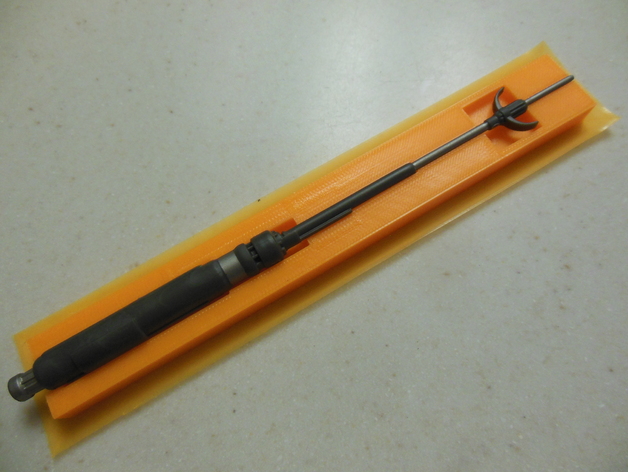
For those of you that bought the Hasbro TFA X-Wing toy and were dismayed at the crookedness of the cannons here is the tool to fix them! Please read the use instructions carefully. This is a simple precision jig that will hold the cannon straight while it cools down after gently heating it with a blow dryer. The cannon does not need to be super hot for this to work. Once placed in the jig it takes about 5 min for a hot cannon to cool down and become straight. Don't rush it. The jig cutouts are symmetrical and meant to hold the cannon at key points while allowing clearance around the part details regardless of the which side they are on. The small flat ridge at the cannon barrel base is always intended to be facing up The STL file is Cura scaled and oriented for printing. The process seems pretty straight forward to me and was very easy to do but I will point out that you IMPLEMENT IT AT OUR OWN RISK. I have included some tips below to help make this process successful. Let me know if there are additional questions on how to use the jig. I may post a video of instructions if people are interested. As you can see in the before and after shots it works great! Print Settings Printer: Rigidbot Big Rafts: No Supports: No Resolution: 0.1 mm Infill: 25% Notes: I would suggest a brim of about 10 lines wide if you have problems with warping or want to just guarantee a flat jig. As this is a precision fit jig I also suggest that you use a calibrated filament to print with. You can find the one I use here: http://www.thingiverse.com/thing:1037301. It will make a huge difference in the quality of the print and the effectiveness of the jig. I used a bottom, top and side thickness of 0.8 mm. You want there to be plenty of thickness to produce a smooth surface finish. For PLA at 190 C I used a bed temp of 60 C and at layer 5 turned it down to 45 C just after the part cooling fan came on to full speed. Post-Printing Clean up Make sure there are no bumps or strings in the trough where the cannon will lay. Trim away any defects with a sharp blade. Be very careful if you sand the surfaces (Should not be needed with a calibrated print) as you can open the jig tolerances and the cannon might not hold in place while it cools. Custom Section Tips - Using the jig Test fit the cannon in the jig to make sure you are familiar with the orientation required to hold it straight and flat. The jig will hold the cannon all by itself so you do not need to hold it in with anything else. It is recommended to clamp the jig down to a solid surface to make it easier to place the hot cannon in it and not have it shift around. This has a second benefit of keeping the jig flat if you do have a slight warp. With a blow dryer on high hot - heat the cannon till it starts to sag just a little. A critical point to get hot is the at the point the barrel meets the cannon body. There is a flat ridge there that is a primary cause of the warped shaped in that area. Do not get the cannon too hot or stretch it. It is better to try two or three attempts in the jig and have to repeat than damage the part. The best way to align the cannon in the jig is to start at the tip and place the flash suppressor right at the edge of the box then make sure the ridge at the base of the barrel is flat against the top of the jig. Work your way across the rest of the features quickly from end to end pressing them into the jig. Note that the flash suppressor may not be parallel to the surface when the flat ridge is. Pay close attention to the image above for placement of the cannon in the jig and when you test fit it. Do not try to heat the cannon while in the jig. You will likely warp the jig. If the cannon does not look straight to you after you remove it from the jig you can gently repeat the heating process to it without harm. The cannons are soft plastic. If over time the cannons start to sag just repeat the procedure to straighten them back out.
With this file you will be able to print Hasbro TFA X-Wing Cannon Jig with your 3D printer. Click on the button and save the file on your computer to work, edit or customize your design. You can also find more 3D designs for printers on Hasbro TFA X-Wing Cannon Jig.