HawkbaitFPV 18650 2s End Caps v03
thingiverse
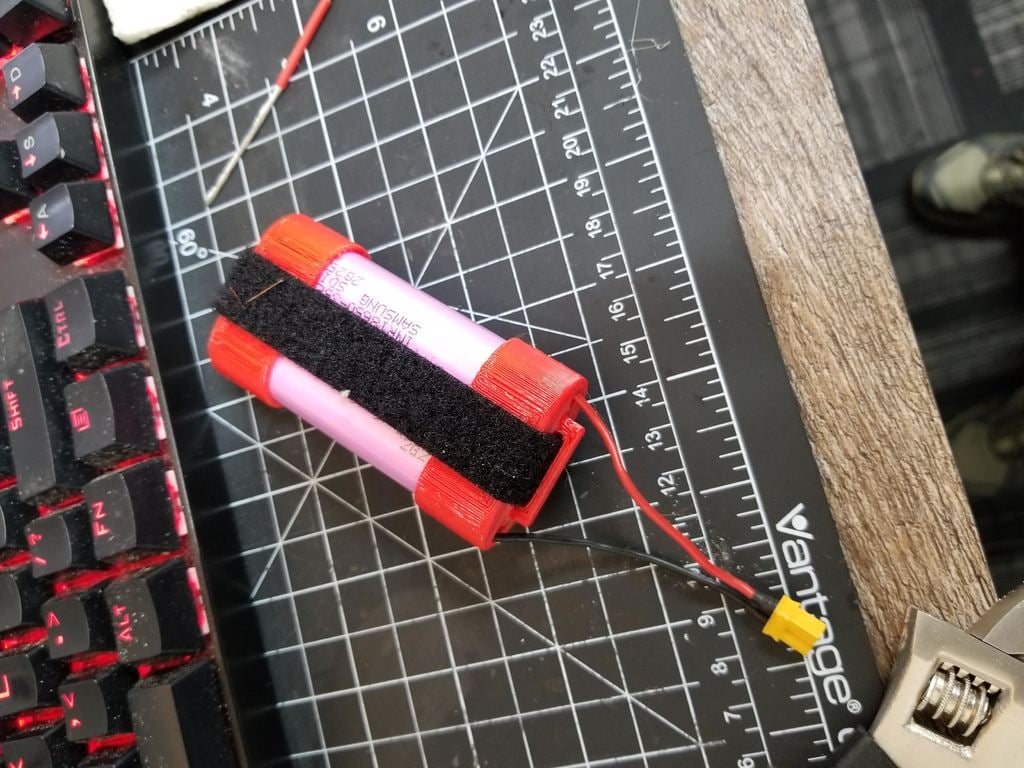
**Disclaimer - 18650 cells and Lithium cells in general can be dangerous and may catch fire or EXPLODE if you mishandle, overheat, over discharge, over charge or physically damage them. Use caution when working with batteries in general and use your best judgment** Hey Micro Drone Enthusiasts. With the recent buzz around ultralight 3 inch quad copters and the amazing capacity and flight times reported by pilots like WildWilly and KababFPV with 18650s I decided I wanted to give the 1860 Diatone Cube 339 combination a try. I have a handful of 18650 cells in the workshop but I wasnt ready to start tab welding them together or worse try to solder onto the raw cells so i devised a solution that would allow me to continue using my existing nitecore charger and charge the cells individually but also easily mount them on the diatone cube frame. Individual cell weight varies wildly depending on the brand and capacity of the cells and even with inexpensive Ultrafire cells its not uncommon to see flight times in the 10 minute range. Some pilots report that with genuine Samsung or LG cells they have flown for up to 17 minutes. To assemble this part you will need to print 2 identical end caps. I designed them in a way that makes them very easy to print and assemble and uses very common parts found in the typical RC hobbyists tool kit. You will need a Soldering Iron, 4 conductive disks approximately the size of a US dime (18mm) High silicone battery wire and an XT30/Beta connector ETC. V03 - Once the parts are done printing focus on the assembly of the conductor disks. Some people my choose to use something like a US dime while others can find copper disks at the local hobby shop simply cut out the size and shape you need and use a punch or large screwdriver to hammer a protrusion to the depth of your particular 18650. 3-4 swings with a lightweight hammer over soft wood is enough to create the protrusions in a US dime. Some cells have large protrusions on the positive side of the cell while others have flat tops. sand the protrusion flat or relatively flat to to ensure you dont end up with a small contact patch that may result in both poor performance as well as additional heat due to excess resistance. For the remainder of the build Ill refer to one side as the END CAP and the other as the BATTERY LEADS. Simple solder your battery leads ( XT30 or PH2/Beta connector ) to one pair of the conductors threading the battery leads through the provided holes in one end of your case. Then solder the other 2 conductors together using a small length of wire to create a 2S configuration. If you so choose now would be the time to glue the conductors into the end caps to prevent them from falling out of the end caps when changing cells. Install your cells according to the indicator marks on the side of the caps and as always test with a multi meter before plugging into your quad copter to ensure you have installed the batteries correctly and have the correct polarity. **V04 is currently the lightest option, printed in PETG with 25 percent infill with 4 perimeters it weighs in at 10G. It does not hold the cells as tightly or as well aligned as the original version but on micros every gram counts** Flight video will follow additional testing in this configuration - FLIGHT VIDEO PLACEHOLDER -
With this file you will be able to print HawkbaitFPV 18650 2s End Caps v03 with your 3D printer. Click on the button and save the file on your computer to work, edit or customize your design. You can also find more 3D designs for printers on HawkbaitFPV 18650 2s End Caps v03.