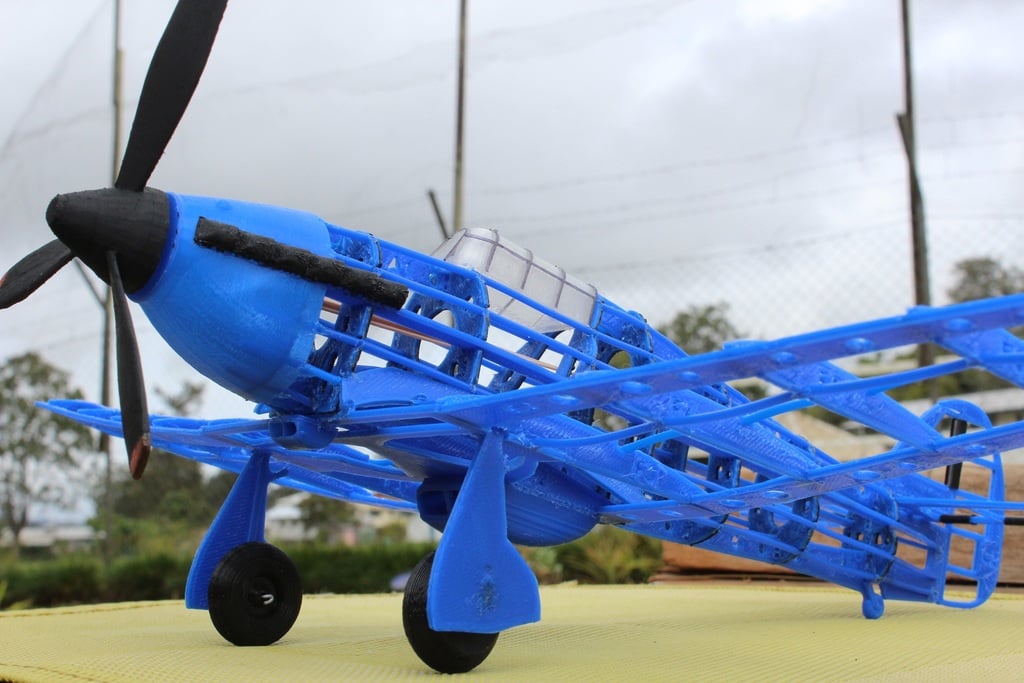
Hawker Hurricane MKIIA model plane
thingiverse
- For 3D printing or laser cutting - Designed to work and be assembled like the old balsa wood rubber band model planes - The wingspan of the aircraft is ~420mm - A reference assembly video has been posted at the following link: https://www.youtube.com/watch?v=KGvR3ibxaFY - A few weeks ago I uploaded a similar design of a Spitfire plane: https://www.thingiverse.com/thing:3534350 - Some of the parts as the cockpit and the nose of the airplane are being optimized for spiral vase printing. - Also check the redesigned version of this plane as a full RC model https://www.thingiverse.com/thing:3884803 If you need to buy this model for business use and have a receipt for it visit: https://cults3d.com/en/3d-model/game/hawker-hurricane-mkiia-model-plane Printing INSTRUCTIONS: *** Propeller 0.1mm layer height 6 top and bottom layers support material 2 rafters no skirt Print as it is and do not flip over. It should be with the nose down and with the hole up sand, prime, sand and paint for smoother surfaces. See the pictures and the video for example. *** Nose spiral vase 0.1mm layer height 6 to 10 bottom layers print as it is and do not flip (it should be small flat base down). *** Cockpit (if printing as spiral vase) 0.1mm layer height 2 bottom layers Trim the flat base surface after printing *** Cockpit (if printing as solid model) 0.1mm layer height 0% infill 7 top layers 2 bottom layers Trim the flat bases surface after printing *** Wheels, Radiator housing and Air intake scoop 0.1mm layer height 6 top and bottom layers no rafters or support material I also successfully used the variable layer height feature in Slicer and worked perfectly for smoothing the surfaces and revealing the details. *** Front wheel holders 0.2mm layer height 15% infill The upper section can be shortened with up to 6mm if it's too long, depending on how you want to install it. *** All the other parts 0.3mm layer height no special settings and leave the default infill settings. Most likely it does not matter as all the pieces are having only 6 layers Use the provided A3 layout to get the right position of the fuselage and wing pieces. When you assemble the wings to the central section, elevate the outer edges of the wings with 1.8cm as in the video. Notice that I used a couple of green li-ion batteries as stands. You can use any object that has similar heights. Also, check the overview picture (with labels and arrows) to get an idea of where each part should be placed. Otherwise, the name of the parts could get confusing at some point. Use a thick paper clip to make the hook and the pin for the rubber band. You can cut the paper clip wire in half. Use one of these half as an axel for the propeller. At one end, the axel will connect with the propeller and it will be inserted into it's hole and at the other end you will have to shape it and make it into a hook to attach the band. Insert the hook from the inside of the nose cone as you see me doing in the video and once is inserted through the nose hole, secure the propeller into position using a drop of super glue (see the black picture). Somebody asked me this question and I’m posting it here since I think is good information other people might be interested in. DM: They were beautiful planes, weren't they? I kind of miss the balsa and paper days, but I like the idea of printing the parts. Question: why heat weld the parts rather than gluing them? MT: Of course one could glue the parts, especially if they choose to laser cut some wooden or cardboard sheets. I choose to weld them for the simple reason of having a fast build I could share with my son and record in a short video. I created these parts being inspired by an older balsa wood plane design from the '80s. I realized there are not so many of these models being uploaded on Thingiverse nor any other sites. People have plotters for cutting cardboard and laser cutting cnc machines nowadays and they could easily involve in creative weekend activities with their kids like I did with my son, but the models are nowhere to be found. I checked the ebay and online markets to see if I could find some old school balsa wood models for sale and they are either too expensive, preassembled or inexistent. You rather find lego kits or dismantled drones, but is not the same thing. If you check the hobby stores you are most likely to find balsa wood plane kits, but most of the parts are semi-assembled. Like the wing is made out of 2 or 3 parts one has to glue together, and the fuselage is made of 5-6 U-shaped segments. They simplified the build to make it faster. Maybe the kids nowadays don't have the patience to spend 2 or 3 days to build it and they would rather have it finished in one afternoon. But on the other hand, my kid would probably never understand the shape of a wing rib and why it needs to be like that if the wing comes preassembled in the package. Have fun and post pictures after you make your own.
With this file you will be able to print Hawker Hurricane MKIIA model plane with your 3D printer. Click on the button and save the file on your computer to work, edit or customize your design. You can also find more 3D designs for printers on Hawker Hurricane MKIIA model plane .