HDMI to VTX Converter
thingiverse
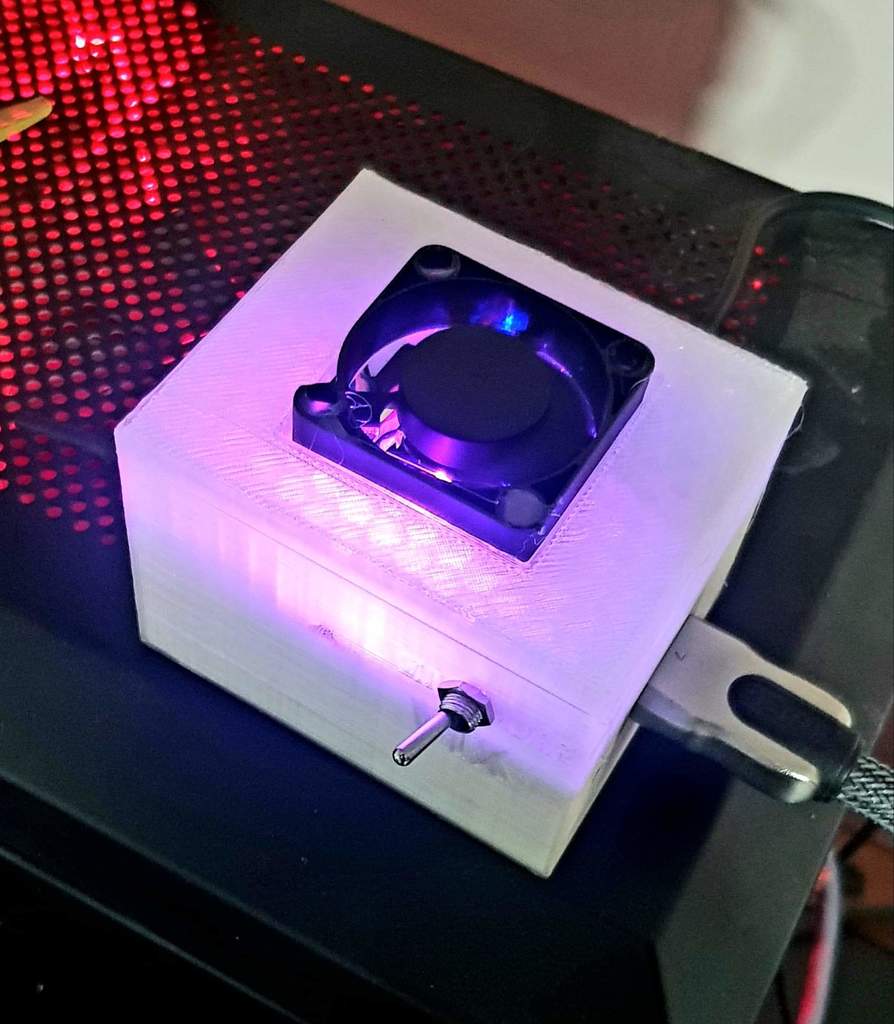
This is a design and build guide for my version of a HDMI to VTX converter. This gadget allows you to send the image from your computer and receive it wirelessly in your FPV Goggles. To build this I used the following components: HDMI2AV converter https://www.amazon.com.au/dp/B01L8P11LC/ref=cm_sw_r_cp_apa_fabc_MUEYFbT2X4EFQ there are other similar converters that may be better quality but this is the one the print is designed around. VTX https://www.amazon.com.au/dp/B077HX25V5/ref=cm_sw_r_cp_apa_fabc_9MGYFbCZVFQZ7 This is a cheap VTX that works well, the print is designed around this as there is a hole placed in the side to allow the button on the vtx to be pressed with a small screwdriver. Fan https://www.amazon.com.au/dp/B074YJH3P9/ref=cm_sw_r_cp_apa_fabc_CPGYFbWWW2FE8 cheap 5v fans that the print is designed to fit. Switches https://www.amazon.com.au/dp/B07Q1HTYNS/ref=cm_sw_r_cp_apa_fabc_pRGYFbCR3T8GJ two position switches for switching the power to the vtx and fan on and off. Here are the build instructions from memory, I did this 8 months ago. I will be building another and taking photos/updating details soon. Start by opening the shell of the hdmi converter. Plug in the usb and using a multimeter find an available 5v pad and ground pad. Solder a wire from the 5v pad to one side of the switch and another from the vtx 5v on to the other side of the switch. Solder the ground wire that is next to the 5v wire on the VTX to a ground pad on the hdmi converter. Cut the usb plug off the fan, pass the wire through the printed lid and expose and tin the wires. Solder the power wire to the same side of the switch as the 5v in for the VTX. Solder the ground wire to the same ground pad as the VTX. On the VTX there is a video in wire and a ground wire next to this. On the hdmi converter there are three av inputs, locate the video one (yellow). The outside shell is ground and the inner part is for video. Locate where these are connected to the board. Solder the video wire from the VTX to the video connector pad and the ground wire next to the video wire onto the ground pad connected to the outside shell. Plug in the usb and make sure all is functioning. Cut or melt a slot in the converter cover for the wires to pass through when it is placed back together. Reassmble the converter and place into the printed box so the hdmi cable is exposed at the end and the usb port is exposed at the side. Remove the nut from the switch, place the switch in the hole in the side of the printed box and use the nut to secure it. Use double sided tape to secure the vtx in the box on top of the converter, making sure the button can be pressed with a small screwdriver through the hole on the side. Push the dipole antenna from outside in from the ufl connector end and connect it to the vtx. Hot glue the fan in each corner to secure to the lid. Place the lid on, connect the usb and hdmi then enjoy!
With this file you will be able to print HDMI to VTX Converter with your 3D printer. Click on the button and save the file on your computer to work, edit or customize your design. You can also find more 3D designs for printers on HDMI to VTX Converter.