HE3D K200 (K280) End Effector / E3D Hot End Double Duct
thingiverse
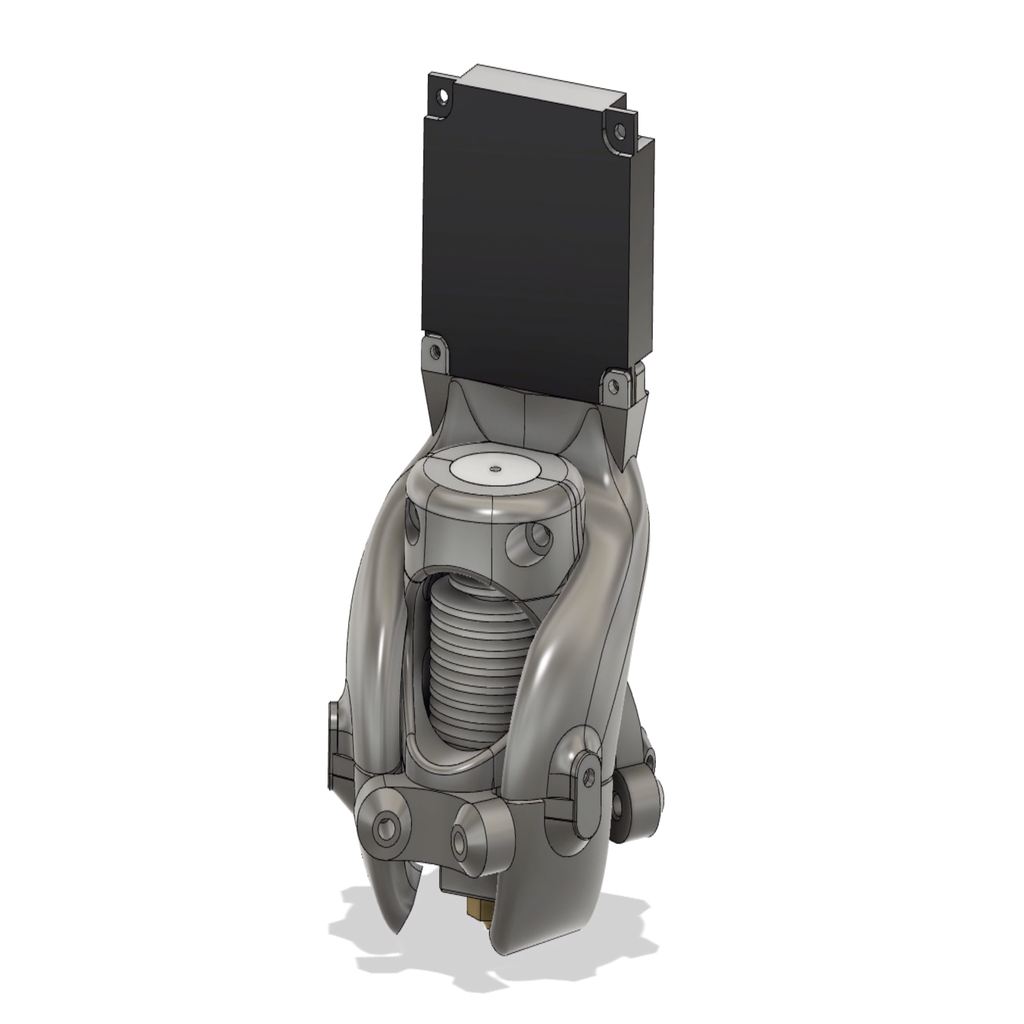
HE3D K200 Double Duct Hot End (for E3D V6 clone, j-head) UPDATE 3/5/2020: Added 2 older versions of the the E3D mount by request. One with no part cooling fan, one with a single side mounted part cooling fan. UPDATE 12/30/2019: Added requested STEP file. UPDATE 11/2/2019: Added a new E3D cap with bowden tube train relief. There are 2 versions of the small bowden clamp, a short and a tall. The opening in the back still allows the ability to push down on the coupler to release the bowden tube, so you can remove it without having to disassemble it. On my setup the bowden tube was resting/pressing against the turbo fan causing a rattle. Requires 2 M2x6mm. UPDATE 10/29/2019: Modified the End Effector to thicken the Z tower side. Even printed in PETG, when printing PLA, the End effector would get hot enough to soften and deform. I also added a small vent in the Double Duct housing to channel a bit of air down, onto where the heater cartridge cables come out. Not sure if it helps, but I have not had any deformation yet. Print: - E3D End Effector - E3D Double Duct housing - E3D Hot End cap - (2) Part fan ducts (mirror the part in slicer to print both sides) You'll also need: - 4 M2x5mm (2 for the box fan, 2 for the air ducts) - 2 (or 4) M3x16mm (3030 fan) - 2 M3x12mm (for the mounting to end effector, the 2 back holes) - 3 M3x10mm (2 of the E3D cap, 1 for connecting the front of the Double Duct housing to the end effector) All parts printed at 0.2mm, in PLA, 20% infill. They can all be printed without supports, depending on how tuned your printer is. Except for the End Effector, print it in PETG, it will be close to the heat block. For best results, print the parts (specially the small ducts) in the orientation shown. All the bolts thread straight into plastic. Yes, it's more than strong enough. No, you don't need to pre-tap the holes. And Yes, be careful not to over-tighten. ------------------------ I wanted to replace the stock H3ED hot end with an E3D V6 clone. One of my goals was also to recess the print head as far into the End effector as possible to gain print height. The bad side of this, is that you end up with very limited in space around the End Effector. You either build up, out, or down. I went with Up and started by stacking the fans on the back. I'm just using the 2 stock fans that came with my K200 (30mm fan and 40mm box fan). I also love that it looks like a dude sitting on an other dude's shoulders.. ;-) Now I needed a way to get the part cooling fan air around the end effector, so I made the ducts (below the end effector) a separate part. This give a few other benefits, like the ability to create longer or shorter ducts based on your particular needs., Or maybe create other duct shapes to get different air flow patterns. Or, block the air flow from one side all together, if you ever needed to. All this ended up giving me 33mm more build volume height. (Important Note: you will need to change your Max Z Height to compensate. Mine ended up being +32.9mm to be exact.)
With this file you will be able to print HE3D K200 (K280) End Effector / E3D Hot End Double Duct with your 3D printer. Click on the button and save the file on your computer to work, edit or customize your design. You can also find more 3D designs for printers on HE3D K200 (K280) End Effector / E3D Hot End Double Duct.