Headphone Holder with Cable Management Spool Table Mount Version - with STEP file
prusaprinters
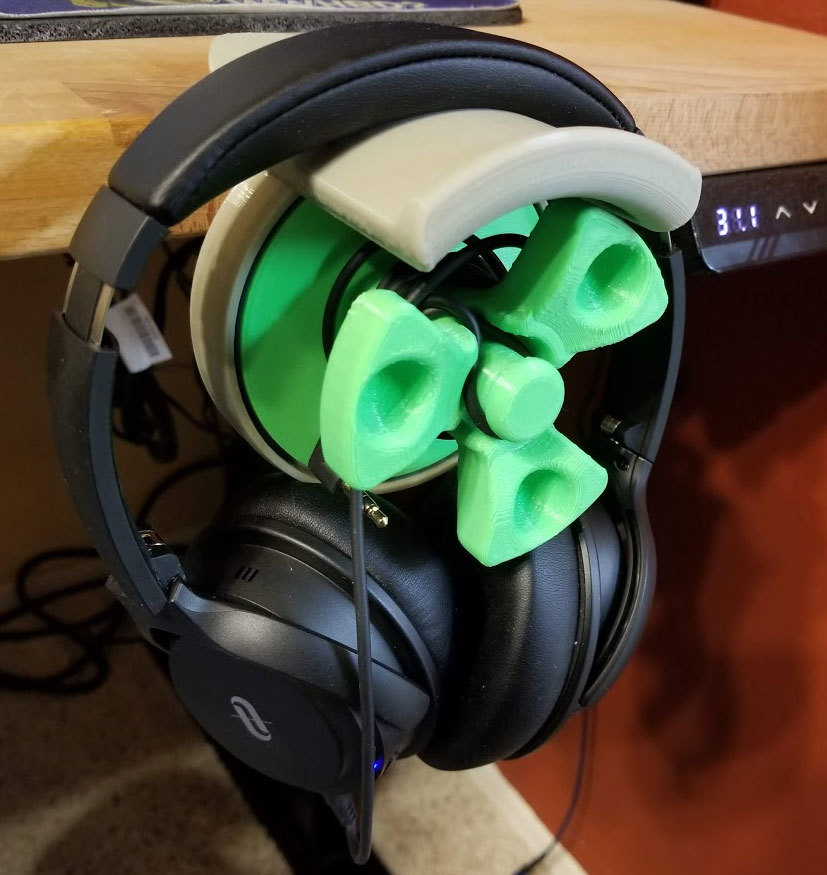
<p>This is a desk mount headphone holder with a ratcheting cable spool.</p> <p>The desk mount is remixed from philbarrenger's awesome "Monster Mouth Headphone Holder - Clampable" ( <a href="https://www.thingiverse.com/thing:1657541">https://www.thingiverse.com/thing:1657541</a> ), and the rest is a remix of my "Wall Mount Headphone Holder with Cable Management Spool - VERSION 2" ( <a href="https://www.thingiverse.com/thing:4202518">https://www.thingiverse.com/thing:4202518</a> ).</p> <p>This thing will require:</p> <ul> <li>2x M4 nuts</li> <li>2x M4x12mm flat head bolts (It should be possible to use round head bolts with the newer design). </li> <li>One 608zz bearing, which can be salvaged from an old fidget spinner. </li> <li>One spring from a ball point pen</li> <li>Two #8 flat head screws for wall mounting.</li> <li>Optionally a rubber band, to quiet the gears. I tried a normal rubber band which was relatively thick and also a rubber band from a bunch of asparagus which worked a bit better but also added some resistance to turning.</li> <li><p>Glue to secure the Clip on the back of the Base once everything is working. <strong>I'm not your mom, but eye protection is required when assembling.</strong></p> <p>To assemble:</p> <ol> <li>First install the bearing on the reel. Using a second bearing to set the first bearing can help. </li> </ol> </li> </ul> <ol> <li>Then place the pen spring into the hole in the back of the base. </li> </ol> <ol> <li>The sliding part will go in next, and capture one end of the spring. Ideally the spring action of the slider should be moderate and should not take much force to move it in the track. I'd say the pressure of the slider should be similar to the pressure of the cap on the pen the spring was removed from. If it does not move freely, remove the slider and try sanding the base and cleaning up the part a bit. I found that some of the springs I used were a bit too forceful, so I trimmed them to about 3/4 their original length, which worked well. It may take some trial and error in fitting with different pen springs or trimmed springs to get a good pressure from the slider. If the spring provides too much force, the reel will not be easy to turn and will be louder. Be careful of course with the springs and wear eye protection when installing them.</li> </ol> <ol> <li>If you don't enjoy clickety click sounds, then now is a good time to install a rubber band on the geared teeth of the reel to quiet them down. Regular rubber bands seem to be a decent compromise between speed and noise, but a thicker band will quiet it more. There should be no twists in the band when it is installed. It should be possible to pop the reel off later and install the band if you find that it needs a thicker or thinner band (so far with the several prototypes I have made, I have been able to remove the reel without breaking it and change the bands without a problem).</li> </ol> <ol> <li>Next, the "clip" can be installed on the back (see the pics - this is the green part shown on the back of the base). The clip will hold the slider in, and should snap into place securely. If it does not, then it probably needs to be cleaned up. There are very small cuts in the part which can be carefully cleaned up using a razor blade, and any foot on the part should be cleaned as much as possible. I found that printing this part without supports or any brim worked best. Same for the slider. Once everything is working as it should, add some glue to hold the clip in permanently, but be careful that the glue does not contact the slider. If the clip is not flush with the base, it should be sanded a bit to get it flat (otherwise there could be a small gap when the desk mount is attached.</li> </ol> <ol> <li>Now the base would be be mounted to desk mount using the M4 nuts and bolts. You could also add glue at this point.</li> </ol> <ol> <li>Finally, install the reel by pushing the installed bearing onto the post of the base. Note that the post will be a tight fit and once on, it probably won't come off the post without breaking - but it will probably still allow you to remove the reel since the reel should pop off the bearing. The slider may be in the way, but by angling the reel a bit during the installation, it should be possible to push it out of the way to set the reel in place. </li> </ol> <ol> <li><p>Once it is assembled, test it by giving the reel a couple turns in both directions and make sure it all works. I found that the rubber band smooths out after several cycles. Printing tips:</p> <p>BASE: I printed the base with supports but used an overhang angle of 85% to avoid supports in the enclosed pockets. There is really only one place where the base needs supports and that is the flat area just above the opening in the back of the part. I printed the base using 0.2mm layer height.</p> <p>REEL: I was able to print this without supports, though it was close. The arms of the reel may need to be supported but everything else should not need them. I printed the reel using 0.2mm layer height.</p> <p>CLIP: Printed without supports and without a brim if possible to avoid the small gaps in the part merging together. I printed the clip using 0.12mm layer height.</p> <p>SLIDER: CLIP: The latest version of this is already scaled to 99% of the original, but if it is not fitting well it may need to be scaled further. Print it without supports and without a brim if possible to avoid the small gaps in the part merging together. I printed the clip using 0.12mm layer height. This part should be glued in after it is fully test fitted and confirmed that everything works.</p> <p>All parts were printed with 3 walls and 15% gyroid infill.</p> <p>These are just what I used so as always, use your best judgement on what works for you and your printer, and good luck!</p> <p>Parts are not oriented for printing. The STEP file is included for easy remixing.</p> <p>Please post any makes and if you see a problem please post a comment.</p> <p>Updates:<br/> 4-30-2020: Thanks to feedback, I corrected the model for the base, the updated version is "6I". None of the other parts required updating, but I did update the STEP file as well.</p> </li> </ol> Category: Music
With this file you will be able to print Headphone Holder with Cable Management Spool Table Mount Version - with STEP file with your 3D printer. Click on the button and save the file on your computer to work, edit or customize your design. You can also find more 3D designs for printers on Headphone Holder with Cable Management Spool Table Mount Version - with STEP file.