Headrest Mod for Staples Hyken Chair
thingiverse
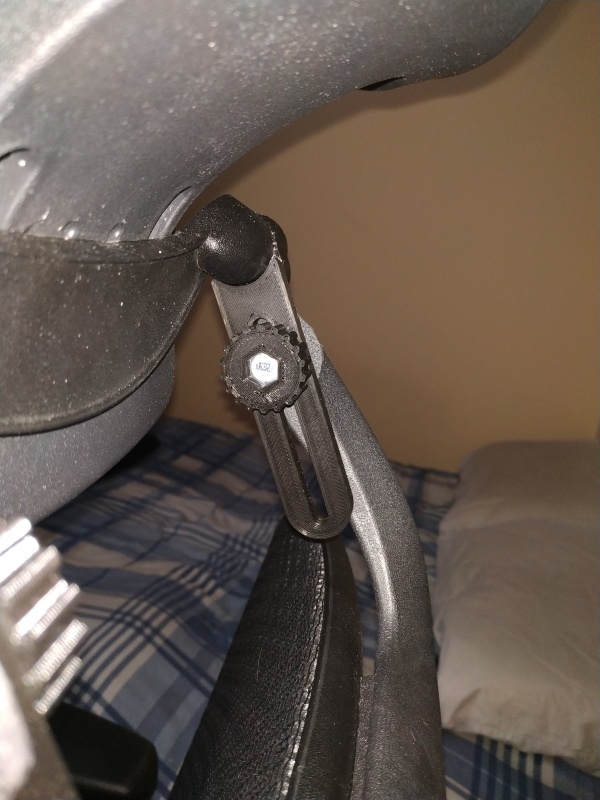
This is a mod I made for the Staples Hyken chair. The chair is great, but the headrest is famously disappointing for taller people. The mod allows a much greater range of motion in the headreast (forward/backward, as well as up/down). This should hopefully make the headrest better for everyone as the extra positioning opportunities may be useful to short people as well. ### What to Print Print 2 of each: "main_piece.stl", "thumbscrew.stl", and "chair_insert_hex_nut.stl" ### Extra Hardware Needed You'll need a little bit of hardware to put it together: - 2 x 1/4"x1" bolts - 2 x 1/4" nuts - 6 mm or 5/32" allen key - (optional but recommended) 2 thin pieces of rubber, no thicker than 1/8" (1/16" would be best), each cut into a circle with a 1" diamater, with a 1/4" hole in the center. (These will help to hold the headrest in place after adjusting the position.) ### Assembly Assembly is pretty straightforward. - (optional but recommended) Remove the headrest from the chair. (2 machine screws on the back) - Using the allen key, remove the two screws on the side of the headrest (the swivel mechanism). Keep the screws as we'll be putting them back shortly. Note: At this point, I'll refer to the two pieces of the headrest as the "mesh part", and the "C-arm part" (the piece that was originally attached to the top of the chair) - Now, at the same area where the screws were removed, you need to pull the headrest apart, enough to separate the two parts of the headrest (like in [this picture](https://i.imgur.com/CcV1EH9.jpg) from [this Imgur album](https://imgur.com/gallery/XwE7F) describing a Hyken headrest mod made popular on reddit). Note: Significant force may be needed to pull the arms apart so that you can separate the two parts of the headrest assembly. There's a small chance you could break the arms. I recommend that you do this in a warmer area so the plastic flexes more willingly, and does not snap. Don't do this if the plastic is in a cold area! Warm it up first. - Attach the female hex part of the main_piece to the male plastic hex nut sticking out of the side on the "mesh part" of the headrest. Use the screws we removed (the ones from a couple steps ago) to tighten the main_piece to the "mesh part". Leave them a little loose so they can be adjusted. Do the same with the other main_piece. - Take a chair_insert_hex_nut and insert a 1/4" nut into it. Insert it, **nut end first**, into the female hex-shaped hole in the "C-arm part". Do the same with the other chair_insert_hex_nut. - Take a 1/4"x1" bolt and bury the head in the printed_thumbscrew. Do the same with the other bolt/printed_thumbscrew. (Don't worry if the head doesn't go all the way in.) - Now, line up the headrest pieces so your bolt/thumbscrew can go through the slotted holes and into the chair_insert_hex_nut that we mounted in the "C-arm part". - Put the assembled headrest back on the chair. Loosen the thumbscrews to adjust the headrest, and tighten them when it is in the desired position. Tighten the screws with the allen key to adust the pivot/swivel mechanism in the headrest to the desired position.
With this file you will be able to print Headrest Mod for Staples Hyken Chair with your 3D printer. Click on the button and save the file on your computer to work, edit or customize your design. You can also find more 3D designs for printers on Headrest Mod for Staples Hyken Chair.