Heat Sealer For Small Plastic Bags (eg Anti Static)
thingiverse
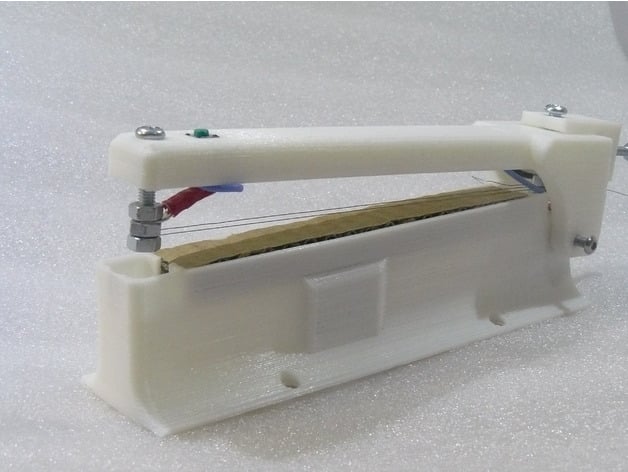
A heat sealer, made from PLA... yes, it really works and doesn't melt into a pile of goo :-) There are 3 printable parts, the arm, base and tensioner, then you will need to add... Some 0.2mm Kanthal wire - you could use Nichrome, Constantan or thicker wire or whatever, but your power requirements/time to seal would be different. Strung as described below and shown in the pictures, 0.2mm Kanthal will get you about 3.4 Ohms total heater wire resistance. A 5.5/2.1mm DC Panel Socket A 5v coil relay ("sugarcube" size - 15.5mm diameter, eg Omron G5LA-1) A 6mm tact switch A diode (not really important exactly what just for clamping the relay coil's inductive spike, I used a 1n4004 because it was handy) Either a 10W or greater power supply higher than 5v and a miniature DC-DC buck converter set to about 5-6v output, or a 5v 2A power supply (in which case no converter necessary obviously). I personally used a 12v 10W power supply and a buck converter, because that's what I had handy. Wire - preferably silicone (remember if it touches the heater wire you don't want the insulation to melt) M3 and M4 screws and nuts, M4 should be at least 25mm and M3 at least 30mm Two (4mm) ring or fork style crimp connectors Corrugated cardboard ~2.5mm thick (ie, from an old cardboard packing box) Hot glue Kapton tape recommended but not essential The base prints more or less without supports, a couple places will be rough but "plastic finds a way", add support if your bridging isn't so good. Cut 3 pieces of carboard and fit them into the top of the base these act as the cushion for pressing the sealing wires into. The tensioner should be printed on it's side so that in use it is not trying to pull the layers apart. Insert two M3 nuts in the holes in the back of the tensioner. The arm should be printed upside down so the hinge is facing up, no support. On the back of the arm where the tensioner fits there is a cavity which if you want you can fill with epoxy or something for more strength, I didn't need to the plastic is strong enough as is. It is best to "string" the arm before fitting it to the base as this is quite fiddly. Put a 4mm bolt and nut through the slotted hole on the arm, put the "positive" ring connector on the bolt, start another nut on the bolt but don't tighten it, take a length of heating wire about 35-40cm long and loop the mid-point around the bolt, using your third pair of hands tighten the nut down to hold the wire. Insert the second 4mm bolt at the other end, add a nut, the ring/fork crimped wire for the "negative", a second nut, loop the wires around so you have two strands of wire running the length, 4mm apart, and using your fourth pair of hands tighten the nut. Now hopefully all that remains is to tighten the tensioner. It's probably best to not over-tention. The 0.2mm wire is quite easy to break. Wiring is pretty straight forward, circuit diagram in the files, one end of the switch can be connected direct to the negative heating-wire 4mm bolt in the same ring crimp so you only need to bring 3 wires out from the back to the arm, positive, negative and one leg of the switch. Hot glue is used to secure the switch and the power socket (there isn't room for the usual retaining nut for the socket). If you have some Kapton tape (5mm wide best), a length can be run down the hotwire as I have shown in one of the images, at least for my current Kanthal A1 Ribbon wire this will prevent the hotwire from actually sticking to the the bag and provide a better "sealing" action instead of a "cutting" action, the bag does not stick to the kapton, so you can seal by heating the wire, then release the button but hold it closed until it's cooled, then lift it. Usage is simple, plug in your power supply (as above assuming using 0.2mm Kanthal wire, you will want about 5v at 2A either using a miniature DC-DC converter tucked in the base so you can apply a 12v or greater supply, or directly using a 5v 2A one), put the bag in the obvious place press down the arm gently and hold the button for about 5-7 seconds to seal (exact time varies depending on bag etc, some I have take about 7 seconds, some take closer to 10), as the wire heats and expands a fraction just press down a little more to take up the slack. After releasing the button keep pressing down for a couple seconds before removing the bag, if the bag sticks to the wire just click the button for a second and it will come off, try not to twang the wire or you might break it.
With this file you will be able to print Heat Sealer For Small Plastic Bags (eg Anti Static) with your 3D printer. Click on the button and save the file on your computer to work, edit or customize your design. You can also find more 3D designs for printers on Heat Sealer For Small Plastic Bags (eg Anti Static).