Heated Build Platform Controller V0.2
thingiverse
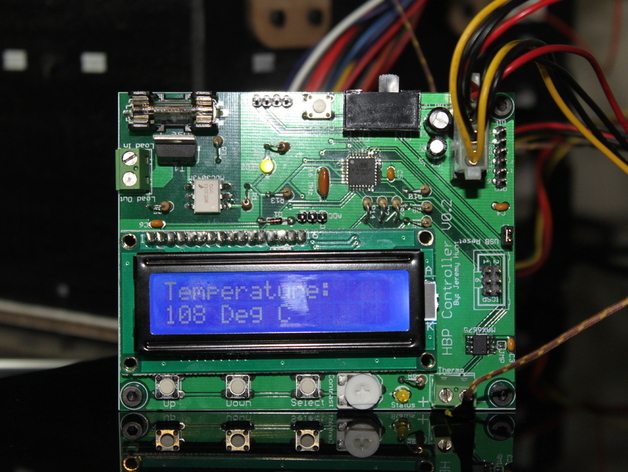
This project involves creating a fully integrated solution for controlling a heated build platform while enabling communication with the motherboard, as well as utilizing the platform as a hot plate for surface mount reflow. The user has constructed a custom board to achieve these capabilities and recently managed to gather all necessary components for its assembly and testing. The board is designed to manage 120/240VAC mains voltage using an optically-isolated triac with fuse protection, while temperature feedback is obtained through a Type-K thermocouple read by a MAX6675. It features an Arduino based on ATMega328 in TQFP package for control and user interaction is facilitated through a 16x2 LCD screen and three buttons. Power for the control circuitry is derived from a Molex connector on an ATX power supply's 5V line. The board can manage up to 1000W of AC mains power, supports I2C communication with the motherboard, has a measurable temperature range of 0-1024°C with 2°C accuracy, and includes an LCD screen and buttons for user feedback. It is programmed using a USB-TTL cable or ISCP programmer and features optical isolation and fusing for AC power. However, the mains power testing has not been performed yet. The project files, Gerber production files, pictures of the board, and an Excel file containing parts, suppliers, costs, and board designators are included in a ZIP file. The user is considering selling this board as a kit if there's enough interest. This design has won the PLTW Innova Award for Imagination. The board can be ordered from BatchPCB, and components can be obtained from Mouser, Jameco, Digikey, Adafruit, Sparkfun, or other sources. Surface mount chips should be soldered first, followed by PTH components, with headers having staggered holes for easier alignment. Upon powering the board using an ATX Molex power supply, the power LED should illuminate. The Arduino Duemilanove bootloader must be programmed onto ATMega328 using Arduino IDE and an ICSP programmer. The thermocouple should then be connected, and software can be written and uploaded to the board for use.
With this file you will be able to print Heated Build Platform Controller V0.2 with your 3D printer. Click on the button and save the file on your computer to work, edit or customize your design. You can also find more 3D designs for printers on Heated Build Platform Controller V0.2.