Heathkit Hero 1 Shoulder Repair
thingiverse
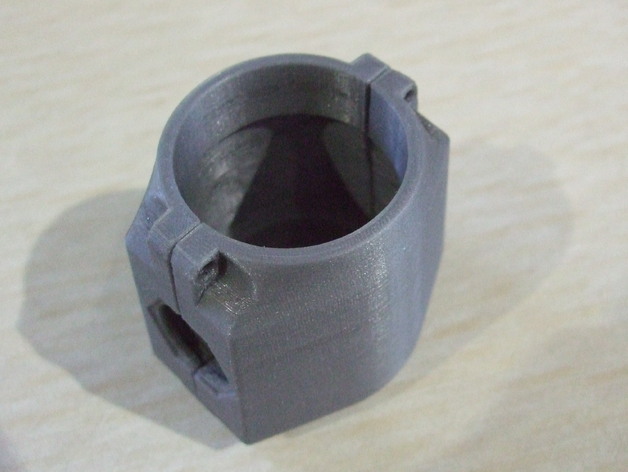
Firstly, thanks to Gyrobot for designing and printing these out. Heath Company began the HERO 1 project in October 1979. The first units were available in 1982. This is a real blast from the past and a credit to the technology available at the time. The R2D2 of its day. The problem with old robots from the early 1980's is that the plastic goes brittle with age. Replacement parts are hard to find and expensive too. This is a shoulder repair piece that will fit over the existing plastic arm and makes a new interface with Heathkit Hero's shoulder. A common breakage area due to the higher stresses on the brittle plastic. This repair was designed as an offering to the Heathkit community via a request from Scott Schreiber of Retro Gaming Rounduphttp://www.retrogamingroundup.com/ The printed repair was designed and fit tested tested on the Heathkit Hero at The Museum of Computing in Swindon. http://youtube.com/watch?v=wm8WtTRuE7Y Blog information can be found here :http://swindon.hackspace.org.uk/blog/heathkit-hero-printable-parts/http://swindon.hackspace.org.uk Instructions Print stl twice with support. Use screws to fasten each half over affected area and clamp onto metal hexagonal shoulder interface. Whilst this repair will obviously make your robot un-original, it will salvage any broken arms and allow Hero to be fighting fit for an arm wrestle again. It has been designed sympathetically and if printed with grey plastic, it should blend in well and make Hero appear like it's on steroids.
With this file you will be able to print Heathkit Hero 1 Shoulder Repair with your 3D printer. Click on the button and save the file on your computer to work, edit or customize your design. You can also find more 3D designs for printers on Heathkit Hero 1 Shoulder Repair.