Heavy Duty C Clamp Tripod for Camera and Light
thingiverse
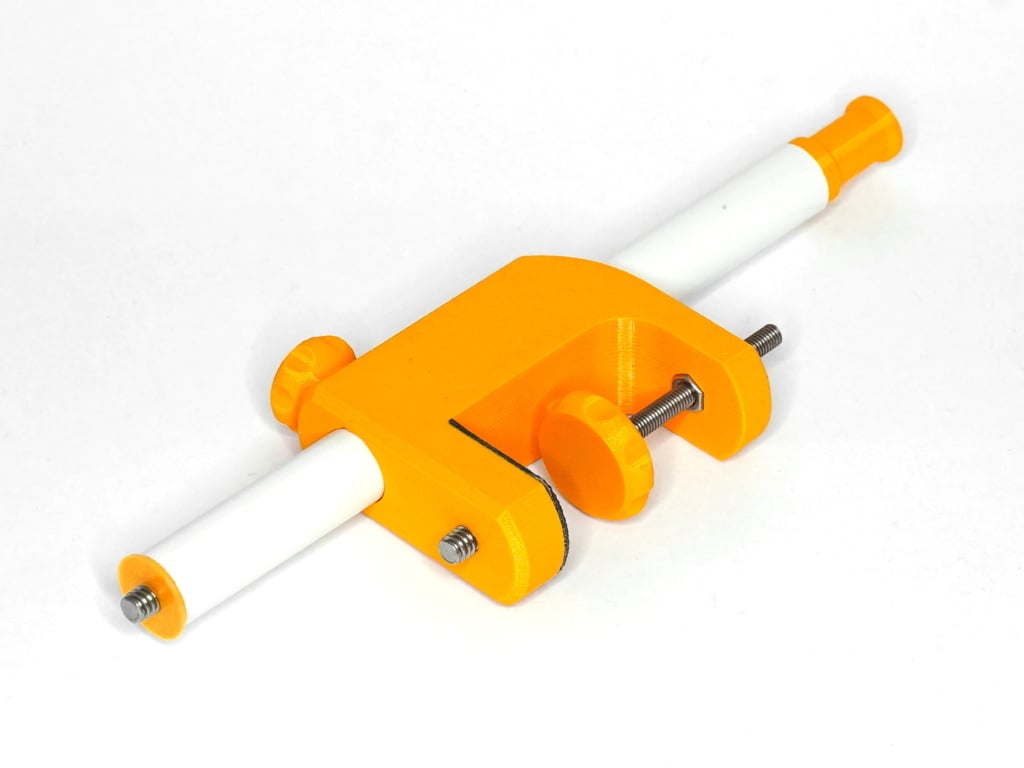
This is an heavy duty c clamp to mount photo gear to an table top or an shelf. I failed to break the prototype, so I consider it strong enough. Th e secret of its strength will reveal the slicer. So be curios! It has an 1/4" thread to directly attach a ball head. But the pole gives you more flexibility. The pole is made for 16mm tubes. You can use cable pipes witch is the cheapest option. The optimal choice would be aluminum, but carbon will also has its appeal ;-) There are different models for different screw sizes. So you should find the appropriated screws in your stock or at your local hardware store. (Witch wars quite frustrating that's why I added the addition options.) I have provided two caps for the pole. One for an camera screw and with an spigot for lights. The spigot fits through the clamp, so the pole can be removed from the clamp later. BOM 1pcs M5x40/50/60 hex bolt (choose according to the clamp body size) 2pcs M5 nuts 1pcs M4x10/12/16 hex bolt (choose the model for the knob according to the size) 1pcs m4 nut 1pcs m3x30 countersink screw (to enforce the spigot) 2pcs 1/4-20 unc 5/8 countersink screw 1pcs anti slip pad with adhesive (non-slip shoe pads, witch are used to make high heels mire secure) Printing The body sould be printed wit 0.2mm layer hight, 0.4mm nozzle with and 3 perimeters. Mounting 1. Step: Equip the m5 hex-bolt with the "ClampSpindelKnobLid" and one m5 nut. 2. step: Insert the prepared m5 Bolt into the body of the clamp. This needs all space from all cavities. Push the nut into its cavity at the bottom and insert a second m5 nut into the cavity at the outside of the clamp screw the bolt down until it engages with the second nut too. 3.Step: Now put the "ClampSpindelKnob" in top of the bolt and press the "ClampSpindelKnobLid" into the "ClampSpindelKnob" from the bottom. This will need a fair amount of force and you will hardly get this apart again. (not shown:) Screw the 1/4-20 5/8 screw into the upper bracket of the clamp. 4. Step: Stick an piece of non-slip pad under the upper bracket as shown and trimm of the access with an utility knife. 5. Step (not shown): Insert the m4 nut into its cavity inside the tunnel at the rear. Fit the knob with the appropriated m4 hex bolt and screw it in from the rear. 6. Step: Cut the pole from an 16mm tube to the desired length. Equip the "ClampPoleCap" with the second 1/4-20 5/8 screw and glue it in one end of the pole. The other end is to be equipped with the "ClampSpigot" witch can be enforced with an m3x30 countersink screw. Please considere leaving me a tip if you like the design.
With this file you will be able to print Heavy Duty C Clamp Tripod for Camera and Light with your 3D printer. Click on the button and save the file on your computer to work, edit or customize your design. You can also find more 3D designs for printers on Heavy Duty C Clamp Tripod for Camera and Light.