Heizungsverstärker | Radiator Booster
thingiverse
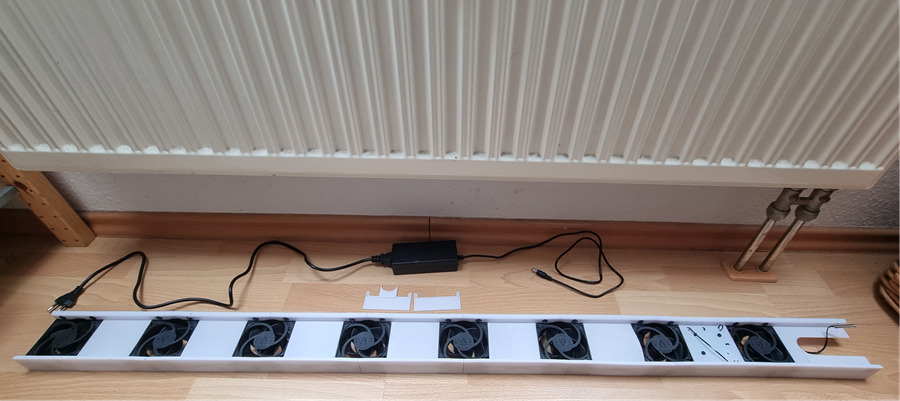
This is a heating booster for [Vogel & Noot Type 21 two-layer compact radiators](https://www.vogelundnoot.com/de/produkte/kompaktheizkoerper.htm#tab-1) in widths 132cm and 62cm at 80mm depth. The system works with standard 8cm PC fans (3 pin) which connect the printed segments together. In addition, the segments are connected to each other with small filament pieces that are inserted into three holes on the sides. Squeeze the filament a little with pliers before inserting it for more friction. The segments adhere to the radiator with pressed-in round 10x3mm neodymium magnets. There are recesses in the segments for the cable feed-through, so that four fans each can be connected in parallel via a Molex distributor. For reasons of efficiency, as little air as possible should escape at the bottom and sides, so the system is closed at the bottom with plates between the fans and via attachable side plates. The side elements for holding the control board differ in length and number for the 132 and 62cm wide radiators and are named accordingly. All other segments are identical and differ only in terms of number. Power is supplied via an 8mm hole in the controller segment, through which a cable can be fed or a connection socket installed. For fan control I used a 12V relay control board with temperature sensor, which is mounted with M3 screws on the holes provided. To adjust the fan speed, an adjustable DC-DC step-down converter is recommended. With this converter, the fan voltage can be reduced from 12V to approx. 7-8V, so that the fans run quietly but sufficiently strong. To connect the fans to the voltage converter, I constructed a Molex adapter into which 4 standard straight 2.54mm pin headers are inserted. The 3pin fan connectors are plugged into them. Alternatively, you can just solder everything together. Print the segments in STL orientation in 0.3 layer height with 20% infill and the Molex adapter in 0.2 layer height. Make sure that the raised plates (sealing between the fans) are aligned in the direction of the Hotend fan, otherwise they will be easily bent away by the airflow during printing. --- Parts list 132cm radiator --- 1x ModulsRight_132cm_Radiator Controller.stl 4x Moduls_2x.stl 1x Module_1x.stl 1x ModulLeft.stl 2x Molex4xAdapter Male 3Pin.stl 8x 8cm PC fan (3pin Molex) 34x 10x3 round neodym magnets 1x Temperature controller W1209 [Manual](https://www.manualslib.com/manual/1793148/Diymore-W1209.html) 1x Adjustable DC-DC Step-Down Converter [D-SUN with MP-1584 chip](https://www.google.com/search?q=D-SUN+Mini+DC-DC-Converter-Step-Down-Module+MP1584) 1x 8mm connection socket 1x power supply 12V, 2A, DC voltage 4x M3 screws and nuts 6x 2-3mm cable ties --- Parts list 62cm radiator --- 1x ModulsRight_62cm_Radiator Controller.stl 1x Moduls_2x.stl 1x ModulsLeft.stl 1x Molex4xAdapter Male 3Pin.stl 4x 8cm PC fan (3pin Molex) 20x 10x3 round neodym magnets 1x Temperature controller W1209 [Manual](https://www.manualslib.com/manual/1793148/Diymore-W1209.html) 1x Adjustable DC-DC Step-Down Converter [D-SUN with MP-1584 chip](https://www.google.com/search?q=D-SUN+Mini+DC-DC-Converter-Step-Down-Module+MP1584) 1x 8mm connection socket 1x power supply 12V, 2A, DC voltage 4x M3 screws and nuts 5x 2-3mm cable ties ------------ I would be very happy if you have as much fun with the things as I do. ------------ If you like <a href='https://ko-fi.com/alvomane' target='_blank'><img height='36' style='border:0px;height:36px;' src="https://storage.ko-fi.com/cdn/kofi3.png?v=3" alt="If you like, buy Me a Coffee at ko-fi.com" title="Buy Alvomane a Coffee at ko-fi.com" /></a> :-) Thank you very much! --- German description --- Das ist ein Heizungsverstärker für [Vogel & Noot Type 21 zweilagige Kompakt-Heizkörper](https://www.vogelundnoot.com/de/produkte/kompaktheizkoerper.htm#tab-1) in den Breiten 132cm und 62cm bei 80mm Tiefe. Das System arbeitet mit handelsüblichen 8cm PC Lüftern (3 pin), welche die gedruckten Segmente miteinander verbinden. Zusätzlich werden die Segmente untereinander mit kleinen Filamentstücken verbunden, die in drei seitlichen Löcher gesteckt werden. Quetscht das Filament vor dem Einführen für mehr Reibung etwas mit einer Zange. Am Heizkörper haften die Segmente mit eingepressten runden 10x3mm Neodym-Magneten. In den Segmenten gibt es Vertiefungen für die Kabeldurchführung, so dass je vier Lüfter über einen Molex-Verteiler parallel verbunden werden können. Aus Effektivitätsgründen sollte unten und seitlich möglichst wenig Luft entweichen, so dass das System unten mit Platten zwischen den Lüftern und über aufsteckbare Seitenplatten geschlossen ist. Die seitlichen Elemente für die Aufnahme der Steuerungsplatine unterscheiden sich für die 132 und 62cm breiten Heizkörper in der Länge/Anzahl und sind entsprechend benannt. Alle anderen Segmente sind identisch und unterscheiden sich nur hinsichtlich der Anzahl. Die Stromversorgung erfolgt über ein 8mm Loch im Controller-Segment, durch das ein Kabel geführt oder eine Anschlussbuche eingebaut werden kann. Zur Lüftersteuerung habe ich eine 12V Relais-Steuerungsplatine mit Temperaturfühler verwendet, die mit M3-Schrauben auf die vorgesehenen Löcher montiert wird. Zur Einstellung der Lüftergeschwindigkeit empfiehlt sich ein regelbarer DC-DC Step-Down Converter mit dem die Lüfter-Spannung von 12V auf ca. 7-8V reduziert werden kann, so dass die Lüfter leise aber ausreichend stark laufen. Zum Anschluss der Lüfter an den Spannungswandler habe ich einen Molexadapter konstruiert, in den je 4 handelsübliche gerade 2,54mm Stiftleisten eingesetzt werden. Darauf werden die 3Pin-Lüfterstecker gesteckt. Alternativ könnt ihr auch einfach alles zusammenlöten. Druckt die Segmente in STL-Ausrichtung in 0.3 Schichthöhe mit 20% Infill und den Molex-Adapter in 0.2 Schichthöhe. Achtet darauf, dass die hochstehenden Platten (Abdichtung zwischen den Lüftern) in Richtung des Hotendlüfters ausgerichtet sind, da sie sonst durch den Luftzug beim Druck leicht weggebogen werden. --- Stückliste 132cm Heizkörper --- 1x ModulsRight_132cm_Radiator Controller.stl 4x Moduls_2x.stl 1x Modul_1x.stl 1x ModulLeft.stl 2x Molex4xAdapter Male 3Pin.stl 8x 8cm PC Lüfter (3pin Molex) 34x 10x3 runde Neodym-Magnete 1x Temperatursteuerung W1209 [Anleitung](https://www.manualslib.com/manual/1793148/Diymore-W1209.html) 1x Regelbarer DC-DC Step-Down Converter [D-SUN mit MP-1584 Chip](https://www.google.com/search?q=D-SUN+Mini+DC-DC-Converter-Step-Down-Module+MP1584) 1x 8mm Anschlussbuchse 1x Netzteil 12V, 2A, Gleichspannung 4x M3 Schrauben und Muttern 6x 2-3mm Kabelbinder --- Stückliste 62cm Heizkörper --- 1x ModulsRight_62cm_Radiator Controller.stl 1x Moduls_2x.stl 1x ModulLeft.stl 1x Molex4xAdapter Male 3Pin.stl 4x 8cm PC Lüfter (3pin Molex) 20x 10x3 runde Neodym-Magnete 1x Temperatursteuerung W1209 [Anleitung](https://www.manualslib.com/manual/1793148/Diymore-W1209.html) 1x Regelbarer DC-DC Step-Down Converter [D-SUN mit MP-1584 Chip](https://www.google.com/search?q=D-SUN+Mini+DC-DC-Converter-Step-Down-Module+MP1584) 1x 8mm Anschlussbuchse 1x Netzteil 12V, 2A, Gleichspannung 4x M3 Schrauben und Muttern 5x 2-3mm Kabelbinder
With this file you will be able to print Heizungsverstärker | Radiator Booster with your 3D printer. Click on the button and save the file on your computer to work, edit or customize your design. You can also find more 3D designs for printers on Heizungsverstärker | Radiator Booster.