Helix RH clamp for BPE Pro arrow fletching jig (may suit other jigs as well)
thingiverse
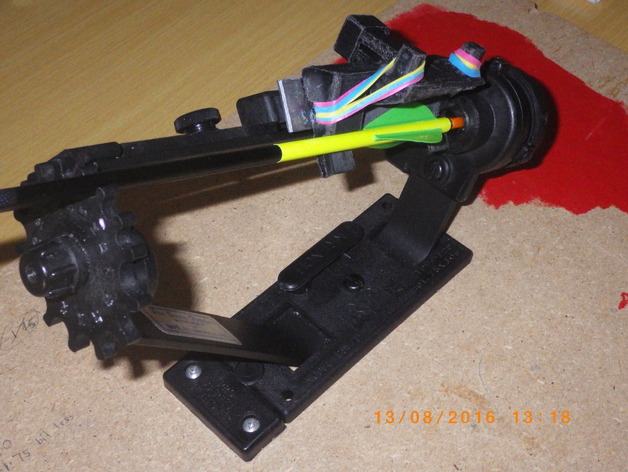
This fletching clamp was created for arrows up to 6.1 mm or 0.24" in diameter and for the BPE Pro fletching jig. Whether you shoot target outdoors or hunt, it is beneficial to use thinner arrows. It is designed for vanes up to 2" long, like the Blazer. It puts 2 degrees of right hand helix into the vanes. Helix produces better flight path than offset fletching. It may work with other fletchers as well but you may need to adjust the back angle of the clamp base so it can slide into position parallel to the magnet. I created this because it was hard to adjust to the exact centre position of the arrow and needed to adjust different distances on the front and back of the clamp position. With this design the front and back are set to the same distance. The easiest way to set it up is to put an arrow in the jig, attach the clamp to the jig magnet. Loosen the front and back distance adjusting screws on the jig and hold it upside down allowing gravity to align the clamp to the arrow. Once it sits on the arrow slowly tighten the nobs and readjust if necessary and tighten it further until it is completely locked into position. Print Settings Printer: Wombot Exilis Rafts: Doesn't Matter Supports: Yes Resolution: 300 micron or less Infill: 20% Notes: Suggesting to use CraftWare 1.14 to gnerate the G code. The support it generates is very easy to remove, unlike others. Post-Printing Requirements Make sure where the elastic touches the clamp does not have sharp edges. If it would then file these corners to round. How I Designed This Construction For the metal plate on the back you can use thicker than 1.5 mm or 1/16" steel plate. On the photos I used 2.5 mm which was cut from a right angle bracket I had at home. Make sure the metal plate is flat and there is no twist in it. You can increase or decrease the clamping force by selecting the desired length, number and type of elastics you use for the clamp. You can pull the elastic through by using either D-loop material or fishing line or some other usable thread. With this clamp you can use up to 3 vanes on an arrow shaft. If you use the BPE Pro jig then set the nock angle to 90 degrees and the 3 vane positioning locks to 0, 120 and 240 degrees, see photo no 10. With the BPE Pro you can get up to 6 vanes on the arrow but with this design only up to 3 is recommended as the actual clamp would interfere with the other vanes already glued on the arrow shaft when getting to the last one. (The original clamp is shown on one of the photos as well) Usage I personally like the fletching a bit closer to the nock as you can see it from the photos. You can add a spacer or add an extension to the design to increase the nock distance from the vanes if that is your preference. Once you glued a vane in place, after the required amount of time for your particular glue, open the clamp by pinching the levers on the top together and lock it into the open position by sliding on the Clamp lock, see photo. Now you can rotate the arrow with the end nob to the next fletching position by turning it anti clockwise. Recommended arrow rests I never use whisker biscuit type arrow rests but they are suitable for this fletching. I would recommend drop away arrow rests or prog type launcher one like the Spot Hogg Premier or Infinity. Both come with a blade as well as the prog launcher so you can choose which one to install but I have not tested it with a blade type. I like the prog because I can adjust the distance between them.
With this file you will be able to print Helix RH clamp for BPE Pro arrow fletching jig (may suit other jigs as well) with your 3D printer. Click on the button and save the file on your computer to work, edit or customize your design. You can also find more 3D designs for printers on Helix RH clamp for BPE Pro arrow fletching jig (may suit other jigs as well).