Hello, Stabby Kitties
thingiverse
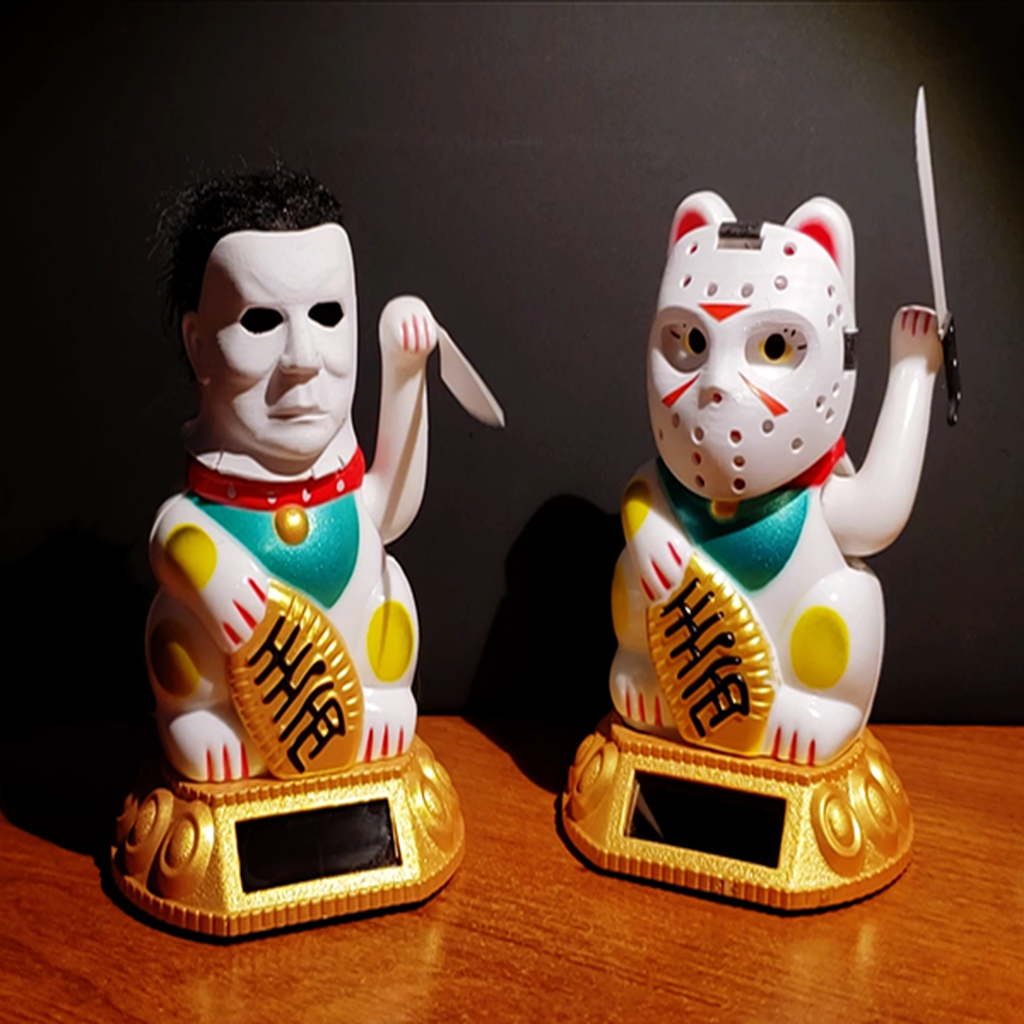
# Updated! ## Now with more ***Halloween stabby-ness!!*** There are several mask models on Thingiverse, but I recently did some character modeling so thought I'd take a ***stab*** at it myself. The hockey mask was first as that was easier to manage, and now I've box-modeled Michael Myers. I'll update the latter if I dial it in better (tricky to get his look with different proportions). My kitties came from Lotus Gifts (their card above) and they said that they do sell by mail. They're awesome people and have had their shop there forever, so I just ask that, if you can, please order from them if you can. --- ### Tips: My first knife proved too heavy, so I made a half-handle and glued it to the side of a piece of thin plastic. I may try to rebuild the hand to clutch the knives, but that will take a lot of trial and error. Gluing it to the side feels right; now he's not a willing accomplice. The blade plastic I used was a piece of some left over detail masking from some odd project, doubled over; very thin and sturdy enough. Some paper should do just as well (I just didn't trust I wouldn't crease or tear it during application.) I found the hockey mask printed best when it's nearly vertical, tilted back just enough that the supports were on the inside. Printing face-up hides the support points,, but the layer steps are difficult to clean up. If you have a pin vice, just use a small bit to clean the inside of the holes. The rest can clean up by scraping with a dull xacto blade (a sharp blade will catch the layers and cut into the mask). You will have to open it up to attach counterweights inside. A couple tiny screws from a lost project did nicely for me. Black masking tape works well as straps. Gaffer tape is a bit thick. I tried to twist the axis so the machete arm could slash rather than stab but found it was really tricky to get the weighting right. The resulting action was wrong. If I ever get that right I'll update my recipe. Stuffed animal fur is great for the hair. Finally, a use for beanie babies. If you improve on my methods or have any questions, please let me know. The fun is in figuring out work-arounds on ridiculous little challenges, and I'd love to hear how anyone improves on my methods. Or if you find a new use for the models. ### Models: - **StabbyMachete**: Proper tool for the hockey mask. Best if printed with blade as thin as possible. - **StabbyThinKnife**: Lighter version of the knife. Best if printed so blade is one or two layers (If using Cura, just push the geometry down below the surface or scale the geometry). - **StabbyKnifeHandle**: Can be glued to a paper blade for a lighter prop. - **StabbyMaskVented**: Updated version. There were some crumpled polys inside around the eyes, and I suspect those could be a problem if anyone reshapes it to fit a new face. - **StabbyMaskSolid**: Similar, but without the holes in case those cause print issues. Also this allows it to be deformed much further and clean ones drilled or booleaned later (I may try one for Godzilla later). If making holes is a problem, black dots should work. - **StabbyMMMask**: I'm not quite happy with the model yet, but at least it's recognizable. Note that some trial and error will be necessary to make it match to the severed neck stump of the kitty; your mileage may vary. Work in progress. - **StabbyMMScalp**: Making this a separate piece allows for easier cleanup of the mask, placing the original eyes in position, or painting the interior black. Plus this allows for gluing a scalp in place (pictured hair is taken from a beanie baby). The ridges are just to give the glue some additional tooth.
With this file you will be able to print Hello, Stabby Kitties with your 3D printer. Click on the button and save the file on your computer to work, edit or customize your design. You can also find more 3D designs for printers on Hello, Stabby Kitties.