Hellraiser / LeMarchand / Lament Configuration Puzzle Box
prusaprinters
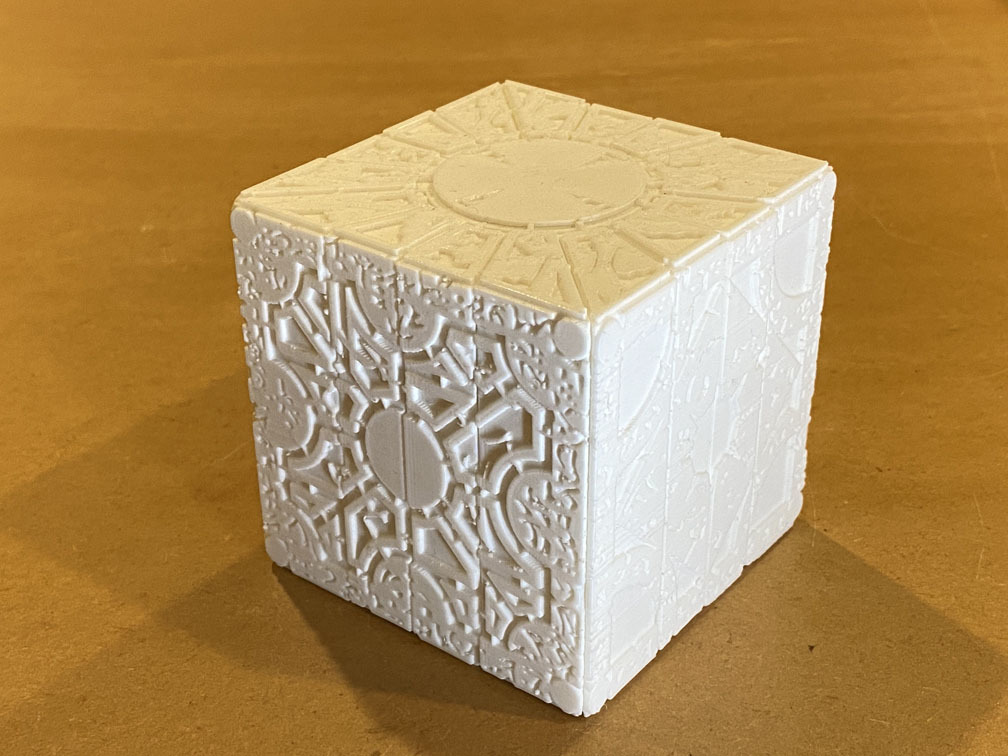
<p>A somewhat functional version of the puzzle box from the Hellraiser movie franchise. Turn one of the dials to unlock the box and allow it to be moved to the star configuration. Does not summon Cenobites though.</p> <p>The face designs are based on art by <a href="https://www.deviantart.com/artist064">artist64</a> and the original props by Simon Sayce. I've simplified the design so that an 0.4mm nozzle and 0.2mm layers will produce good results. This box has all five unique side designs (only the top and bottom are identical). The pairs of designs on the sides are very similar but not identical on the original prop.</p> <h3>Printing</h3> <p>Print one of everything except the "Pin" and "Pin with Handle" pieces. Print two of either of those models. I recommend the "Pin with Handle" version as it makes assembly easier. It's probably best to invert the "Top" and "Bottom" models for printing, but for the best finish you should either invert both or neither. Many of the parts will need supports.</p> <h3>Assembly</h3> <p>This is a puzzle box and the main puzzle here might be assembly.</p> <p>Start with the "Top" piece, oriented so the side where the central cylinder does not extend to the face is facing down. Looking down from above you should be able to see the entrances to the tracks on the inside wall of the central cylinder. The "Core" piece goes into the central cylinder so that pins on the outside ride in those tracks. Rotate it slightly clockwise and it should drop down through the "Top" piece to an extended position. At that position rotate it further clockwise. You need the tracks on the inside of the "Core" to line up with the holes in the central cylinder of the "Bottom" piece when the box is in the closed configuration. If they're lined up that way then you can drop the "Top" piece onto the "Bottom" piece so the box is closed. Note that the opposite sides of the box are subtly different. Make sure it looks right and that you haven't got the "Top" rotated 180 degrees relative to the "Bottom" piece.</p> <p>Now insert two "Pin" pieces into the central cylinder cavity so that the pins poke through the small holes in that wall. The curved side of the "Pin" pieces should be completely flush with the cylinder wall. Putting the pins in is easiest to do using the version of the "Pin" pieces with the integrated handle, if you do then just cut or twist the handles off once the "Pins" are in place. Next put the "Pin Lock" piece in. You'll need to rotate it to get it past the "Pin" pieces. Once it's fully down, use a screwdriver to rotate it 90 degrees to lock the "Pin" pieces in place. At this point you should be able to change the box from the box configuration to the star configuration.</p> <p>For the dial assembly, first put the three pieces together. The "Lock" piece pushes onto the "Dial" piece trapping the "Plug" piece in between. If you've got the "Plug" piece the right way up then will only be able to rotate about a quarter turn. Notice there are a couple of tabs on rim of the "Plug" piece that go into the notches on the inside of the "Top" piece central cylinder. Holding the "Plug" in one hand so the "Dial" can rotate, rotate the "Dial" as far as it will go clockwise (when looking at the face of the "Dial"). Now line those tabs on the "Plug" up with the notches and push</p> <p>the plug into the box. I find the best way to do this is to line the tabs up slightly counter-clockwise of the notches and then rotate the "Dial" clockwise while pushing down on the "Dial" - it should not take much rotation to get the "Dial" seated. The box is now unlocked. Rotate the "Dial" a quarter turn counter-clockwise to lock it. This can be a bit stiff the first time as the dial assembly will probably be slightly too tightly pushed together.</p> <p>You can glue the dial assembly together if you want a more permanent connection (and even carefully glue the "Plug" piece to the "Top" piece), but I recommend doing a dry assembly of the whole thing first to get comfortable with how it goes together. You'll need glue that gives you enough time to get the whole thing together and working otherwise you might end up with a "Dial" that is too tight.</p> Category: Props
With this file you will be able to print Hellraiser / LeMarchand / Lament Configuration Puzzle Box with your 3D printer. Click on the button and save the file on your computer to work, edit or customize your design. You can also find more 3D designs for printers on Hellraiser / LeMarchand / Lament Configuration Puzzle Box.