Hermione Granger's Wand Resliced, with battery holder- Harry Potter
prusaprinters
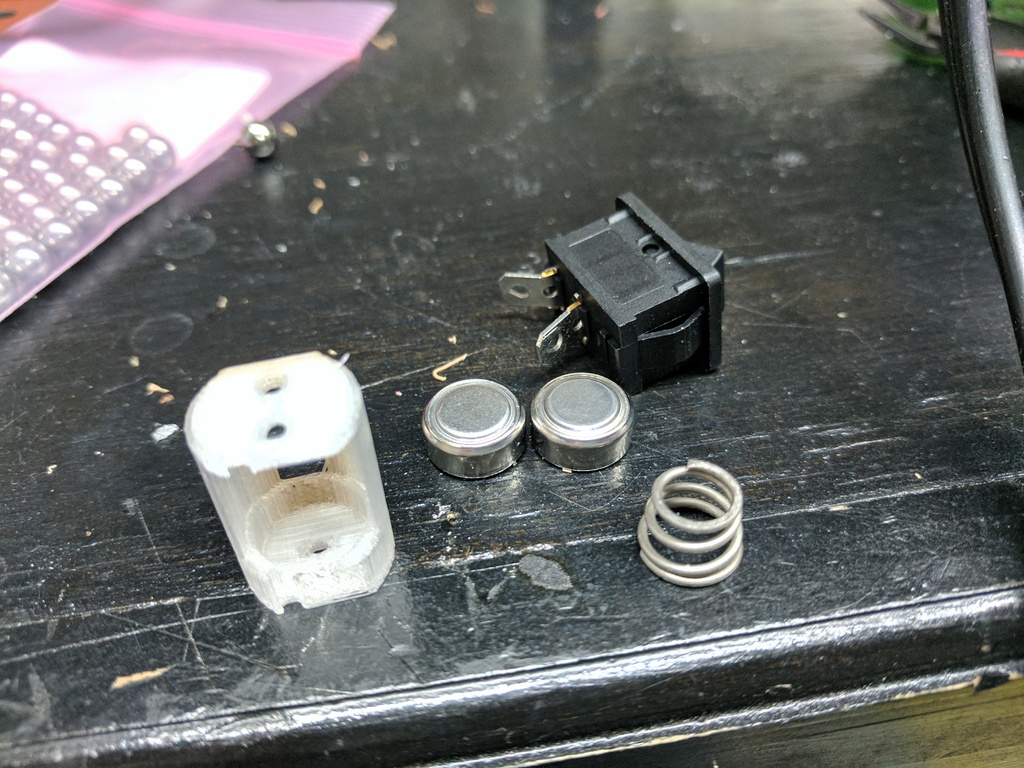
<p>Made a new battery holder for the Hermione Wand by Fritz Laun (<a href="/fflbm4/about">http://www.thingiverse.com/fflbm4/about</a>).</p> <p>It holds the two batteries listed in the original thing (<a href="https://www.thingiverse.com/thing:1089917">http://www.thingiverse.com/thing:1089917</a>) and uses a faucet spring (https://smile.amazon.com/KISSLER-RP4993-Delta-Faucet-Spring/dp/B00B483CV6/ref=sr\_1\_11?ie=UTF8&qid=1477623694&sr=8-11&keywords=faucet+spring) to hold the batteries steady.</p> <p>Soldering to the spring didn't work well, so I soldered the wire to itself and crimped it to the spring flat.</p> <p>The battery holder slips into the wand through the switch hole, so you can disassemble and replace the batteries when needed.</p> <p>Additionally, I resliced the wand so that the top and bottom aren't aligned - that way there's a nice big overlap for gluing. I held mine together with super glue, which worked wonders on the clear PETG as well as some woodfill.</p> <p>To install, wire up the LED first. The wires should reach from the installed LED to the end of the wand. It's also really helpful to know which wire is positive - i.e. attached to the long leg of the LED.</p> <p>Next, glue everything together. Route the wires out the switch hole. I used binder clips to hold the pieces in place, and the heated bed on my printer to make the glue dry faster.</p> <p>Wire up the positive LED wire to the power switch.<br/> Wire the negative LED through the battery holder side with a single hole, and attach to the spring. I soldered it to itself, then wedged it into the spring.</p> <p>Use a new jump wire to run through the battery holders other side, with two holes. The wire should go in one hole, out the other, and get soldered to itself - so you'll need to strip about a half an inch.</p> <p>The other end of that wire goes to the non-pupulated leg of the power switch.</p> <p>Put the batteries in, and test!</p> <p>Finally, carefully slide the battery holder into the wand, then all the wires, and finally the power switch. I bent the switch legs a good bit, although I'm not sure it was necessary.</p> Category: Accessories
With this file you will be able to print Hermione Granger's Wand Resliced, with battery holder- Harry Potter with your 3D printer. Click on the button and save the file on your computer to work, edit or customize your design. You can also find more 3D designs for printers on Hermione Granger's Wand Resliced, with battery holder- Harry Potter.